 VMware NSX-V is the SDDC technology of the future. What ESX was once for Servers, NSX is now for Networks. I highly encourage everyone to make yourselves familiar with this technology. NSX with all its features is quite complex, but the entry point is quite simple and requires only basic vSphere and networking skills. This beginners guide explains how to deploy NSX in your homelab even with limited physical ressources by downsizing NSX Manager and NSX Controller VMs. The guide starts at zero and quickly explains how to deploy NSX and connect your first Virtual Machine to a VXLAN based logical switch that is able to communicate to the physical world through an NSX Edge Gateway.
What do you need to create the Lab?
- vCenter 6 with some physical ESXi Hosts
- vSphere Distributed Switch (dvSwitch)
- NSX Manager Appliance (Download: NSX 6.2.2)
- There is no special physical Switch requirement
This guide is not intended as a comprehensive guide to fully understand all aspects of NSX. It's just a quick deployment guide with some tweaks for low resource Homelabs.
- Prepare your vSphere Platform (vCenter Server Appliance, ESXi Hosts, Cluster and dvSwitch). I recommend to update everything to the latest version available, which is currently vSphere 6.0 Update 2 and NSX 6.2.2.
- Configure a NTP Server for ESXi Hosts and the vCenter Server to ensure time consistency.
- Deploy the NSX Manager Appliance, provided as OVA (Download: NSX 6.2.2). The deployment wizard is pretty straightforward, nothing special here if you have ever deployed a template. Make sure to configure a NTP Server, and enable SSH.
- The NSX Manager is preconfigured with 4 vCPU and 16GB Memory. That might be a little oversized for a tiny homelab. If your hardware has limited resources, shutdown the NSX Manager and reduce the configured resources. 2 vCPU and 8 GB Memory should be possible without any impact (Of course, this is not supported by VMware). However, you can set it even lower but keep an eye on the memory consumption. You can check it by logging in to the NSX Manager with SSH (password set during ova deployment) and run the command "show system memory":

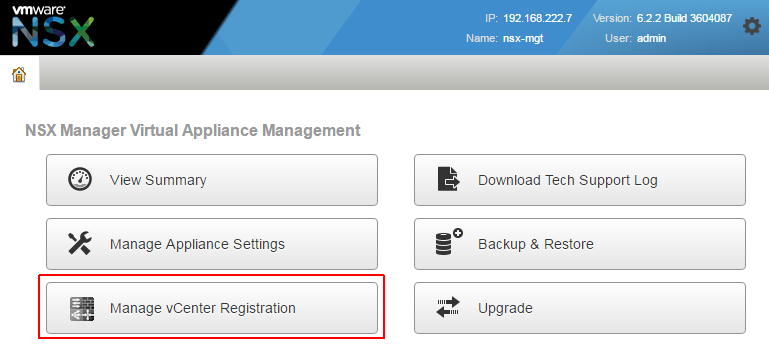
- The NSX Manager needs to be registered with the vCenter Server. Open the NSX Manager with a browser and login as admin, with the password configured during the deployment.

- Navigate to Manage vCenter Registration
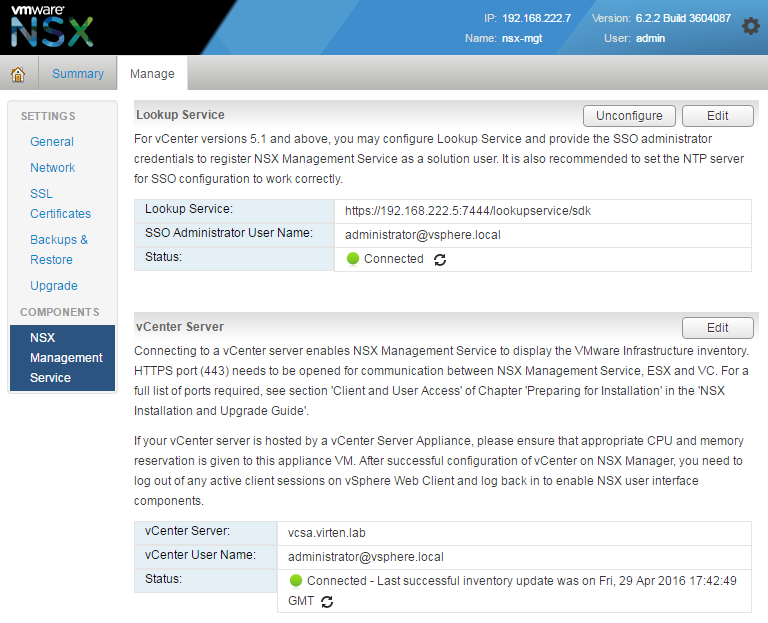
- Configure the Lookup Service to the IP Address of your Platform Services Controller and the vCenter Server connection to your vCenter Server. For vCenters with an embedded PSC, the lookup service runs on the vCenter Server itself. The following information are required:
- Lookup Service IP
- Lookup Service Port (Default: 7444)
- SSO Admin Credentials
- vCenter Server Address (IP or DNS Name)
- vCenter Server Admin CredentialsVerify that both Services are connected:
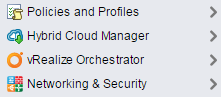
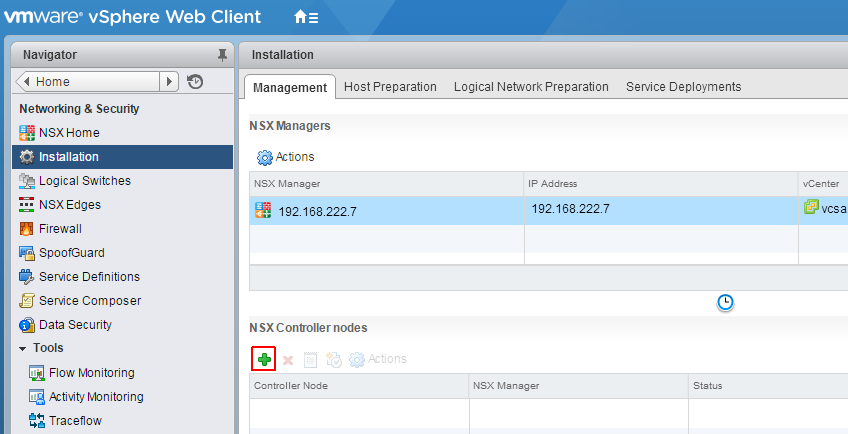
- Login to the vCenter Server Web Client. You should now see the Network & Security icon where NSX is configured. Open it:
- The first part of the configuration is to deploy NSX Controller nodes which are representing the Control Pane of NSX. NSX Controllers are Virtual Machines. At least 3 NSX Controllers are required for redundancy. Click the + symbol to deploy the first controller.
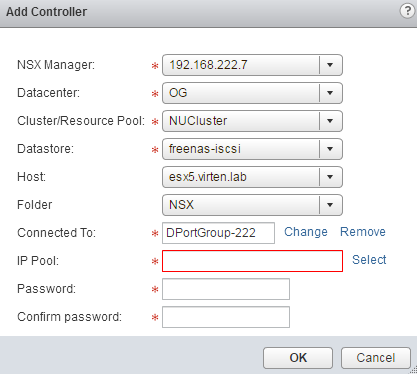
- Select the options for the NSX Controller until the IP Pool configuration and click Select to select or create an IP Pool.
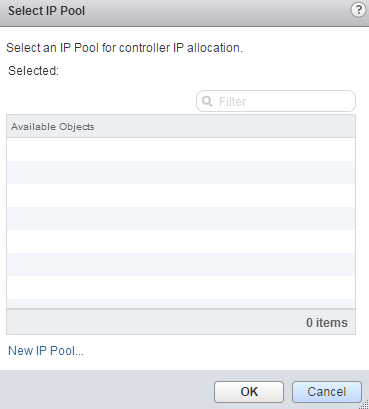
- Click New IP Pool...
- Enter Network details. This should be the same layer 2 network as your vCenter Server, ESXi Hosts and NSX Manager. NSX Controllers are automatically configured with IP Addresses defined in the Static IP Pool. Configure the range with the number of IP Addresses you want to reserve for NSX Controllers.
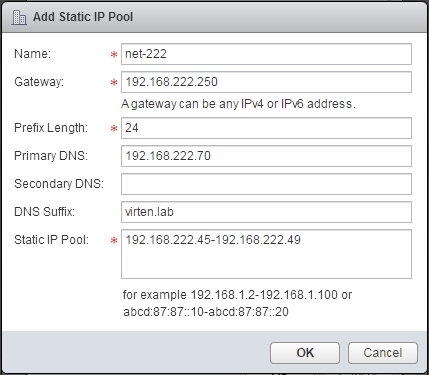
- Finish the IP Pool configuration, select it and finish the Controller configuration:

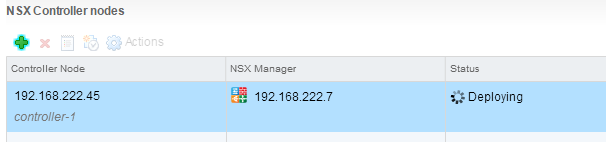
- Wait until the deployment has been finished.
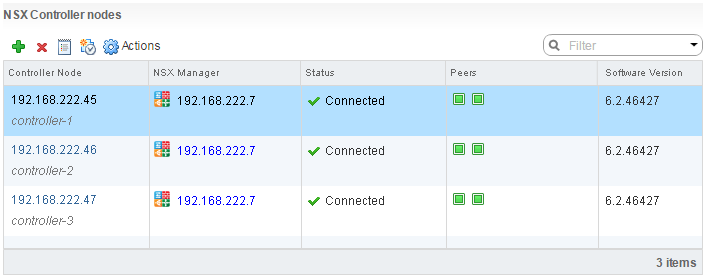
- Deploy 2 additional controllers in the same IP Pool and wait until all controller nodes are deployed and connected.
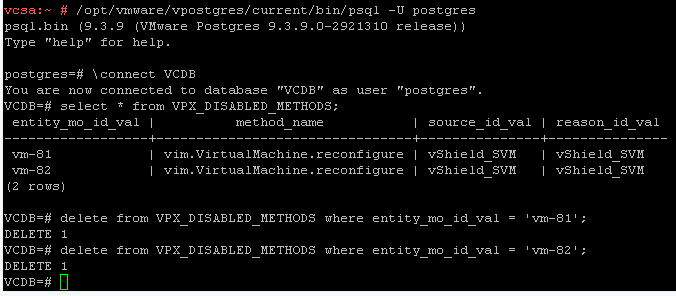
- NSX Controllers are preconfigured with 2 vCPU and 4GB Memory. For your tiny (unsupported) homelab you can also reduce NSX Controller resources, but this is a little bit more tricky because the "Edit settings" function is blocked by the vCenter. To disable vCenter Server protection you have to delete respective entries from the VPX_DISABLED_METHODS table. This method is also described by Tom Fojta.
- SSH to the vCenter Server
- Enable Bash
- Connect to the vCenter Postgres Database
- Identify Object IDs
- Delete entries
- Restart vCenter Server ServiceCommand> shell.set --enabled True Command> shell vcsa:~ # /opt/vmware/vpostgres/current/bin/psql -U postgres psql.bin (9.3.9 (VMware Postgres 9.3.9.0-2921310 release)) Type "help" for help. postgres=# \connect VCDB You are now connected to database "VCDB" as user "postgres". VCDB=# select * from VPX_DISABLED_METHODS; entity_mo_id_val | method_name | source_id_val | reason_id_val ------------------+--------------------------------+---------------+--------------- vm-68 | vim.VirtualMachine.reconfigure | vShield_SVM | vShield_SVM vm-81 | vim.VirtualMachine.reconfigure | vShield_SVM | vShield_SVM vm-82 | vim.VirtualMachine.reconfigure | vShield_SVM | vShield_SVM (1 rows) VCDB=# delete from VPX_DISABLED_METHODS where entity_mo_id_val = 'vm-68'; DELETE 1 VCDB=# delete from VPX_DISABLED_METHODS where entity_mo_id_val = 'vm-81'; DELETE 1 VCDB=# delete from VPX_DISABLED_METHODS where entity_mo_id_val = 'vm-82'; DELETE 1 VCDB=# select * from VPX_DISABLED_METHODS; entity_mo_id_val | method_name | source_id_val | reason_id_val ------------------+-------------+---------------+--------------- (0 rows) postgres=# \q vcsa:~ # service-control --stop vmware-vpxd vcsa:~ # service-control --start vmware-vpxd
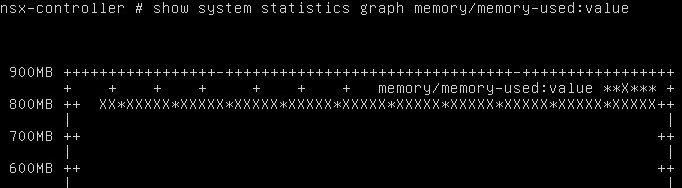
- After the vCenter Server service has been restarted you should be able to edit NSX Controller Resources. It is possible to resize NSX Controllers to 2 GB without any major issues. If you want to go lower, verify memory consumption by logging in to the NSX Controller with SSH and run the command "show system statistics graph memory/memory-used:value". Memory Usage here is 800MB:
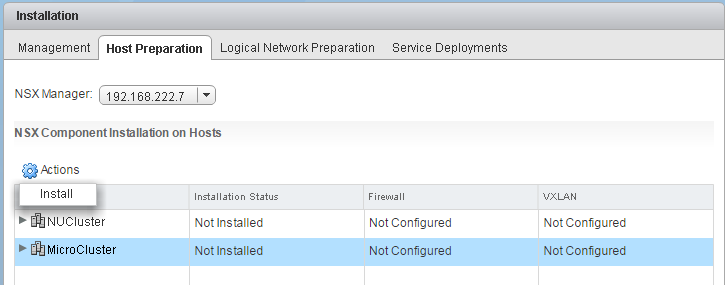
- Now you have to prepare ESXi Hosts to be compatible with NSX. Navigate to Network and Security > Installation > Host Preparation, select your Cluster and click Install. This will install 2 VIB on all ESXi hosts in the Cluster. The installation is completely transparent to virtual machines. Maintenance Mode is not required.
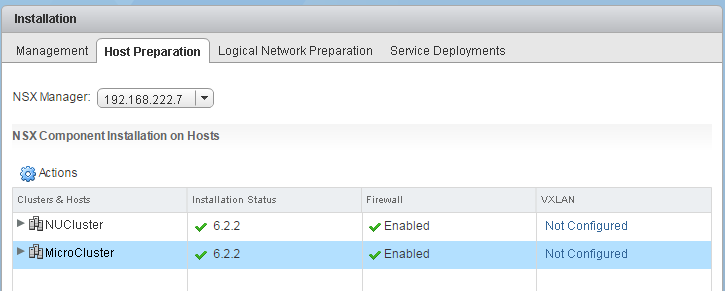
- Refresh the vSphere Client to check the Status and wait until the installation has been finished.
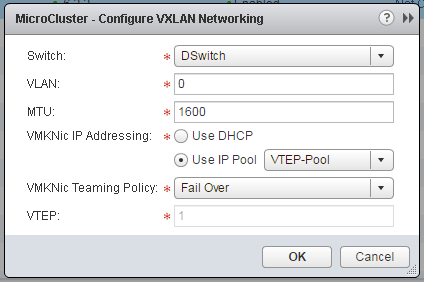
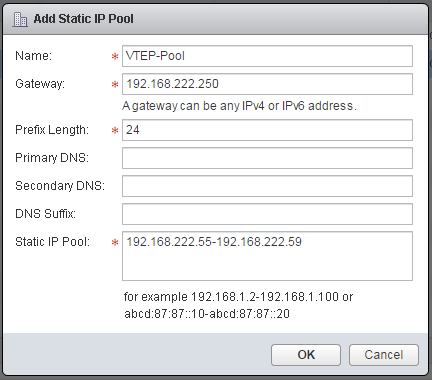
- To allow ESXi hosts to talk to each other and to the physical network, they need Tunnel Endpoints (VTEP Interfaces). Click Not Configured in the VXLAN tab, configure VXLAN settings and add an IP Pool for VTEP interfaces. Make sure to size the IP Pool according to the number of ESXi Hosts:
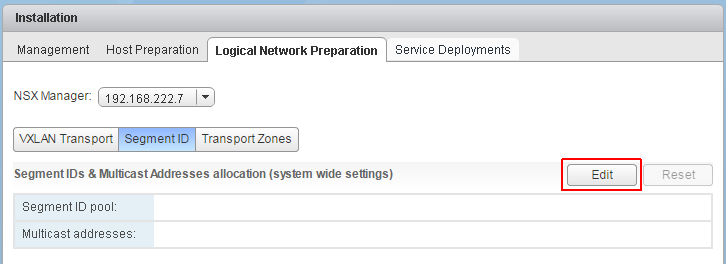
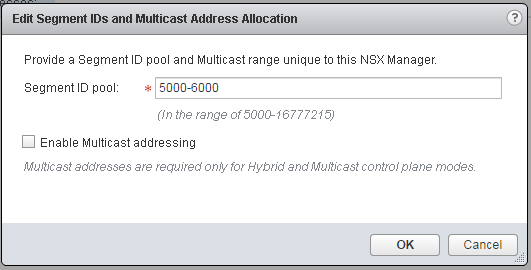
- Navigate to Network and Security > Installation > Logical Network Preparation > Segment ID, and configure the Segment ID pool to the Number of VXLANs your are planning to use:
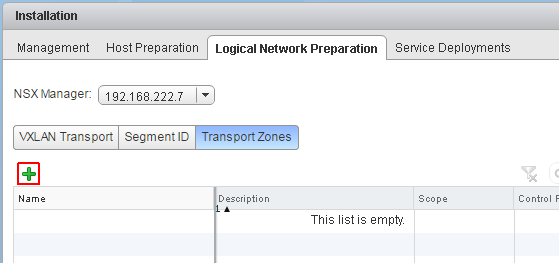
- To determine the replication boundaries of a VXLAN Network, a global transport zone is required. Navigate to Network and Security > Installation > Logical Network Preparation > Transport Zones, and click +
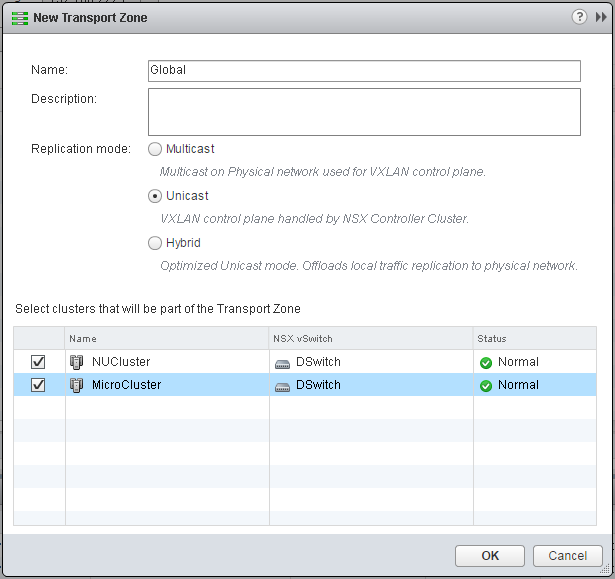
- Add a Global Transport Zone and set the Replication mode to Unicast. This setting allows NSX Controllers to talk to each other without any multicast requirements on physical switches. Select all clusters that needs to be part of the Transport Zone.
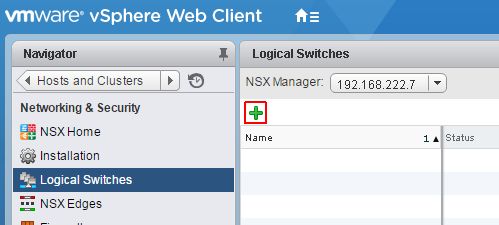
- Now the initial NSX configuration is finished and you are ready to configure the first Logical Switch. A Logical Switch is basically a VXLAN Network or Portgroup where Virtual Machines are connected to. Navigate to Network and Security > Logical Switches click +
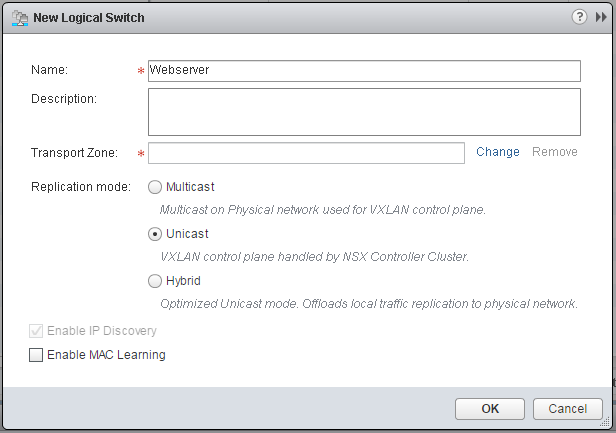
- Name the Logical Switch and set the replication mode to Unicast.
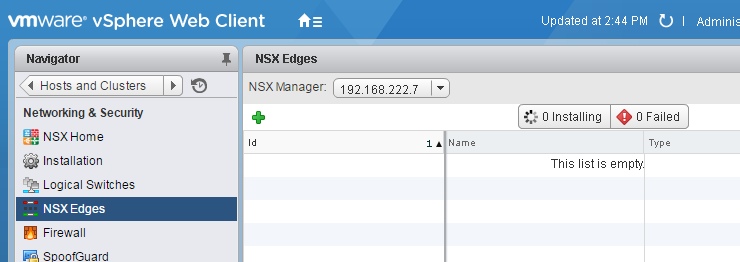
- To connect the "virtual" Logical Switch beyond the VXLAN you need a NSX Edge. The Edge Gateway is a Virtual Machine with 2 network interfaces, one connected to the VXLAN and one connected to the outside network. The Edge Gateway acts as Router. Navigate to Network and Security > NSX Edge and click +
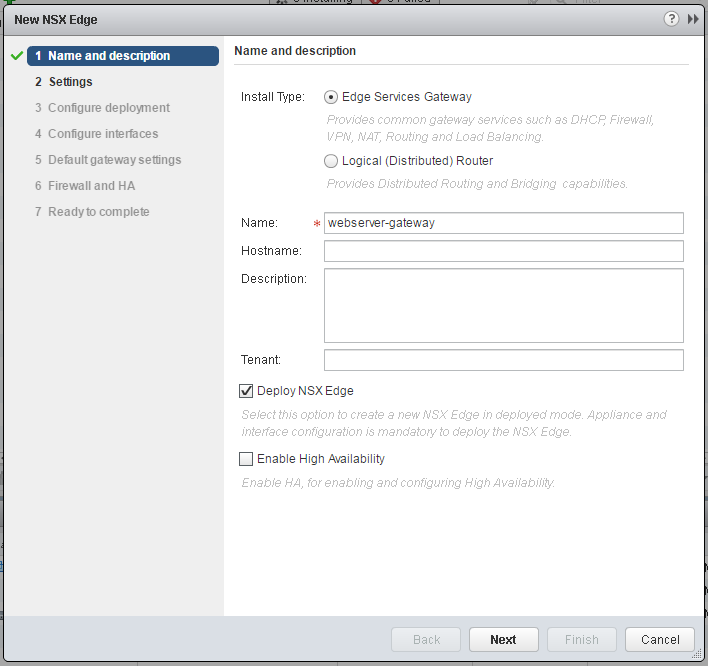
- Set the installation type to Edge Services Gateway and enter a name
- Set Admin credentials and enable SSH.

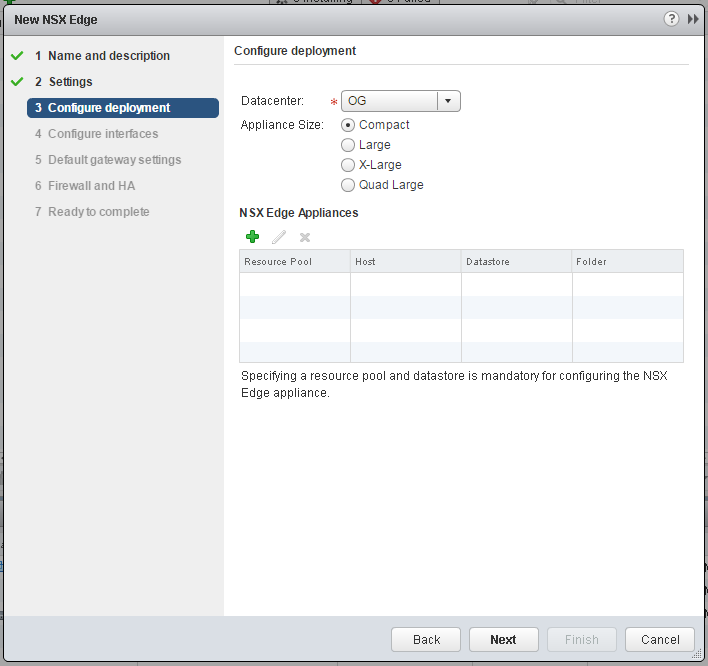
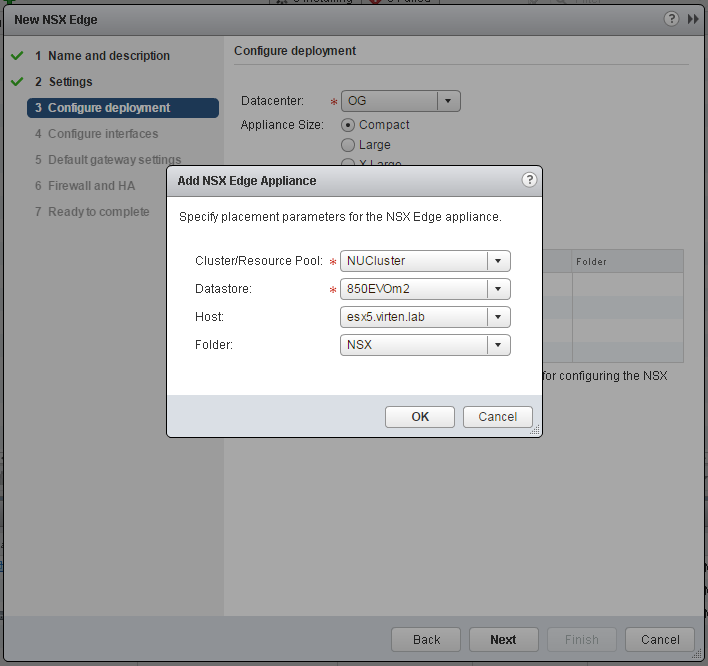
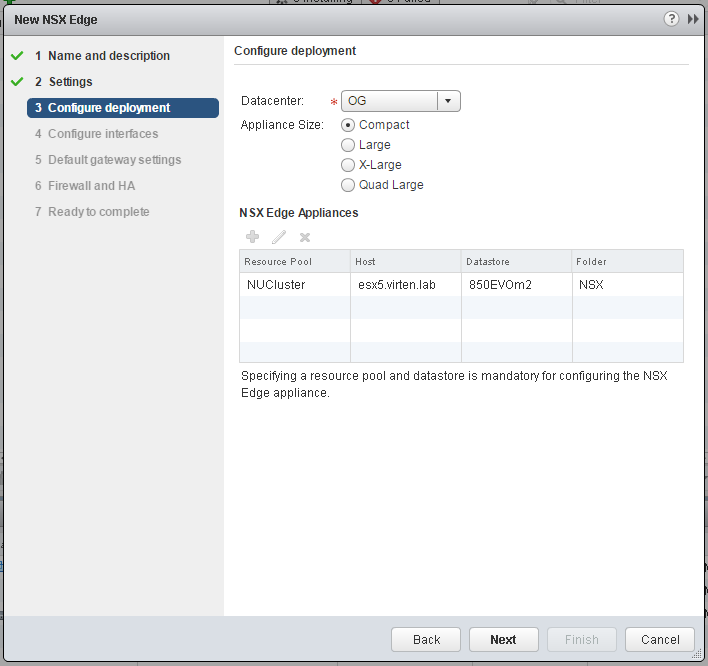
- Set the Appliance Size and configure the NSX Edge Appliance placement
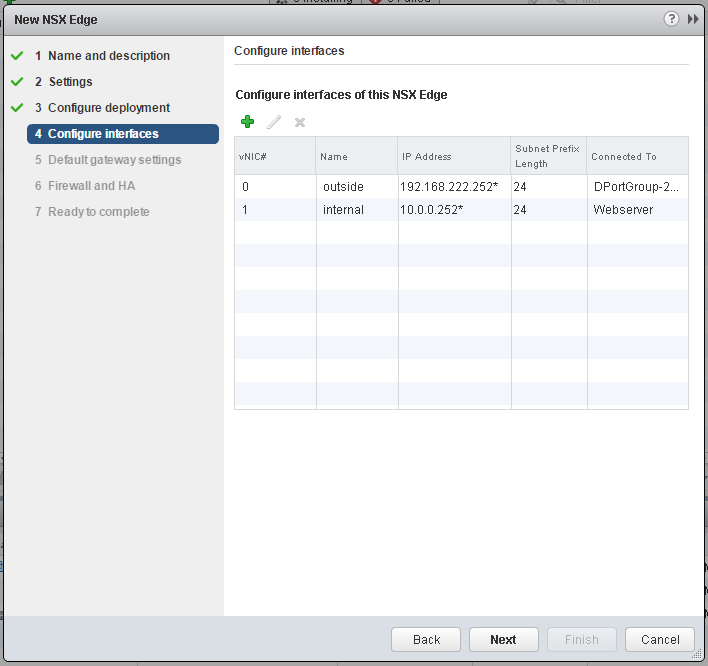
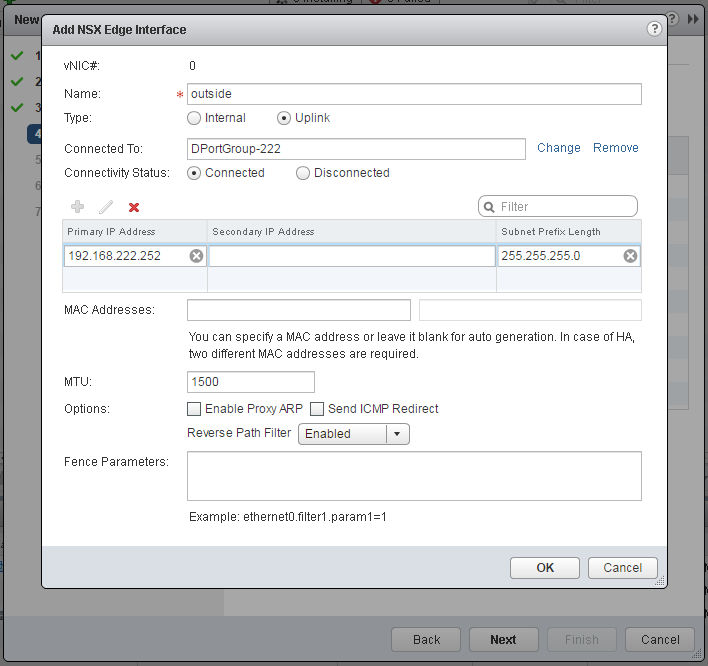
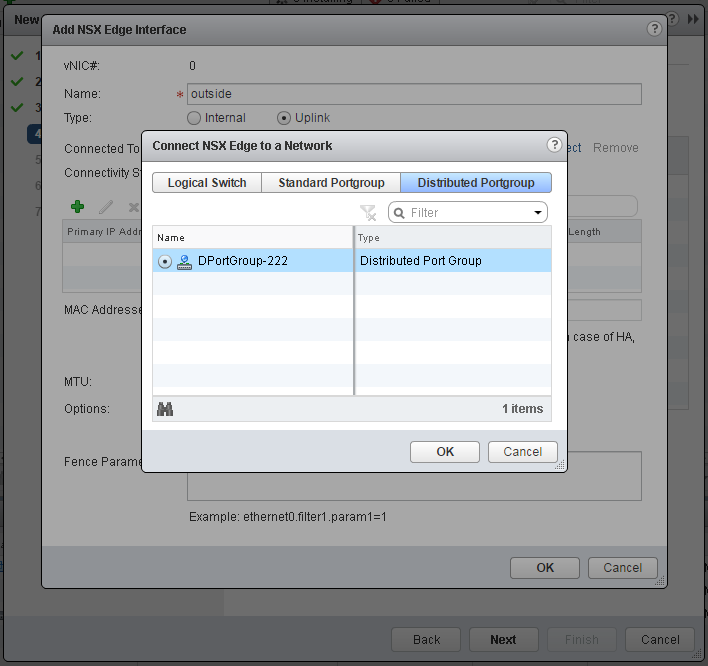
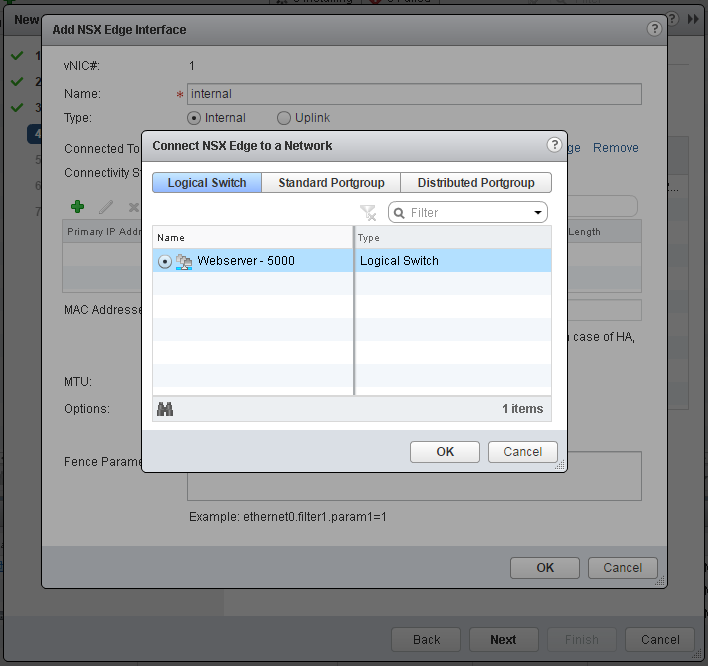
- Configure Edge Interfaces. Place one interface to your physical connected portgroup and a second to the internal Logical Switch.

- Finish the deployment wizard and wait until the deployment has been finished.
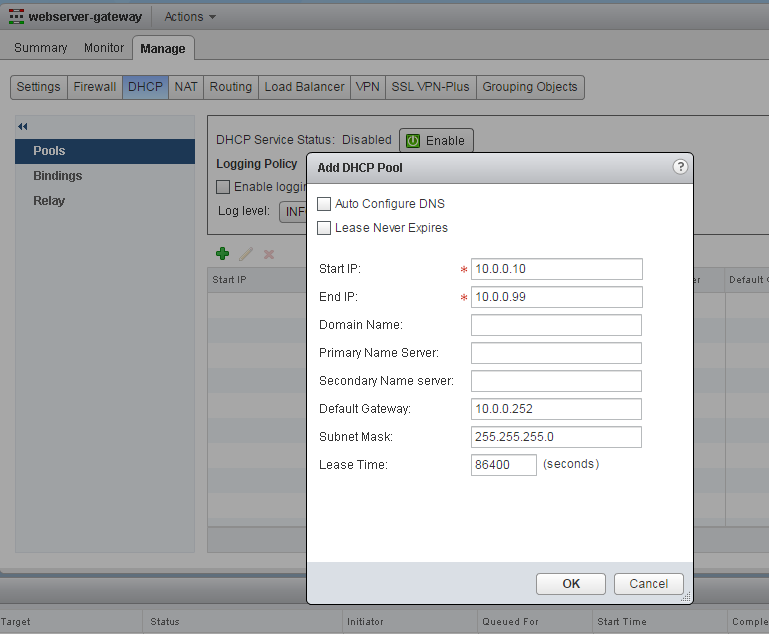
- The VXLAN is now connected to the physical network. For ease of use I am going to enable DHCP on the logical switch. Doubleclick the new edge gateway and open the DHCP tab.
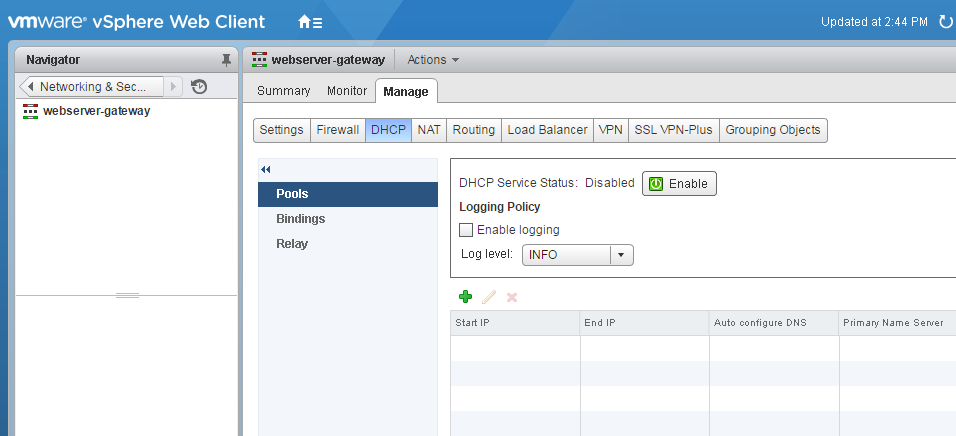
- Add DHCP Pool configuration
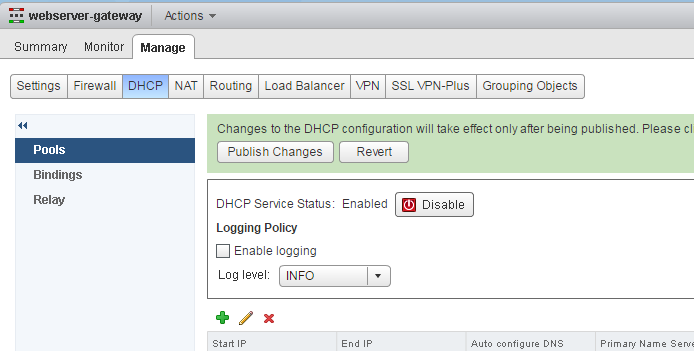
- Activate DHCP and publish changes.
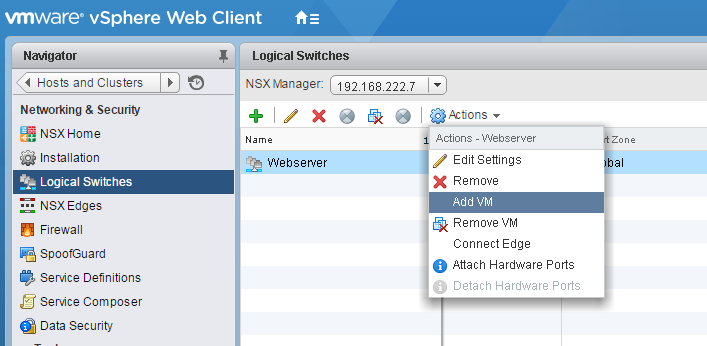
- Navigate to Network and Security > Logical Switches and connect a Virtual Machine to the Logical Switch
Congratulations! You have successfully deployed NSX in your Homelab. The Virtual Machine can communicate with the physical network through the Edge Gateway.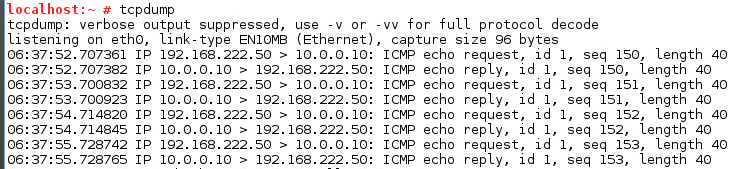
very informative in a very simplistic way, very useful for beginners.
Thanks for sharing.
Pingback: Configure Edge Load Balancing in NSX | Virten.net
If •vSphere Distributed Switch (dvSwitch)is a requirement for NSX, but only available in vSphere Enterprise Plus, how can you set it up in a lab that does not have an Enterprise + license?
I think the license for nsx automatically license you to use distributed switches.
So what ESXi versions are NSX compatible?
All versions of NSX 6.2 are supported with all versions of ESXi 5.5 and 6.0.
More details here: http://partnerweb.vmware.com/comp_guide2/sim/interop_matrix.php?#interop&93=&1=
he/you can simply reinstall esxi host and you can go back to 60 days trial. thats enterprise+
also there are temporary keys in every 3 months for the partners.
vExpert program also providing keys..
Nice article, best on the net (including youtube), i have seen so far.
VMware have made NSX too complicated, but then again all VMware stuff are like addons to esxi.
They need to rethink NSX from a 'core' respect, meaning how much of NSX can be embedded into esxi, can they make the code smaller/lighter/faster, remove old code, consolidate stuff that does the same fuction (eg: vswitch & dswitch).
We have vSwitch, dSwitch, and now nsx-Switch, which switch will they add next.
NSX Manager - this looks like the central hub for all networking information (this should be part of vCenter).
NSX Controller - This keeps the network traffic within the local esxi host, but uses VTEP to send traffic to another host, doing so limits the traffic on your physical switches (this tech would be nice if embedded in esxi with the VTEP, also have the option of adding a virtual one).
NSX Edge - this looks like a simple router (maybe add it to the contoller or embed it into esxi).
While reading this i keep thinking about AWS-VPC, with subnets and security group. If VMware can get NSX as simple as that, then they would not be able to sell esxi/vshere/vcenter without NSX, it would be the de-factor for anything networking in ESXI.
Thanks again.
Pingback: NSX Article | fbifido
Yes indeed ..more linux appliances = more resource , larger attack surface DUH and more to go wrong ..sigh !
C'mon vmware get back to simplicity ..KISS (Keep It Simple Stupid)
Thanks for a great walk-through ...perhaps a b log on how to deploy this appliance from ovftool without it losing the extra config ..good luck :-)
Oh and did they ever hear about a "few-clicks install" ? Instead of yet again having to wait for the painfully slow scripts to complete in their appliances and OMG not the dreaded useless webclient which doesn't even detect the vm has started .. where its C# vsphere client counterpart has already rebooted it and given the vsphere admin access to its console ..LOL
Does the 90 days demo license come with NSX 6.22 when you download it?
to create a test environment, do I need to setup a cluster too, or can I do without?
hi, really nice step by step for newbie.
by the way, can anyone explain me what is the different about'Uplink' and 'Internal' stuff ?
I am really newbie about network.
thank you
The Uplink interface connects to an external network (Standard dvPortGroup).
The Internal interface connected to a VXLAN network (Logical Switch).
Thanks for the answer.
So, if I create a new VM, where should I attach the connection ?
using dvPortGroup ? or using Logical Switch?
(from edit setting)
Pingback: VMware VCP6-NV Certification – Be-Virtual.net
Very useful for initial Home Lad Deployment. Nicely cover small points, thank you for sharing.
Does it need physical Router or switch? Where does VM stands and how will it connect to external and internal network?
Dear,
I have successfully deploy the guide but my vm can ping the external network and also default gateway of edge device which is 10.0.0.252. The VM successfully get the dhcp from edge device.
Dear,
Sorry typo mistake. VM cannot ping the external network and default gateway.
Does the system you want to ping in the external network have a route to your VM network?
Dear,
I have not added any route.
Sorry, but I need know how to resolve the VLAN ID in the vDS?
Each PortGroup need had a VLAN ID but if dont have physical switch How to do?
ESG need that a uplink (port Group with vlan id)
Great post.
Here is another take on it. Deploying two edge devices across two segments to isolate clients from each other.
https://www.computertechblog.com/deploying-vmware-nsx-6-2-in-my-lab/