The following tips and tricks might come handy when working with the vCenter Service Appliance 6.5:
- Enable SSH
- File Transfer with SCP/SFTP (WinSCP)
- Login with Public Key Authentication
- Disable or Increase Shell Session Timeout
- Reset vCenter Server Appliance 6.5 root password
- VIMTop
- Certificate Warning
Enable SSH
You can enable SSH access to the vCenter Server Appliance during the deployment wizard. To enable SSH later you can either enable it from the DCUI (Troubleshooting Options) or from the vSphere Web Client:
Administration > System Configuration > Nodes > vCenter > Manage > Settings > Access

After connecting to the vCSA with SSH you see the proprietary Appliance Shell. To open the fully featured Bash, just type "shell". It's no longer required to enable the shell like you might know it from vCSA 6.0.
File Transfer with SCP/SFTP
To transfer files between your PC and the vCSA you typically use WinSCP or similar tools. This does not work out of the box because the default shell for the root user has been configured to Appliance Shell instead of Bash. When you use WinSCP to connect to the vCSA, the following error is displayed:
Received too large SFTP packet. Max supported packet site is 1024000 B.
Cannot initialize SFTP Protocol. Is this host running an SFTP Server?
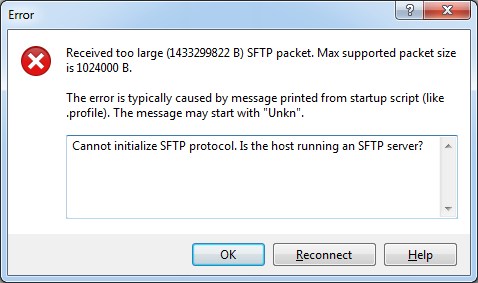
To be able to connect with WinSCP, the default shell has to be configured to /bin/bash:
# chsh -s "/bin/bash" root
If you want to revert this change later and reactivate the Appliance Shell, change the default shell back to /bin/appliancesh:
# chsh -s /bin/appliancesh root
Public Key Authentication
When working with Linux you typically use SSH keys instead of passwords to log in. Public Key authentication is an authentication method that relies on a generated public/private key pair and enables the login without entering a password. If you are not familiar with SSH Public Key Authentication, read this post where I am explaining the basics.
Use the following commands to create a folder structure required for public key authentication:
# cd /root
# mkdir .ssh
# chmod 700 .ssh
# cd .ssh
# touch authorized_keys
# chmod 600 authorized_keys
Add your key to the file by editing it with vi, or with echo/pipe:
echo "ssh-rsa AAAAB[....] fgrehl" >> authorized_keys
Now you should be able to connect to the vCSA with your key. Please note that you can't use the Appliance Shell when you log in without your key. While you can still use "shell" to start Bash, any other API command fails with "Session expired".
Disable or Increase Shell Session Timeout
As a security feature, your are automatically logged out after being inactive for 15 minutes. You can view the current configuration with echo $TMOUT. The value is in seconds (900 seconds = 15 minutes):
root@vc [ ~ ]# echo $TMOUT
900
The timeout can be modified in /etc/profile.d/tmout.sh:
- Open /etc/profile.d/tmout.sh with an editor
- change the line TMOUT=900 to the desired value
- Save and close the file
- Log out and log back in
If you want to completely disable session timeout, delete the tmout.sh script:
root@vc [ ~ ]# rm /etc/profile.d/tmout.sh
Reset vCenter Server Appliance 6.5 root password
The following method provides steps to recover the vCenter Server Appliance (vCSA) root password. The process is slightly different compared to previous versions as the OS has been changed to PhotonOS. The method is officially supported by VMware and documented in KB2147144.
- Take a snapshot of the vCSA to be able to rollback in case of any problems during password recovery.
- Connect to the ESXi Host that runs the vCSA and open a remote console.
- Reboot the vCSA
- Press e immediately after the system starts (When the PhotonOS screen shows up)
- Append rw init=/bin/bash to the line starting with linux
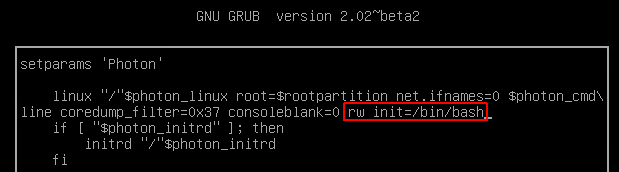
- Press F10 to boot
- In the command prompt, enter passwd and enter a new root password twice
- Enter umount / to unmount the root filesystem
- Reboot the vCSA by running the command reboot -f
- Verify that you can log in with the new root password and delete the snapshot created in step 1.
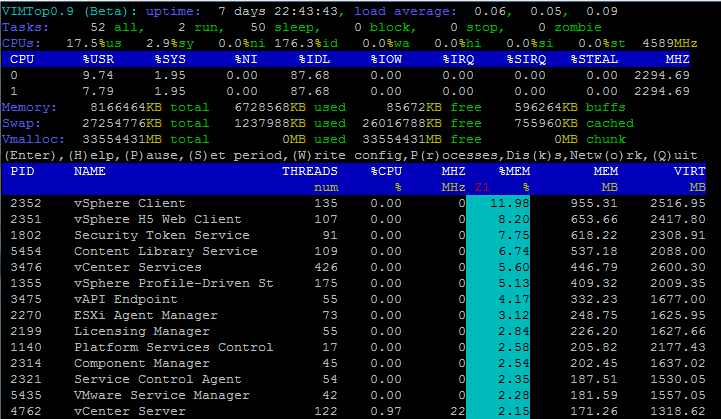
VIMTop
When troubleshooting performance issues on *nix systems you are probably aware with "top". While the vCSA also comes with top, VMware made another handy tool that has a deeper understanding of services running on the appliance.
root@vc [ ~ ]# vimtop
Certificate Warning
To get rid of browser security certificate warnings you have to add the VMCA Root certificate to your local Trusted Root Certificate store. You can either download the certificate from the vCenter Website:
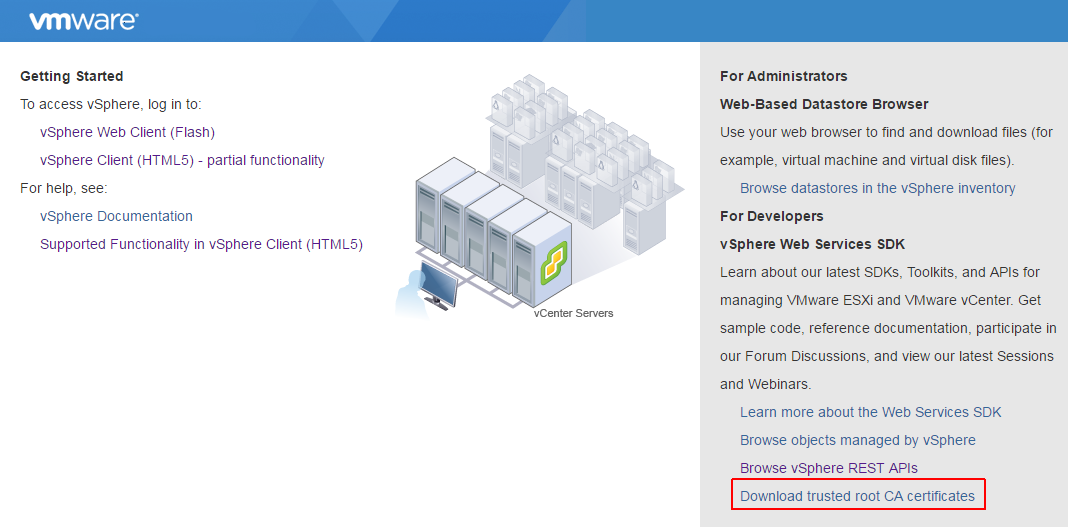 Or use my script to automatically add it to the local root certificate store.