When you run a VMware platform there is usually no way around a shared storage system. A SAN is very expensive and you throw away the opportunity of using local storage. Common usage of ESXi hosts and storage Systems on x86 hardware also leads to a dilemma: Standard Servers usually have plenty of CPU, Memory and local Disks. With ESXi Hosts you waste the local storage and with storage systems you waste CPU and Memory. Combining both on the same hardware leads to an efficient usage that has the option to scale automatically. Today there are already some vendors in the market that provide SAN-free solutions with high available replicated local storage. This howto shows you how to share local storage by installing Open-E DSS V7 as a VSA inside an ESXi host using local storage with RDM.
VSA usage advantages
Deploying a VSA can be useful when you want to achieve the following use cases:
- Using local storage as shared storage (NAS/NFS)
- Access local storage from other ESXi hosts
- Replicating local storage to another ESXi Host
- Building a software raid with local hardware (ESXi does not support softraid)
- Accelerate disk access by using intelligent caching methods
Get Hardware and Software
The hardware i am using for this demonstration is a HP Proliant Microserver N40L with 3 local WD VelociRaptor SATA disks. It has a dual-core 1,5 GHz Turion CPU with 8GB RAM. You can use whatever hardware you want. Usage of an hardware raid controller is optional. VMware vSphere ESXi5.1 has been installed on this system.
The software i am going to deploy is Open-E DSS V7. It is easy and quick to deploy and supports all features i need: Software Raid, iSCSI, NFS, Replication (synchronous/asynchronous), Clustering (Active-Actice / Actice-Passive) and much more. It has a fancy webinterface and is totally uncomplicated to configure. It provides an 60-day Trial version with all features and a free lite version with limited features.
Download Open-E DSS V7 (Download the ISO file)
Why Open-E DSS? I am not affiliated with Open-E, i just like the ease of use. You can probably use any other storage software.
Please note that this deployment method contains unsupported methods, so use it at you own risk.
Install and configure DSS V7
I assume that your ESXi Host is already up and running. It has been installed on one of my three local disks.
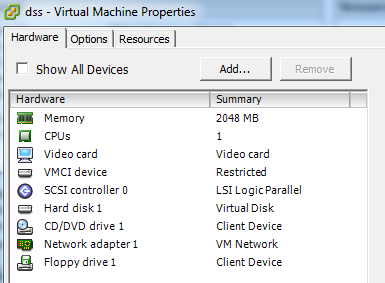
- Create a new virtual machine
- Select your local datastore
- Select Other 2.6.x Linux (64-bit) as Guest Operating System
- Give it at least 2 GB Memory
- Change NIC Adapter to VMXNET 3
- Create a 4 GB virtual disk
- Power on the virtual machine and mount the DSS7 ISO
- Select Run software installer
- Agree license
- Select Installation drive (You should see one disk only)
- Remove the ISO from the virtual machine
- Reboot
- DSS should come up with that sceen
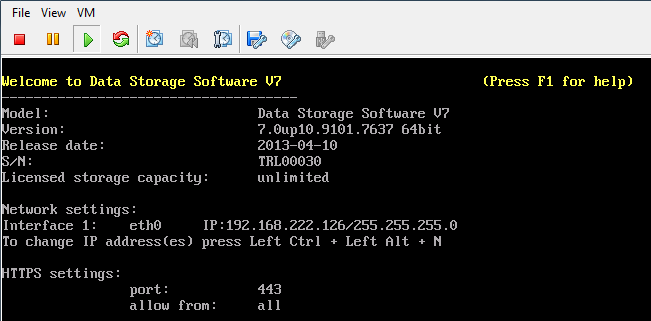
- Press CTRL+ALT+N to configure an IP-Address
- Select eth0 and press ENTER
- Activate DHCP if you want to use an DHCP Server or configure a static ip address
- Apply configuration
- Done - Open-E DSS V7 is now ready to use
Add local disks as RDM to the virtual machine
I want to use the full capacity from my local disks so formatting them with VMFS and create a virtual disk on each is not an option. Using local disks as with raw device mapping is also not possible with VMware by default. But it's possible by using vmkfstools.
- Power off the DSS virtual machine (CRTL+ALT+S)
- Activate SSH on your ESXi (Configuration -> Security Profile -> Services -> Properties)
- Connect to ESXi with SSH by using putty for example
- Locate local disks inside the /dev/disks folder
~ # ls -l /dev/disks/
Look for the disks that do not have any partitions (Partitions can be by identified by the colon and number (:1) at the end) and write down the name.

In my case, the names to remember are:
t10.ATA_____WDC_WD1500HLFS2D01G6U3________________WD2DWXL808089314
t10.ATA_____WDC_WD1500ADFD2D00NLR1________________WD2DWMAP41300429- Locate the path of your DSS virtual machine (/vmfs/volumes/<datastore>/<vm>)
In my case it is located at:
/vmfs/volumes/datastore1/dss7/ - Create a VMDK mapping to the physical disk (vmkfstools -z <physical disk> <virtual disk>)
~ # vmkfstools -z /vmfs/devices/disks/t10.ATA_____WDC_WD1500HLFS2D01G6U3___________________WD2DWXL808089314 "/vmfs/volumes/datastore1/dss7/rdm1.vmdk"
~ # vmkfstools -z /vmfs/devices/disks/t10.ATA_____WDC_WD1500ADFD2D00NLR1___________________WD2DWMAP41300429 "/vmfs/volumes/datastore1/dss7/rdm2.vmdk"
- Add the raw device mappings to your DSS virtual machine by using the vSphere Client.
- Right Click the VM -> Edit Settings...
- Click Add...
- Select Hard Disk
- Select Use an existing virtual disk
- Click Browse and select your RDM Disk
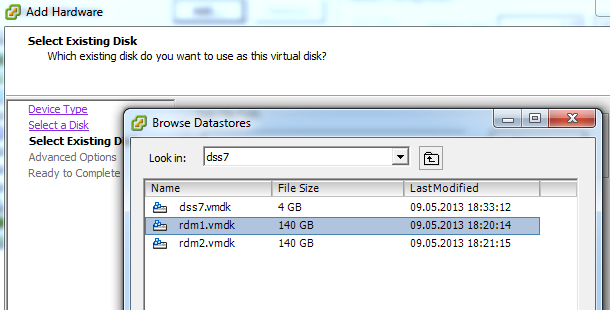

- Repeat this with the second RDM Disk
- Close Virtual Machine Properties
- Power on the Virtual Machine
The virtual machine should now boot with both physical disks attached to it as raw device mapping. Next step is to configure both disks as RAID and present it back to ESXi Host.
Create Software Raid and Volume Group
- Use a a Web Browser to configure the DSS
- Click through the basic configuration until you are at the main configuration screen
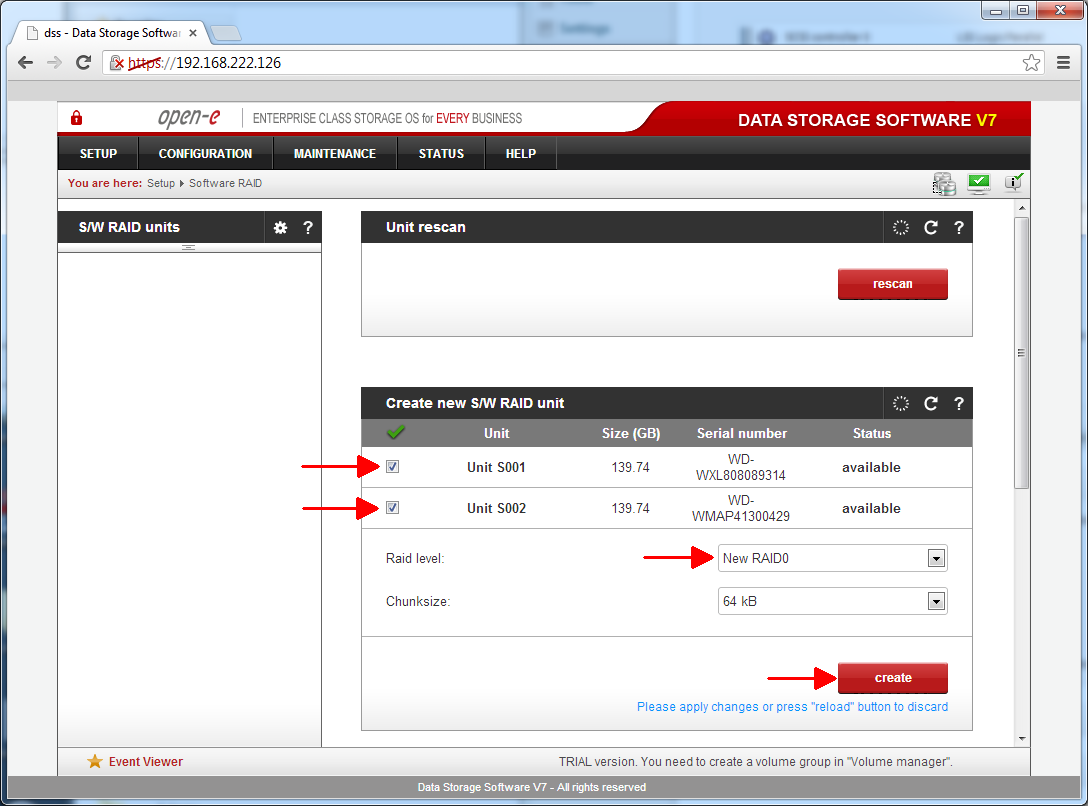
- Navigate to Setup -> Software Raid
- Select your Disks, a Raid level and click create
- Navigate to Configuration -> Volume manager -> Volume groups
- Select the RAID device and assign it to a new volume group
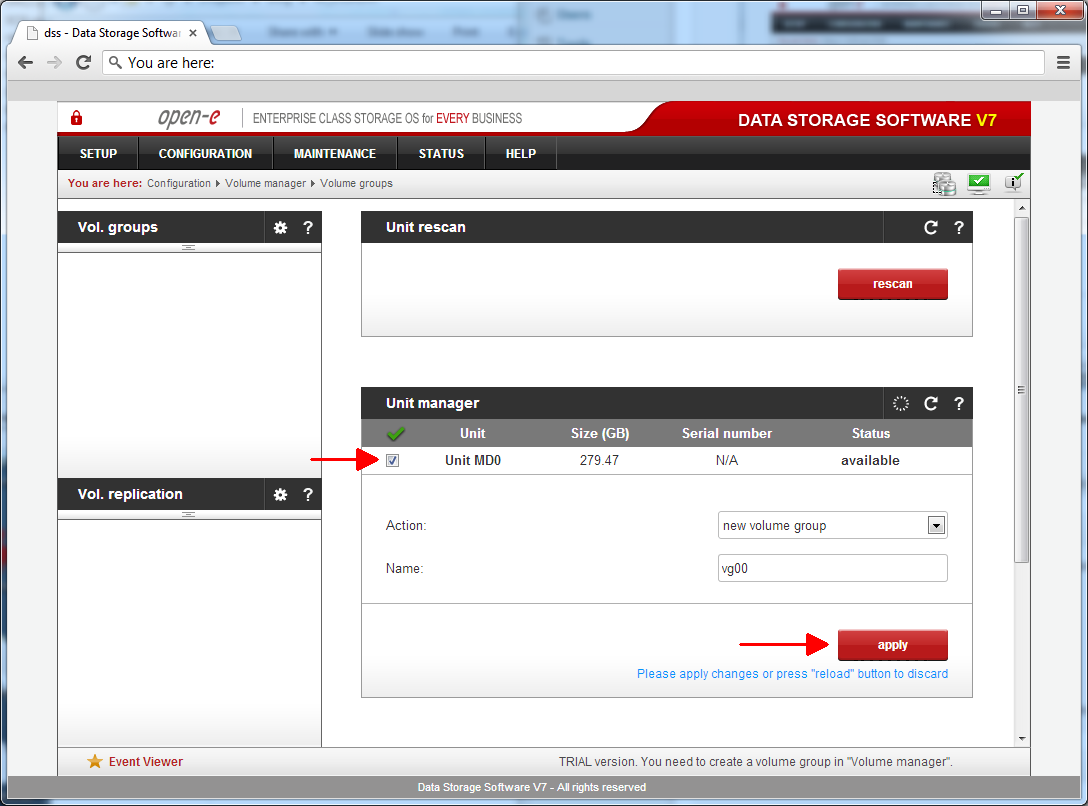
- This operation may take some time.
Present the Volume back to the ESXi Host
I am going to use NFS to present the Volume back to the ESXi Host. It's also possible to use iSCSI, but NFS is less complex.
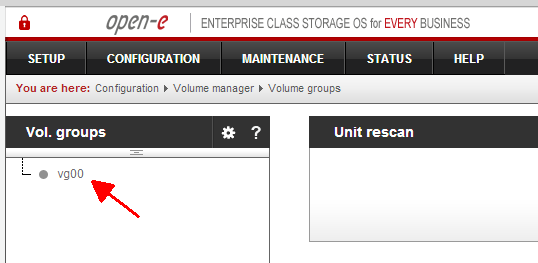
- Select the new created volume group vg00 at the left side of the volume group manager
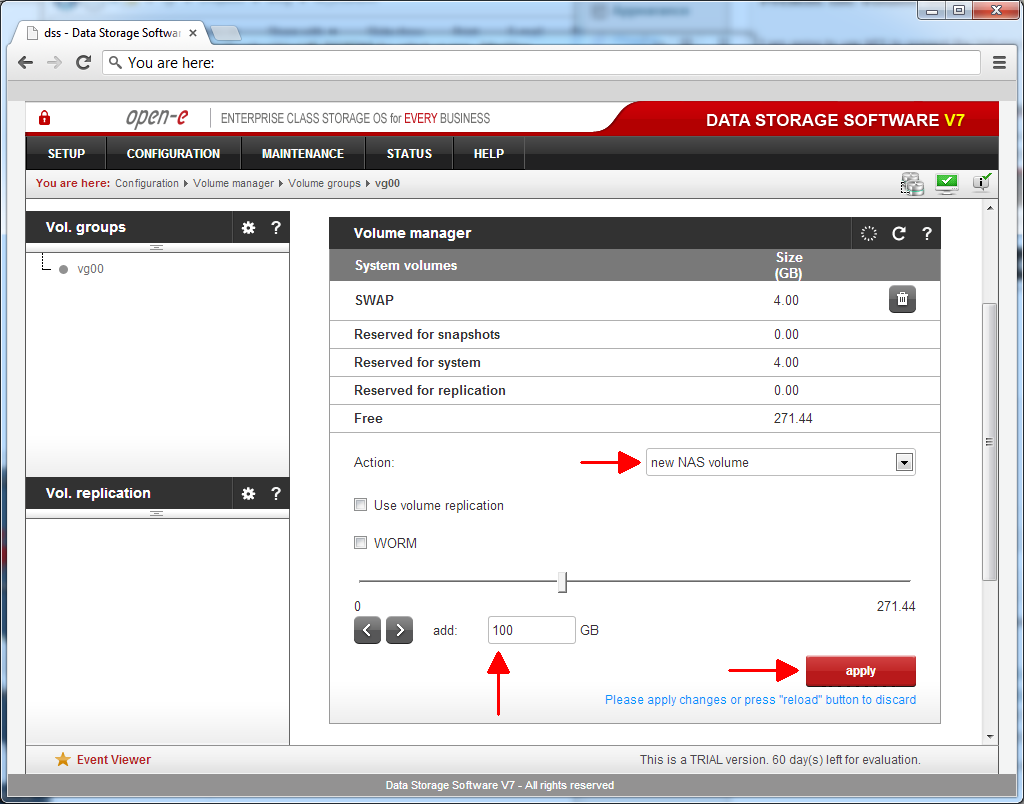
- To create a new volume, select new NAS volume, enter a size an click apply
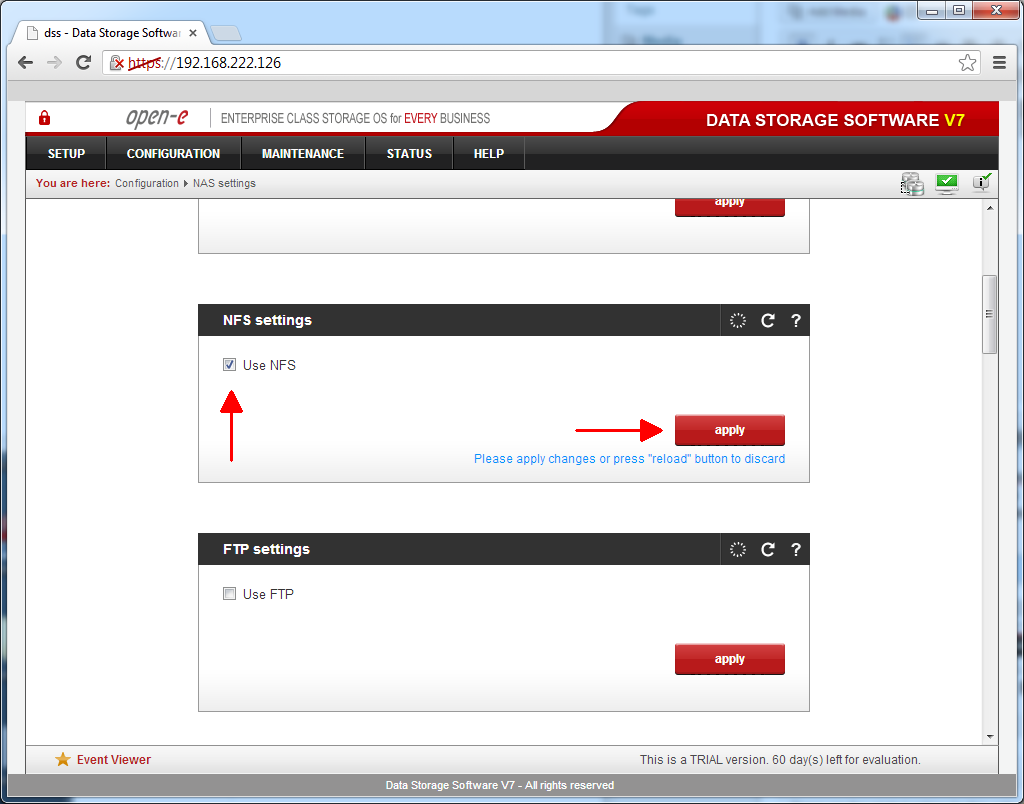
- Navigate to Configuration -> NAS settings
- Activate NFS by selecting Use NFS
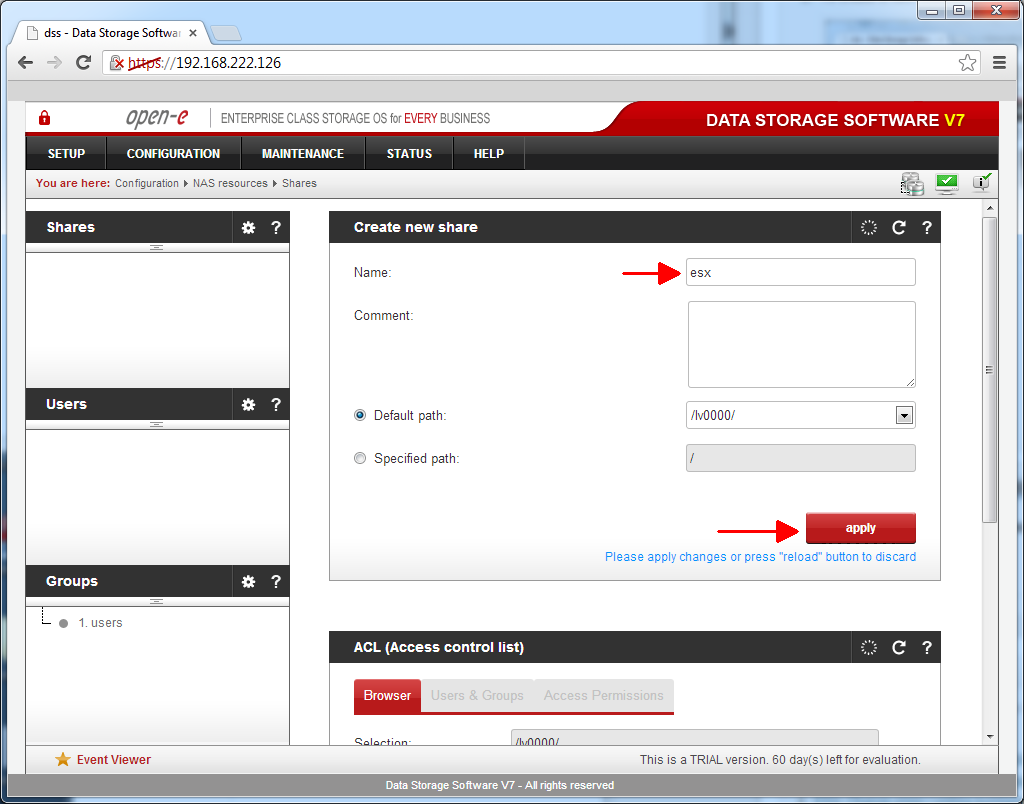
- Navigate to Configuration -> NAS resources -> Shares
- Create a new share
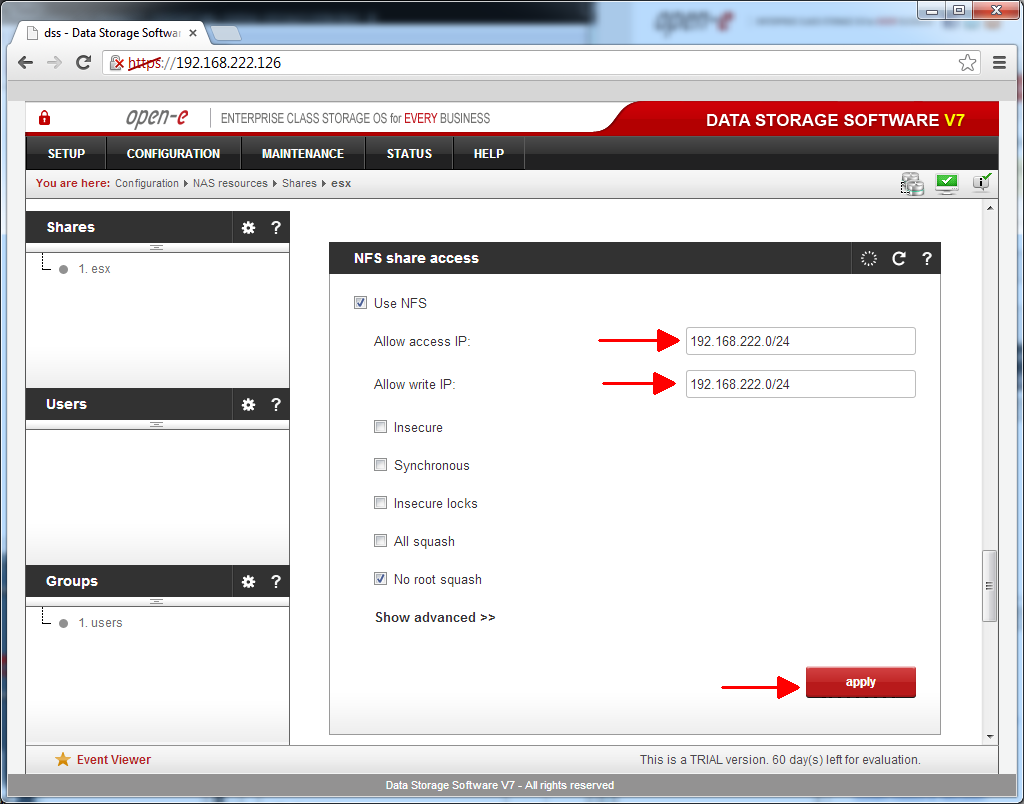
- Click the share at the left side and scroll down to the NFS share access configuration
- Select Use NFS and enter subnet/prefix to allow access for the whole subnet
- Open vSphere Client to mount the NFS share
- Navigate your ESXi Host -> Configuration -> Storage
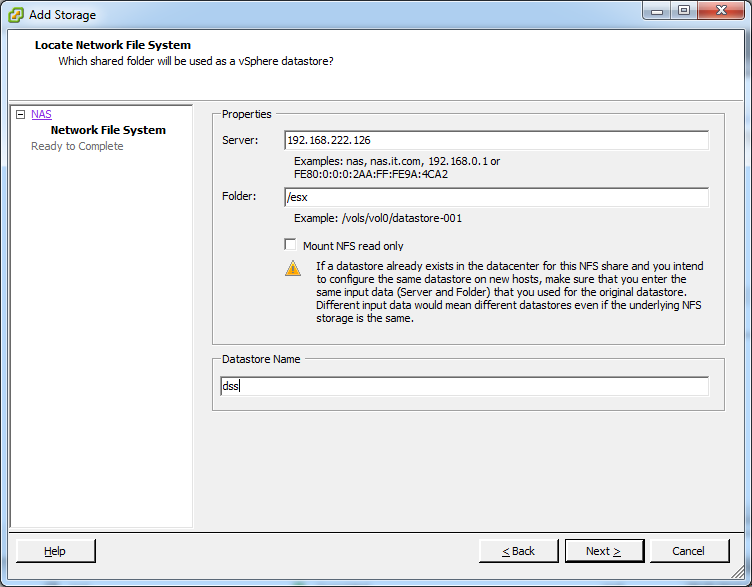
- Click Add Storage...

- Enter your DSS ip address as Server and the Share as Folder and click Next -> Finish
That's it. You have successfully created your own VSA with local ESXi storage and Raw Device Mapping and mapped it back to the ESXi host. Of course, you can access this NFS share from other ESXi Hosts too.


Hello, very interesting post.
I wonder if the whole ESXi can restart by itself, including VMS. What I mean is that when you start the ESXi, provided the dss VM will autostart first, will the ESXi self-reconnect to the dss NFS share, then be able to start VMs physically stored on the NFS share ? Do you need to introduce a long delay between dss start and NFS-stored VMs start for it to work properly, or is ESXi smart enough to reconnect as soon as NFS share gets available and delay NFS-stored VMs start till then ?
Thank you for your reply.
I've never tested that. You can configure the dss VM to start first, that's no problem. ESXi does also reconnect to the NFS share when it is available. And third, you can configure the host with a long VM start delay.
It could be possible but i would not rely on that...
Thank you for this reply.
I'll have to try, because maybe you'll have to re-add VMs to inventory each time.
Or maybe it could work if VM definitions are not on NFS shares, only disks.
What I'd be interested to know actually is if you can do vMotion with such a replicated storage, all based on VMs, so that to twin ESXi hosts could ensure complete fault tolerance, storage included.
Very good post.
If any harddisk damaged, can I simply take it out with shutdown the phsysical machine.
And should I add new local disks as RDM to the virtual machine again as well as add it back to software raid and subsequently from your post?
NFS :shock: ? why no iSCSI? It seems to me a better chice. iSCSI it's not so complex and performance are quite different (on previus test with phisical SAN VM on NFS are not usable in production instead the same SAN vith iSCSI can permore quite well).
Hello,
anybody update the Open-E DSS V7 to 7.0up57.xxxx.21592 2016-10-14 b21592?
After update my testlab virtual appliance in vmware workstation i see the error: H/W RAID DRIVE NOT SUPPORTED in volume manager. Eventlog: System could not activate the volume group vg+vg00 because it contained at least one hardware RAID disk that is not supported by Open-E DSS V7 SOHO.
When i revert to 7.0up56.xxxx.19059 2016-02-29 b19059 all is fine.