If you have ESXi running on a flash media (USB flash drive or SD Card) you might want to create a ready-to-run backup of your host. This posts describes how you can create a backup of your ESXi hosts and create a media with an identical configuration where vicfg-backup is not a solution.
Clone a running ESXi Host with dd
You can copy the content of the SD card or USB flash drive to a datastore by using the dd command.
Identify the disk where ESXi is installed. USB devices are usually mpx.vmhba32:C0:T0:L0. Based on the partitions you can also tell that this is an ESXi (Parition ID 1 and 5-9).
[root@esx1:/] ls -l /dev/disks/
total 1332029424
-rw------- 1 root root 4026531840 Dec 17 19:53 mpx.vmhba32:C0:T0:L0
-rw------- 1 root root 4161536 Dec 17 19:53 mpx.vmhba32:C0:T0:L0:1
-rw------- 1 root root 262127616 Dec 17 19:53 mpx.vmhba32:C0:T0:L0:5
-rw------- 1 root root 262127616 Dec 17 19:53 mpx.vmhba32:C0:T0:L0:6
-rw------- 1 root root 115326976 Dec 17 19:53 mpx.vmhba32:C0:T0:L0:7
-rw------- 1 root root 299876352 Dec 17 19:53 mpx.vmhba32:C0:T0:L0:8
-rw------- 1 root root 2684354560 Dec 17 19:53 mpx.vmhba32:C0:T0:L0:9
[...]
Write the entire disk to an image. I am using one of the datastores.
[root@esx1:/] dd if=/dev/disks/mpx.vmhba32:C0:T0:L0 of=/vmfs/volumes/ds1/images/esx1.img
7864320+0 records in
7864320+0 records out
If you have a large disk, you might want to compress the image. The size of an ESXi installation is about 700MB, all empty space will compress very nice.
[root@esx1:/] dd if=/dev/disks/mpx.vmhba32:C0:T0:L0 | gzip > /vmfs/volumes/ds1/images/esx1.img.gz
There is no noticeable creation time difference but the advantage of piping the command through gzip is a way smaller image.
[root@esx1:/] ls -lh /vmfs/volumes/ds1/images/
total 4625408
-rw-r--r--    1 root     root      676.8M Dec 17 18:01 esx.img.gz
-rw-r--r--    1 root     root        3.8G Dec 17 17:26 esx.img
Copy the image to a safe location.
Write the image to a SD Card or USB flash drive with dd (Linux Host)
If you want to use a Linux host to write the image back to a device you can simply use the dd command again. It is available on all Linux system.
Plug in your target media and identify the device (/dev/sdb in that case)
Write the image to /dev/sdb:
# dd if=esx1.img of=/dev/sdb
If you have previously used gzip to compress the image, use the following command:
# dd if=esx1.img.gz | gunzip | dd of=/dev/sdb
Write the image to a SD Card or USB flash drive with usbit (Windows Host)
- Download USB Image Tools
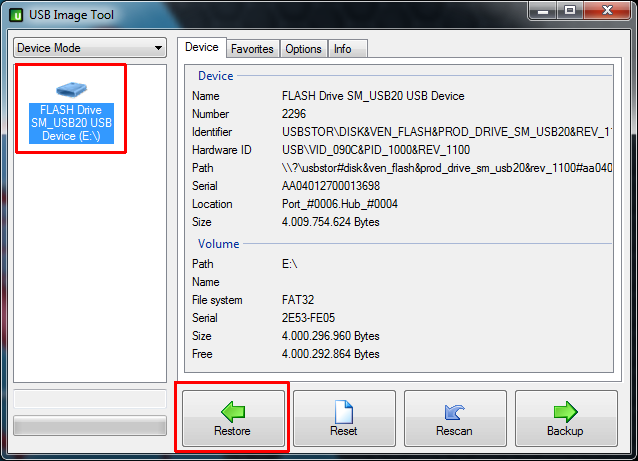
- Open USB Image Tool (Requires Administrator Privileges)

- Select your Device and click Restore
- Locate and open the Image File

- Wait until the process finishes. You do now have a 100% copy of your ESXi Host.
Thanks for the info! Just setup our lab to boot ESXi from internal USB drives. Problem then was how to ensure it was backed up. This solves that problem.
Question though: Is there a way to get the status while it's running? Typically on 'ix OS's one can use CTRL-T or kill -usr1 pid to get the status. Neither of these work on ESXi.
I usually just watch the size of the target file with "ls -lh". Does not work if you copy the file back to the SD card of course.
Pretty much what I resorted to fgrehl. I added it to a watch statement. Problem with that is it doesn't end when the copy stops so you have to watch for a minute to see it hasn't changed size. Oh well, better than nothing I guess.
Hi, thanks for this guide! I can't get it work when i replaced the original 4gb sd-card with a new 16gb sd-card. I get the error: Not a VMware boot bank. Tried another tool, but then it boots an old version of VMWare. The host is upgrade from 5.1 to 5.5.
Nice guide, I have tried it out using two identical USB sticks and it works great.
Only when I "Clone" a micro SD card and restore (windows methode or with Rufus) the image on 8Gb USB or 32GB USB stick. The process goes wrong and the Hyperviser will pop a boot warning: "BANK5: invalid configuration. (return) BANK6: not a VMware boot bank (return) No hypervisor found.
Someone got a idea what is going wrong? Maybe the problem is related to the different type of storage? (SD vs USB)
This problem is usually caused by a wrong partition table.
Make sure to clear all partitions from the target SD card.
Can you do a "partedUtil get [device]" from both sd cards and compare the result? Should be identical..
Hey fgrehl,
The idea was to clone an micro-sd card to an USB device (because i haven't got a second micro sd card 8Gb)(I will order one to night, then I will test a sd to sd clone)
If I look to the partition from the SD card en de USB (clone from SD) Partition table seems the same size.
I tried another thing; I have put the micro SD card in a micro sd to usb adapter (passive) and put is in a USB slot. Then tried to boot the ESXi Server and it wouldn't boot. Same message as in my previous post.
So i think it's related to the different type of storage device. Maybe de ESXi installation config is different for SD vs USB devices.
Hey fgrehl,
I've got exactly the same problem as E reported. I tried to clone a 16GB sd card containing ESXi 5.5 U3 once on Linux using DD and two times once on Windows using USB Image Tool / Rufus and once with dd on ESXi command line.
When trying to boot from the destination sd card I got: "BANK5: invalid configuration. (return) BANK6: not a VMware boot bank (return) No hypervisor found"
Cleaning the partitions on target sd card with parted on linux or diskpart on Windows before writing doesn't help.
Probably it is a problem of the partition table but so far I did not find a way to fix that. I cannot compare the output of "partedUtil get [device]" because the destination sd card does not boot the esxi.
When comparing the size of the sectors with parted I can see that the start and end sectors of all 6 partitions on source and destination sd card are the same. Never the less the destination sd card has some more sectors although both are thought to contain 16GB. Source has got 30894079 and destination has got 31422463 sectors. But IMHO that should cause the problem.
If anyone could post a reason / solution for that problem it would be great.
Hey fgrehl,
I can confirm the problems which E has, mine are the same. I tried to clone a 16GB sd card running ESXi 5.5. The first time I used dd on linux to create an image, the second time I used the USB Image Tool on Windows 7. But the destination sd card does not boot: "BANK5: invalid configuration. (return) BANK6: not a VMware boot bank (return) No hypervisor found."
I think the problem is located to the partition table (as you already said) but I didn't find a solution so far. Looking at the physics of the two sd cards I can see, that both 16GB sd cards have a different number of sectors. The source has got 30894080 while the destination is slightly bigger with 31422464. fdisk shows that the (six) partitions start and end at the same sectors. Never the less after cloning fdisk complaints that the destination sd card has got a wrong GPT size (it is too small because it is set to the size of the source). Fixing the size doesn't help. Using diskpart in Windows to clear the GPT before writing doesn't help either.
There are other threads which seems to have the same problems e.g. http://www.vladan.fr/tool-use-cloning-esxi-usb-stick/
Unfortunately I cannot use partedUtil get [device] on the destination device as it doesn't boot...
I've never cloned usb-flash to sd cards or vice versa. Only same types. Device size shouldn't be a problem as long as the target is bigger (I've done that couple of times without issues).
Let's see if i can reproduce this issue. I don't have a server with SD card to verify at the moment, i will try with an adapter.
I can confirm the issue. Cloned an ESXi from SD card to usb flash drive, does not work. I'll try to fix it.
Okay, here is the problem. USB Image Tool screws up the partition numbering. Not sure why this happens now because it worked when I created this article.
Original device:
partedUtil get /dev/disks/mpx.vmhba32\:C0\:T0\:L0
247 255 63 3970048
1 64 8191 0 128
5 8224 520191 0 0
6 520224 1032191 0 0
7 1032224 1257471 0 0
8 1257504 1843199 0 0
Cloned Device
partedUtil get /dev/disks/mpx.vmhba36:C0:T0:L0
1897 255 63 30489408
1 64 8191 0 128
2 8224 520191 0 0
3 520224 1032191 0 0
4 1032224 1257471 0 0
5 1257504 1843199 0 0
Cloning the device with DD does not have this problem. (Use a Live Linux CD)
fgrehl thank you for the extra support,
I have tried the DD option using a linux OS (ubuntu) and I have successfully cloned a 8GB Micro-SD card to an 8GB USB 2.0 stick. (also tested 32GB USB 3.0 stick)
(My experience with de DD command is that it works faster if you don't use compressed (gz) images. Maybe this is because I'm running ubuntu in a VM)
So if you need to clone USB --> USB, the image tool works. If you need to clone SD, use the DD option!
Hi, I'm Alex, author of USB Image Tool. I got notice of this thread by a post on my websites forum, where somebody reported this issue.
Intentionally USB Image Tool doesn't modify the GPT numbering. In fact it doesn't care for GPT or MBR and tries to backup/restore the whole device (in device mode).
I want to figure out, what is going wrong in this procedure. Could you possibly try to recreate the issue with older versions of USB Image Tool? They are still available for download at http://www.alexpage.de/usb-image-tool/download/.
This could help me to narrow down the problems origin. Restore routines haven't changed that much since 1.70, which was the current version December 2014.
I guess I will have to create a sample SD card with GPT an above partition numbering. Any hints on how to do this effectivly without an ESX server at hand? GParted Live CD possibly?
Hi Alex and thanks for your support.
I've tried to figure out which version I used for the post. I've found the copy in my local documentation, it was 1.70.
I've cloned SD -> USB flash with Version 1.70 and it produced the same issue.
I've also cloned an SD to another SD with version 1.70: Same Issue.
Here are 2 screenshots from GParted from both, source and target:
https://www.dropbox.com/s/qn06h8xsx6xbvh9/esxi-correct-partitions.png?dl=0
https://www.dropbox.com/s/yutiu4afm0xzbzg/esxi-wrong-partitions.png?dl=0
Not sure how you tool handles "Devices Mode", compared to "dd" in Linux. I would assume both are just copying the entire device blockwise, ignoring any type of partition types or partitions iself.
But maybe the problem is related to Windows not recognising the partition numbering correctly? When I use diskpart in Windows to list partitions, the output is quite odd (Both, source and Target):
https://www.dropbox.com/s/w9gqi4ze49qneiz/esxi-windows-partitions.png?dl=0
Any ideas? Anything we can do to help you to narrow down the issue?
Maybe, if you have a Windows 7 available. Looks like you originally did the tutorial with Windows 7. I had some other issues with Win8/10 behaving differently. Maybe you switched to Win10 like me. Thanks for your offer to help.
I'm still on Windows7 on my desktop. But I also have an Windows10 Notebook. The "strange numbering" shown in diskpart happens on both, Win7 and Win10.
Hello Alex,
I'm still at Win7 with my laptop and used the latest version (1.72) of your tool. During the troubleshooting process I have tried cloning with a compressed and uncompressed image. Both made with de dd command. Both give the same issue.
To be clear, the USB to USB process works. The SD cloning to USB did not work. I have not tested SD to SD.
I will tried the Win7 + Tool version V1.70, and report the results.
The cloning SD --> USB using Image Tool V1.7 (on windows 7) gives the same result. I'm not 100% sure if it is the same issue.
Hello Alex,
I just tested to restore sd-card image from ESXi 5.5 (created with dd) with USB Tool version V1.65 on Win7 to a new sd-card and had the same issue with the wrong partition table.
I guess (as fgrehl already said) that the problem is somewhat Windows specific as other tools have the same problem. I also tested
'Rufus 2.8' https://rufus.akeo.ie/
'Win32 Disk Imager 0.9.5' https://sourceforge.net/projects/win32diskimager/
and had also that problem with the partitions.
Using dd in a Linux VM (VirtualBox) within Windows 7 host works as expected and results in a correct partition table.
Interesting. I've had the same issue with version 1.72 of USB Image Tool on Windows 10. My last time using Alex's tool was about 18 months ago (with whatever was current at the time) on Windows 7, and it worked fine. Like mentioned above, the partition numbering was incorrect on the restored USB key.
I used dd from MacOS, and it copied correctly.
I too have exactly the same issue using version 1.72 of USB Image Tool on Windows 10 - the partitions on the destination card differed from those on the source card.
I got around this by using GDisk (GPT FDisk) on a GParted live CD to manually renumber the partitions.
seems to me that the difference in writing the image it is using LBA mode within vmware, while writing it back to usb from windows is falls back to CHS mode.
Don't know how to overcome this but maybe Alex has a solution for this?
I have the same problem what "fgrehl" describes. The partitions are not as on the original USB stick sdx1, sdx5, sdx6, sdx7, sdx8 and sdx9, but are simply numbered from sdx1 to sdx6. This also explains the VMware Start message with BANK5 and BANK6. A cloning with dd in a Suse VM does not work by the way. I have then solved it with a gparted-live-cd (debian), there I could also immediately check the partitions.
I use dd if=/dev/sdb of=/dev/sdc
this Clone usb stick on dev sdb to sdc.
And clean all Partitions on the Destination Usb Stick befor use dd copy
Have you tried this with vSphere 6.5? I keep getting 'Input/output error' when trying to do this.
When I do ls -al /dev/disks, I get the following:
-rw-------    1 root     root     30752000000 Apr  5 02:54 t10.SanDisk00Ultra_Fit000000000000004C531001500321116585

-rw-------    1 root     root       4161536 Apr  5 02:54 t10.SanDisk00Ultra_Fit000000000000004C531001500321116585:1

-rw-------    1 root     root     262127616 Apr  5 02:54 t10.SanDisk00Ultra_Fit000000000000004C531001500321116585:5

-rw-------    1 root     root     262127616 Apr  5 02:54 t10.SanDisk00Ultra_Fit000000000000004C531001500321116585:6

-rw-------    1 root     root     115326976 Apr  5 02:54 t10.SanDisk00Ultra_Fit000000000000004C531001500321116585:7

-rw-------    1 root     root     299876352 Apr  5 02:54 t10.SanDisk00Ultra_Fit000000000000004C531001500321116585:8

-rw-------    1 root     root     2684354560 Apr  5 02:54 t10.SanDisk00Ultra_Fit000000000000004C531001500321116585:9

lrwxrwxrwx    1 root     root            56 Apr  5 02:54 vml.0000000000766d68626133323a303a30 -> t10.SanDisk00Ultra_Fit000000000000004C531001500321116585

lrwxrwxrwx    1 root     root            58 Apr  5 02:54 vml.0000000000766d68626133323a303a30:1 -> t10.SanDisk00Ultra_Fit000000000000004C531001500321116585:1

lrwxrwxrwx    1 root     root            58 Apr  5 02:54 vml.0000000000766d68626133323a303a30:5 -> t10.SanDisk00Ultra_Fit000000000000004C531001500321116585:5

lrwxrwxrwx    1 root     root            58 Apr  5 02:54 vml.0000000000766d68626133323a303a30:6 -> t10.SanDisk00Ultra_Fit000000000000004C531001500321116585:6

lrwxrwxrwx    1 root     root            58 Apr  5 02:54 vml.0000000000766d68626133323a303a30:7 -> t10.SanDisk00Ultra_Fit000000000000004C531001500321116585:7

lrwxrwxrwx    1 root     root            58 Apr  5 02:54 vml.0000000000766d68626133323a303a30:8 -> t10.SanDisk00Ultra_Fit000000000000004C531001500321116585:8

lrwxrwxrwx    1 root     root            58 Apr  5 02:54 vml.0000000000766d68626133323a303a30:9 -> t10.SanDisk00Ultra_Fit000000000000004C531001500321116585:9
Same here. Did you ever find a solution?
@Jeff I never got this to work. I've instead used the method here and it works great:
https://virtualhobbit.com/2015/11/20/cloning-the-esxi-boot-volume/
HTH...
I was excited to use the dd technique to get a backup of my esxcli SD cards, but with 8GB SD card, and from esxcli itself I get a "function not implemented" error at about the 4GB point when trying to grab the image:
~ # cd /vmfs/volumes/sysvmutil1_local/
/vmfs/volumes/564f32dd-6806d2eb-231e-0017a4771900 # dd if=/dev/disks/mpx.vmhba32:C0:T0:L0 of=sysvmutil1.image
dd: /dev/disks/mpx.vmhba32:C0:T0:L0: Function not implemented
Has anyone seen this before? Is it not possible to use dd on the running host itself anymore? esxi 5.5
Just got the same error, ESXi 6.0
When I do the DD command to try to restore the file to a usb drive. I get an error Function no implemented. I am not able to get passed this.
Place "conv=notrunc" at the end of the command string.
I have done this by taking the USB drive out and putting it in a computer running Linux, and implementing the command:
# dd if=/dev/sdb of=/dev/sdc BS=4M
where sdb is the original ESXi 6.5 drive created with the ESXi installer and sdc is a blank USB key. Both keys were 16GB in total size.
The clone created would then run out of space when trying to upgrade ESXi using the ESXi patch tracker at https://esxi-patches.v-front.de/ESXi-6.5.0.html -- which works fine on original USB drives made with the ESXi installer. I also tried to resize the last partition on the USB clone using gparted, but it would not work since it didn't recognize the FS. Do you know why this is? Is there a problem running out of space when using a dd image created from a running ESXi machine?
I investigated into the problem that USB Image Tool screws up the partition numbering by using the new version from Alex 1.74. The new version tried to fix that problem with a new option.
In short:
The problem is still existing but it seems to be problem (bug) of the MS Windows operating system and not a problem of USB Image Tool.
The full analysis can be found here:
Did you forget the link to the analysis?
Link to the forum of alexpage:
http://www.alexpage.de/forum/viewtopic.php?f=1&t=534&p=909#p956
The upshot is:
a) Use the latest version of USB Image Tool (currently v1.75)
b) Select the 'Option' tab
c) Check the option "Fix GPT after Restore (prevents partition re-enumeration)"
d) Now select your Device and click Restore (steps 3, 4, and 5 in the original article)
Perfect! Worked
Guys, after researching and trying dd and Clonezilla for about two days, this worked like a charm
https://virtualhobbit.com/2015/11/20/cloning-the-esxi-boot-volume/
will this work with a esxi installation on SSD disk?
I have my esxi host on a 250 gb SSD. found the disks but when I execute the command it just sits there ... any way to see if it is still doing anything?
Hello,
I have problem:
dd: /dev/disks/mpx.vmhba32:C0:T0:L0: Input/output error
Please help?
Hello Krzystof,
did you set the output file of=/vmfs/volumes/....img
USB Image Tool 1.76 works for me when cloning ESXi6.0 from 8GB to 8GB drives, but not when cloning to a 16GB drive. For preference, clone to a USB3 stick, as restoring the image takes a long time on a USB2 stick!
I ran into similar problem today and I found a simpler solution ... namely:
- first use imageUSB or something similar to clone the card or USB stick (it works even when you shrink the storage to 4gb ... even if it fails to finish!)
- then use gparted to delete all partitions on the new device ... (unmount, delete, apply)
- then terminal:
sgdisk --replicate=/dev/target /dev/source
or
sgdisk -R/dev/target /dev/source
(with great care to the syntax!)
- refresh in gparted and you will see that the partitions have opened up full of data (all partition!) - it can already be used on your server!
- If the partition data does not appear, then just copy the partitions .
I'm glad if I helped!
app. It's not my native language and maybe moderator can edit for better understanding. Thx.
as i have the same issue using usb image tool to clone an esxi 6.7 usb stick, i gotta ask about how to renumber the partition numbers.
"Pete Robinson July 6, 2016 at 4:09 pm, wrote
I got around this by using GDisk (GPT FDisk) on a GParted live CD to manually renumber the partitions."
would someone comment on how to actually use gparted to renumber the partitions?
Hi, after reading out the ESXi USB drive using "dd", can the image be written to a new USB drive on the same ESXi host, or does it have to be written out on a separate Linux host?
Thanks
Eric
After restoring the ".img" to a new USB key (exact same Samsung model) I can boot up and use it no prpblems. But there something strange, now I cannot update it from 6.5 to 6.7 using vCenter 6.7. As with the original USB in place I was able to upgrade it. Strange !!!
I get this message now "Software or system configuration of esxi-3.tnslab.local is incompatible. Check scan results for details".
I'm also sufering something related. I cloned the USB key because I'm upgrading from esx 6.7 to 7 and I need a larger boot device. Now I'm unable to delete uneeded vib's as I could do with the original USB keys. When I execute the command to remove them (excli software vib remove -n shortNameOfTheDriver) I'm getting a message indicading that I'm running a stateless esxi server, any idea?
All,
While I am running "dd if=/dev/disks/mpx.vmhba32:C0:T0:L0 of=/vmfs/volumes/Vol10/images/esx1.img " I am getting , Input/output error .
is that due to corrupted USB media ?
Team,
I am trying to run "dd if=/dev/disks/mpx.vmhba32:C0:T0:L0 of=/vmfs/volumes/Vol101/images/esx1.img " getting Input/output error
is it due to USB media error ? if so , how can correct it and copy the image ?