The HP Microserver N54L and its predecessors N40L and N36L are widely spread home servers. I've written about using it as ESXi host in my Homelab about 2 years ago. Today it is still a great system to be used with ESXi but there are better alternatives, especially due to its limited memory and CPU power. That was the reason why I rededicated my N40L to be a central storage and file server with FreeNAS. This post describes what you need to use the N40L as resilient storage and how to configure it properly for ESXi usage. I will talk about NFS sync writes or performance issues with NFS vs. iSCSI and how to work around them.
Hardware Guide
- HP Microserver: If you do not already have a Microserver, go for the N54L.
- Memory: FreeNAS requires 8GB of RAM to run properly: Kingston KVR1333D3E9SK2 or Corsair CT2KIT102464BA1339.
- Hard Drives: I recommend the WD Red drives (2TB, 3TB or 4TB). The Red series was specially made for NAS usage. You can also use the WD Velociraptor model which is a little bit faster, but much more expensive. The system has 4 slots, but you can add a 5th drive to the cd/dvd slot.
- NIC: An additional NIC is recommended for performance and redundancy: Intel Gigabit PCI-E Network Adapter EXPI9301CTBLK
- USB Flash Drive: I recommend installing Freenas to a USB Flash Drive. The recommended boot device size for FreeNAS is 8GB: SanDisk Cruzer Fit 8GB
- HP MicroServer Remote Access Card: For out-of-band management.
Installation & Configuration
Installation
Installation is very simple. You can use the internal USB port for the USB Flash Drive. If you want to use a 5th hard disk, you can fit it into the cd/dvd slot.
- Downlad the latest Release of FreeNAS
- Boot the installer (Burn it to a CD or mount it with the Remote Access Card)
- Select the 8GB flash drive as target
- Enter your root password
- Remove the CD and reboot
That's it. You FreeNAS will now reboot and come up with DHCP enabled. The configuration can be done with the web interface.

Initial Configuration
- Open the Web Interface
- Login as root with the password you set during the installation. This will start the initial configuration wizard.
- Set your language and exit the wizard at the second step
- If you want to set a static IP address you have to add an interface in Network > Interface
Create a Volume
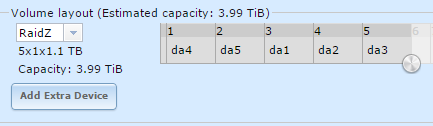
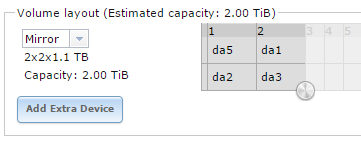
With 4 disks, you can build a RAID10. This will give you the best performance. If you have 3 or a 5th disk you can create a RaidZ. This will give you the most capacity.
- Open Storage > Volumes > Volumes Manager
- Enter a Name
- Configure your volume layout. RaidZ (3 or 5 Disks required):
or Raid10 (4 disks required):
- Press Add Volume
FreeNAS running on your N54L is now ready to be used. From that point you can create your shares to use it as Fileserver or shared storage for ESXi.
Create a NFS Share for ESXi
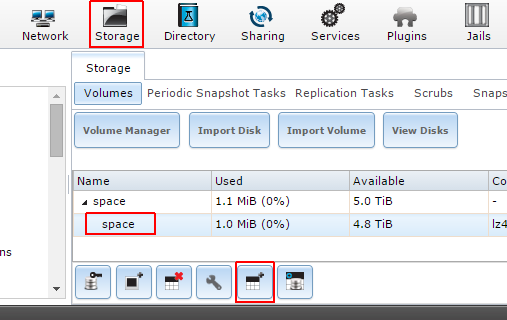
- Open the Storage Tab
- Select the Volume
- Press the Create Dataset icon
- Enter a Dataset Name and press Add Dataset
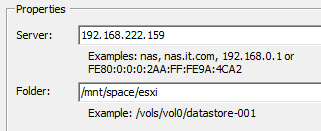
- Navigate to Sharing > UNIX (NFS) and press Add Unix (NFS) Share

- Browse for the Path you want to share (/mnt/[volume]/[dataset])
- Press Advanced Mode
- Change Maproot User: to root
- Press OK
- When it asks to enable services, press Yes
You can mount the share on your ESXi host with Configuration > Hardware > Storage > Add Storage > Network File System
Create a iSCSI Share for ESXi
- Navigate to Sharing > Block (iSCSI) > Portals and click Add Portal
- Enter a Comment and press OK
- Navigate to Initiators and click Add Initiator
- Press OK
- Navigate to Targets and click Add Target
- Enter Target Name, Target Alias and set the Port/Initiator Group ID to 1
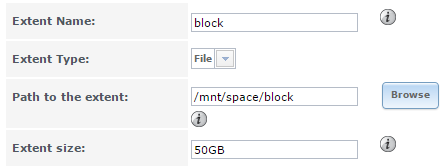
- Navigate to Extends and click Add Extend
- An extend is a file that simulates the Block device. You have to set a fixed size. Select a Extent Name (same as Target Name possible), a Path and the Extent Size
- Navigate to Associated Targets and click Add Target / Extent
- Map Target and Extent and press OK
- Open Services Tab and enable iSCSI
iSCSI vs NFS Performance
Without doing any further optimization like jumbo frames or multipathing, my N40L with 5 WD Red 3TB drives in RAIDZ could achieve the following results.
iSCSI
Write: 72 MB/s - 145 IOPS (I/O Analyzer 512k 100%Read 0%Random)
Read: 98 MB/s - 200 IOPS (I/O Analyzer 512k 0%Read 0%Random)
NFS
Write: 5 MB/s - 20 IOPS (I/O Analyzer 512k 100%Read 0%Random)
Read: 52 MB/s - 120 IOPS (I/O Analyzer 512k 0%Read 0%Random)
That's what I expected. But why is NFS performance so bad? ESXi does synchronous writes operations. The host requests an acknowledgement that the data is actually written to the physical disk before it starts another write. A sync write causes the ZFS filesystem to flush it's ZIL (ZFS Intent Log) to the disk. The ZIL is a log of sync writes that ZFS uses to write data more efficiently to the disk.
So, what can you do to speed NFS up?
- Write the ZIL on a separtate SSD. This will speed up NFS a little bit. I could achieve around 30 MB/s with a SLOG (Separate Intent Log).
- If you do not care about the integrity of your VM, you can disable sync writes. If you do so, be aware that if your storage crashes while data is cached but not written to the disk you will end up with corrupt data.
Disable Sync Writes:# zfs set sync=disabled [POOL]/[DATASET]Enable Sync Writes:
# zfs set sync=standard [POOL]/[DATASET]You can verify the sync status with
# zfs get sync
Pingback: N54L with ESXi 5.5 but which Raid Card
Pingback: How to Upgrade FreeNAS 9.x to 9.3 | Virten.net
Great write up thank you.
I actually had my N40L with ESXi, and then had a VM openindiana presenting the disks (raw disk).
I am just confused, where does ESXi come into this(blush)?
i.e. It appears you are booting the server into "free nas" from USB?
Sorry I am missing something here..
I am about to build an N54L and may change my setup.
However my server function is not only "NAS", it is also to host VM's.
Thanks again.
Yes. At the moment I am using the N40L as Shared Storage only. You can also build somting like VSA on it (Running FreeNAS as Virtual Machine with RDM, presenting the storage back to the ESXi). I've done that some time ago with open-e storage software (http://www.virten.net/2013/05/building-an-vsa-with-open-e-dss-v7-inside-esxi/)
Usefull post, thanks.
I have similar configuration in a N54L. With a recent freeNAS update the USB flash memory died. I connect another one, but just reinstalling freeNAS also died. So, I don't know if was just coincidence, or what to think about the same issue 2 times in 24 hours in the same USB port?
@HEDEL ... USB port might be faulty
Great article, easy to read!
Can you add a Fiber NIC to that box?, I will like to connect it to my ESXi set up