If you want to install the vCenter Server Appliance (VCSA) from vSphere 6 in VMware Workstation you might have noticed that the new guided installer is not suitable for you. The appliance is still available as ova, but it's a little bit hidden. This post explains how to deploy VCSA in VMware Workstation.
- Download VMware vCenter Server Appliance from VMware (.iso file)
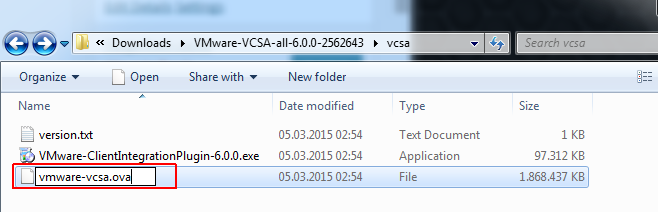
- Extract the content of the ISO
- Add the .ova extension to vcsa/vmware-vcsa file
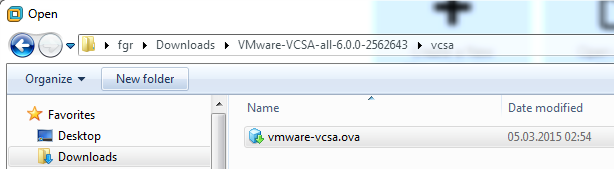
- Open vmware-vcsa.ova with VMware Workstation
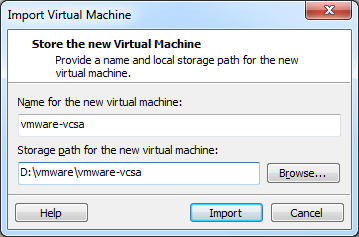
- Import the Virtual Machine. Do not power it on!
- Locate the new Virtual Machine and open vmware-vcsa.vmx with a text editor
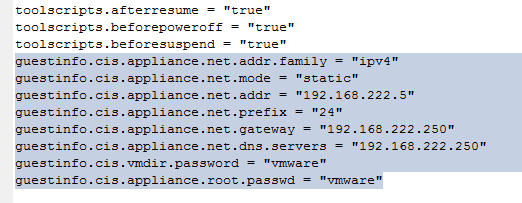
- Add the following parameters. Make sure to change the network settings to your fit your network.
guestinfo.cis.appliance.net.addr.family = "ipv4"
guestinfo.cis.appliance.net.mode = "static"
guestinfo.cis.appliance.net.addr = "192.168.222.5"
guestinfo.cis.appliance.net.prefix = "24"
guestinfo.cis.appliance.net.gateway = "192.168.222.250"
guestinfo.cis.appliance.net.dns.servers = "192.168.222.250"
guestinfo.cis.vmdir.password = "vmware"
guestinfo.cis.appliance.root.passwd = "vmware"
- Save the file and power on the Virtual Machine. The VCSA will now be automatically deployed with a very basic configuration.
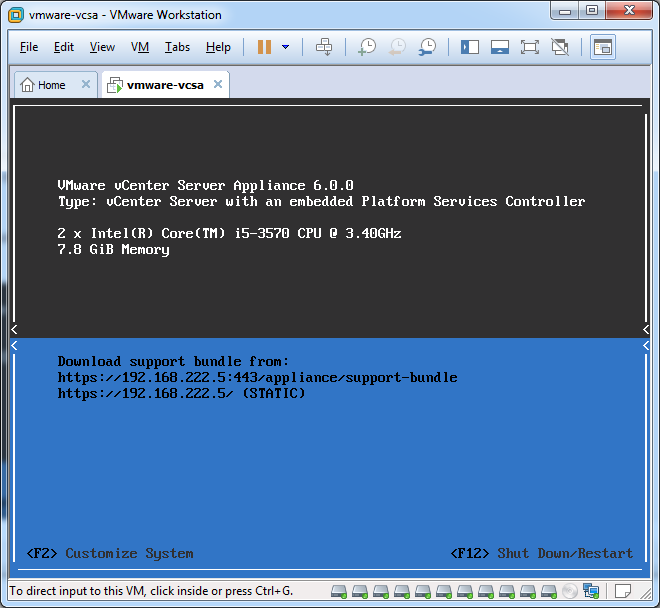
- You can login to the vCenter with the user administrator@vsphere.local and the password configured in vmdir.password (vmware).
Additional OVF Options
There are many more ovf options available. I will explore them deeper in a later post:
- guestinfo.cis.appliance.net.addr.family
- guestinfo.cis.appliance.net.mode
- guestinfo.cis.appliance.net.addr
- guestinfo.cis.appliance.net.prefix
- guestinfo.cis.appliance.net.gateway
- guestinfo.cis.appliance.net.dns.servers
- guestinfo.cis.appliance.net.pnid
- guestinfo.cis.appliance.net.ports
- guestinfo.cis.vmdir.password
- guestinfo.cis.vmdir.domain-name
- guestinfo.cis.vmdir.site-name
- guestinfo.cis.vmdir.first-instance
- guestinfo.cis.vmdir.replication-partner-hostname
- guestinfo.cis.db.type
- guestinfo.cis.db.user
- guestinfo.cis.db.password
- guestinfo.cis.db.servername
- guestinfo.cis.db.serverport
- guestinfo.cis.db.provider
- guestinfo.cis.db.instance
- guestinfo.cis.appliance.root.passwd
- guestinfo.cis.appliance.root.shell
- guestinfo.cis.appliance.ssh.enabled
- guestinfo.cis.appliance.time.tools-sync
- guestinfo.cis.appliance.ntp.servers
- guestinfo.cis.deployment.node.type
- guestinfo.cis.system.vm0.hostname
- guestinfo.cis.system.vm0.port
- guestinfo.cis.upgrade.source.vpxd.ip
- guestinfo.cis.upgrade.source.vpxd.user
- guestinfo.cis.upgrade.source.vpxd.password
- guestinfo.cis.upgrade.source.guest.user
- guestinfo.cis.upgrade.source.guest.password
- guestinfo.cis.upgrade.source.guestops.host.addr
- guestinfo.cis.upgrade.source.guestops.host.user
- guestinfo.cis.upgrade.source.guestops.host.password
- guestinfo.cis.upgrade.source.ssl.thumbprint
- guestinfo.cis.upgrade.source.export.directory
- guestinfo.cis.upgrade.import.directory
- guestinfo.cis.upgrade.silent
- guestinfo.cis.upgrade.user.options
- guestinfo.cis.kv.new
- guestinfo.cis.lookup.hidessltrust
- guestinfo.cis.silentinstall
- guestinfo.cis.clientlocale
Troubleshooting
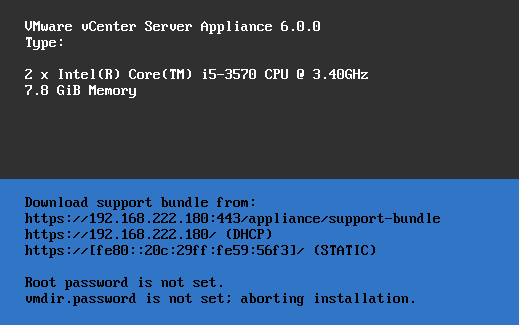
If you do not set OVF properties and just power on the appliance, it will fail during the configuration and display the following error message. If you see this message, deploy the appliance as explained in this post.
- Root password is not set.
- vmdir.password is not set; aborting installation.
Thanks!
I found the ova file but I haven't found the right way to set up vmware-vcsa.vmx
I have done this but when i start browser getting error:
Could not connect to one or more vCenter Server systems:
https://192.168.100.151:443/sdk
Thank you for the detailed and informative article. I had been struggling getting VCSA installed in VM Workstation/ESXi 6 in my test lab. This was a life saver. I look forward to your follow-up digging into more of the installation features.
instructions worked like a champ. Thank you.
tips: It took a while for the VM to finish configuration once powered on, 15 minutes or so; be patient.
Perfect! Thank you!
Thanks! Saved me a lot of research :)
Cheers!
Failed to open OVA descriptor。
workstation 12
Hi
I'm trying to apply your setup with the appliance in a ESXi.
I deployed the vmware-vcsa.ova in my ESXi 6.0.0b. All ok.
I opened the VM parameters, Options -> General -> Advanced.
Got a list of parameters like nvram, pciBridge... The one usually found in the vmx file.
Added 2 lines, one for each of guestinfo.cis.appliance.root.passwd and guestinfo.cis.vmdir.password with my passwords.
But when I power up the VM, still complains that vmdir.password is not set.
(root password warning disappeared after I manually set it up from the console)
What could I've done wrong ?
Thanks
jean-Michel
Why not
guestinfo.cis.deployment.node.type = "embedded" ? (or something) ??
Embedded is default, so you can but you don't have to set it.
what are you guys using for DNS? i dont have a dns server setup in my lab. any ideas?
It depends on what I'm testing. Simple Linux DNS Server, AD Controller (Much overhead), local A Records (painful to maintain), DNS Server on VCSA (absolutely unsupported)...but probably the simplest solution is when your Router can act as DNS Server or supports dnsmasq.
you need a DNS on your system to be able to resolve the vCenter name as it checks to resolve it while first boot, and it fails to autoconfigure if it does not find it
Pingback: Configure vCenter Server Appliance 6 VCSA6 after VMware Workstation Deployment - Virtxpert
Great doc - thanks for putting this together!
Pingback: » My Home LabvPentathlon
zzz...! this doesn't work for 6.1 ..update your stuff
just kidding LOL
Works like a charm .. thanks for a great walk-thru :-)
Hello all,
So when I rename and add the .ova extension to vcsa/vmware-vcsa file and open Text-editor I get the following instead of the "guestinfo.cis" lines like everyone else has to add the custom network lines..
This is what I get....
virtualHW.version = "11"
numvcpus = "2"
scsi0.present = "TRUE"
scsi0.virtualDev = "lsilogic"
memsize = "2048"
scsi0:0.present = "TRUE"
scsi0:0.fileName = "VMware ESX_ESXi 4.vmdk"
ide1:0.present = "TRUE"
ide1:0.autodetect = "TRUE"
ide1:0.deviceType = "cdrom-raw"
ethernet0.present = "TRUE"
ethernet0.connectionType = "nat"
ethernet0.virtualDev = "e1000"
ethernet0.wakeOnPcktRcv = "FALSE"
ethernet0.addressType = "generated"
usb.present = "TRUE"
ehci.present = "TRUE"
ehci.pciSlotNumber = "0"
pciBridge0.present = "TRUE"
pciBridge4.present = "TRUE"
pciBridge4.virtualDev = "pcieRootPort"
pciBridge4.functions = "8"
pciBridge5.present = "TRUE"
pciBridge5.virtualDev = "pcieRootPort"
pciBridge5.functions = "8"
I feel so close but so far on this one guys..help please
You are very close. Everyone has these lines you've mentioned in the .vmx file. You have to add the "guestinfo.cis" lines by yourself to the end of the file. They are not there by default. Just copy them to the end of the file.
Thanks for the feedback.
I see guys start creating the edited network string under the "toolsscripts.beforepoweroff" string but I don't get even that as you can see from the example.
So my question is where to insert it?
Thanks again Fgrehl
Danie I dont think all of those lines actually exist when you go to paste the networking lines into your vmx files. I noticed after looking at my vmx file again that my lines are actually no longer even at the bottom of the file and it looks as if there are even more lines than when it was create. Try just pasting them at the bottom, filling them out with the proper information for your environment, and try starting the VM. I would image you will notice those missing lines show up once it has completely booted up.
I just opened the wrong .VMX file. I was able to add those lines at the very bottom and it worked.
Thanks for your help.
Fantastic! Thank you so much! I cant run this within my dev esxi environment due to other restraints so will work out perfectly! Thanks again!
Anyway, I'm in and finally logged in but I dont see any configuration tabs on top including the EULA and License or start screen like everyone's setup shows on the web. It's like I dont have full access or something is preventing me from accessing all the configuration choices to make this thing useful for setting up my environment otherwise the VC web page looks ok.
FYI, I installed vCenter as a VM not as the install C++ client in my Win2008 server and when logged in using my physical PC browser I get the same thing but this time Chrome work but I.E didn't work but problem persist.
Thanks in advance all.
it hangs at the splash screen of vmware. with a load bar of 75%
This guide worked. However, my concern is around the hostname and service URLs using an IP address versus a hostname. Since this installation was essentially 'silent', you don't get an opportunity to specify the hostname instead of IP for vCenter, PSC, SSO, etc. Can I just edit these values in Advanced vCenter Settings and replace IP with hostname?
You the man! Thanks a bunch! I called VMware to ask for help, but the support knew nothing and refused to open a case since i just evaluate it.
@Dwayne You can change hostname. ssh to vCenter VM, once you're in, type this per instruction to get to a shell.
* Enable BASH access: "shell.set --enabled True"
* Launch BASH: "shell"
From there it's a Linux machine, change to whatever hostname.
Hi,
I have added all the text as show above but when it completes the DNS is DHCP and I don't have any ability to change the IP address setting. has anyone had this issue?
Thanks! This works so much better than their stupid browser-based installer that fails with zero description. Running great!
Pingback: VMware vSphere Homelab - erste Gehversuche - driftar's Blog!
I see the Hostname problem all over and have played with it and figured it as simple thanks to your post taking the STD lines you suggest ading before power on and then just one more guestinfo.cis.system.vm0.hostname="FQDN" that this resolved my problems of the host name.
Thanks for this post
Pingback: VCSA on VMware Workstation with Hostname not IP Address | Dave's Notepad
This doesn't work for workstation 14 and vCenter 6.5U1 anymore, the file is an ova already in the ISO and when imported, presents you with options for configuration. The option that doesn't work is NOT to power on, as this is the default and cannot be changed. Configuring the OVA options doesn't work, even though there is a DNS configured in the environment. Any tests on this setup?
Hans, i just got it working in VMWare Workstation 14, extract the .ova file from the iso, open this in VMWare 14 and it will open a windows where you can enter all the info like IP adress und standard gateway and root password... Just make sure to fill out everything there, also in the other categories like root and directory password. After the import the appliance starts automatically, to be sure leave it alone for 30 minutes, after that you will have the appliance text screen in the vm with your IP-Adress and Port and you should be able to login there with a browser... after you login the deplayment phase starts and all services are starte and so on, takes some time again but this time you will have a progress bar in the browser, and after that completes you get the real login page... Be sure the FQDN is resovable...just finished here some seconds ago, I hope it really works...