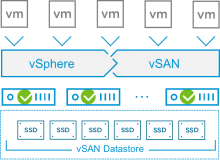
 The VMware vSAN 6.6 has been released today. In this post, I am going to run through the 3 steps to upgrade vSAN 6.5 to vSAN 6.6. Upgrading Virtual SAN is a multistage process, in which you must perform the upgrade procedures in the order described here:
- Upgrade vCenter Server to version 6.5.0d
- Upgrade ESXi Hosts to version 6.5.0d
- Upgrade the vSAN on-disk format to version 5.0
1. Upgrade vCenter Server Appliance
To upgrade a vCenter Server Appliance (vCSA) you can either use the online repository or download an upgrade ISO. When the vCSA has internet access, the simplest way is to use the online repository. Otherwise, you have to manually download the ISO, upload it to a datastore and mount it to the vCSA.
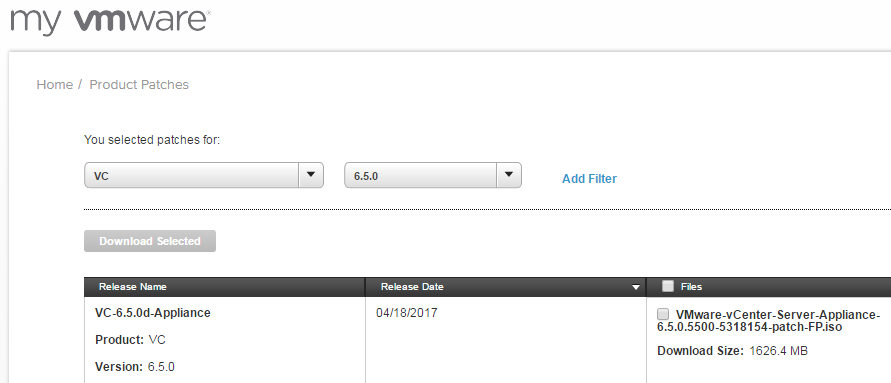
- (Optional) Download Upgrade ISO from VMware Product Patches.
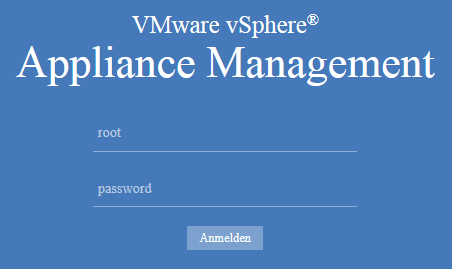
- Open vCenters Appliance Management Page (https://[VCSA-Address]:5480) and login as root.
- Navigate to Update

- Press Check Updates > Check Repository
(Optional: Check CDROM when using the upgrade ISO)
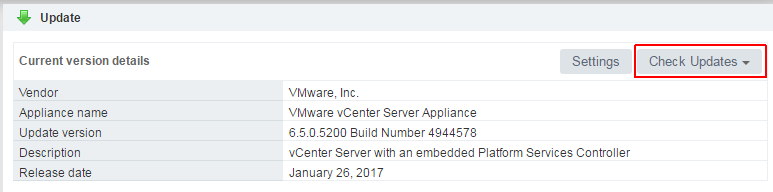
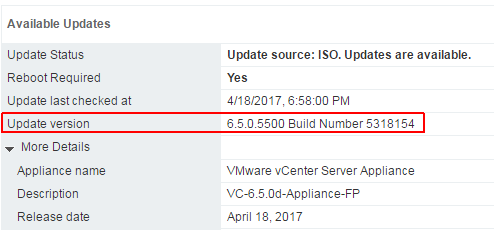
- Double check that the available update is at least:
6.5.0.5500 Build Number 5318154As of writing this post, the update was not yet available in the repository. In that case, you have to download the Upgrade ISO as mentioned in Step 1.
- Press Install Updates to start the update process.

- Reboot the VCSA.
- Close the original browser window and launch a new browser to login back into the vSphere Web Client. You may also need to clear your browser’s cache. This step is very important to prevent issues with the Web Client after upgrading.
That's it for the vCenter Server Appliance. The next task for the vSAN cluster upgrade is to upgrade ESXi hosts to version 6.5.0d (Build 5310538).
2. Upgrade ESXi Hosts
There are two popular ways of upgrading ESXi: vSphere Update Manager, or via the ESXCLI. If you use Update Manager to upgrade the hosts, the default evacuation mode is "Ensure data accessibility". If you use this mode, and while upgrading Virtual SAN you encounter a failure, your data will be at risk. I'm using ESXCLI because I only have a few hosts to upgrade.
- Download ESXi 6.5d Offline Bundle
- Upload the .zip file to a datastore.
- Place the first ESXi host in maintenance mode.Select the Ensure data accessibility or Evacuate all data evacuation mode, depending on your requirement, and wait for the host to enter maintenance mode. Please note that evacuating all data takes a lot of time, but might prevent data loss in case of failures during the upgrade.

- Connect to the ESXi host with SSH.
- Run the following command to install the upgrade.
#esxcli software vib update -d /vmfs/volumes/<DATASTORE>/ESXi650-201704001.zip
- Reboot the ESXi host.
- Exit maintenance mode.
Once the upgrade is completed, repeat the steps for all hosts in the vSAN Cluster. At this point, the upgrade to vSAN 6.6 is finished, but the on-disk format is still on version 3.0.

3. Upgrade the vSAN on-disk format to version 5.0
It is not required but recommended to upgrade the Virtual SAN disk format to the latest version. I'm using the Ruby vSphere Console (RVC) to continue with the disk format upgrade. If you are not familiar with RVC, refer to my Getting Started with Ruby vSphere Console (RVC) article or the RVC Guide.
- Log in to the vCenter Server using RVC.
- Mark the vSAN Cluster for further usage. This allows you to use ~vsan instead of the full path when running commands.
> mark vsan /vc.virten.lab/Datacenter/computers/vSAN65-Cluster/
- Check the disk status with vsan.disks_stats
> vsan.disks_stats ~vsan
+---------------------+------------------+-------+------+----------+--------+----------+----------+----------+----------+----------+---------+----------+---------+
|                     |                  |       | Num  | Capacity |        |          | Physical | Physical | Physical | Logical  | Logical | Logical  | Status  |
| DisplayName         | Host             | isSSD | Comp | Total    | Used   | Reserved | Capacity | Used     | Reserved | Capacity | Used    | Reserved | Health  |
+---------------------+------------------+-------+------+----------+--------+----------+----------+----------+----------+----------+---------+----------+---------+
| mpx.vmhba0:C0:T1:L0 | vesx1.virten.lab | SSD   | 0    | 5.00 GB  | 0.00 % | 0.00 %   | N/A      | N/A      | N/A      | N/A      | N/A     | N/A      | OK (v3) |
| mpx.vmhba0:C0:T2:L0 | vesx1.virten.lab | MD    | 2    | 9.99 GB  | 5.20 % | 0.39 %   | N/A      | N/A      | N/A      | N/A      | N/A     | N/A      | OK (v3) |
| mpx.vmhba0:C0:T3:L0 | vesx1.virten.lab | MD    | 1    | 9.99 GB  | 6.53 % | 5.36 %   | N/A      | N/A      | N/A      | N/A      | N/A     | N/A      | OK (v3) |
+---------------------+------------------+-------+------+----------+--------+----------+----------+----------+----------+----------+---------+----------+---------+
| mpx.vmhba0:C0:T1:L0 | vesx2.virten.lab | SSD   | 0    | 5.00 GB  | 0.00 % | 0.00 %   | N/A      | N/A      | N/A      | N/A      | N/A     | N/A      | OK (v3) |
| mpx.vmhba0:C0:T3:L0 | vesx2.virten.lab | MD    | 2    | 9.99 GB  | 6.65 % | 5.43 %   | N/A      | N/A      | N/A      | N/A      | N/A     | N/A      | OK (v3) |
| mpx.vmhba0:C0:T2:L0 | vesx2.virten.lab | MD    | 1    | 9.99 GB  | 1.49 % | 0.31 %   | N/A      | N/A      | N/A      | N/A      | N/A     | N/A      | OK (v3) |
+---------------------+------------------+-------+------+----------+--------+----------+----------+----------+----------+----------+---------+----------+---------+
| mpx.vmhba0:C0:T1:L0 | vesx3.virten.lab | SSD   | 0    | 5.00 GB  | 0.00 % | 0.00 %   | N/A      | N/A      | N/A      | N/A      | N/A     | N/A      | OK (v3) |
| mpx.vmhba0:C0:T3:L0 | vesx3.virten.lab | MD    | 2    | 9.99 GB  | 1.64 % | 0.39 %   | N/A      | N/A      | N/A      | N/A      | N/A     | N/A      | OK (v3) |
| mpx.vmhba0:C0:T2:L0 | vesx3.virten.lab | MD    | 1    | 9.99 GB  | 5.20 % | 0.31 %   | N/A      | N/A      | N/A      | N/A      | N/A     | N/A      | OK (v3) |
+---------------------+------------------+-------+------+----------+--------+----------+----------+----------+----------+----------+---------+----------+---------+
Make sure that the Health Status for all disks is OK.
- Start the upgrade with vsan.ondisk_upgrade
> vsan.ondisk_upgrade ~vsan
+------------------+-----------+-------------+----------------+----------------+------------------+----------------+----------------+
| Host             | State     | ESX version | v1 Disk groups | v2 Disk groups | v2.5 Disk groups | v3 Disk groups | v5 Disk groups |
+------------------+-----------+-------------+----------------+----------------+------------------+----------------+----------------+
| vesx1.virten.lab | connected | 6.5.0       | 0              | 0              | 0                | 1              | 0              |
| vesx2.virten.lab | connected | 6.5.0       | 0              | 0              | 0                | 1              | 0              |
| vesx3.virten.lab | connected | 6.5.0       | 0              | 0              | 0                | 1              | 0              |
+------------------+-----------+-------------+----------------+----------------+------------------+----------------+----------------+

2017-04-18 21:47:05 +0000: Running precondition checks ...
2017-04-18 21:47:07 +0000: Passed precondition checks
2017-04-18 21:47:07 +0000:
2017-04-18 21:47:07 +0000: Target file system version: v5
2017-04-18 21:47:07 +0000: Disk mapping decommission mode: evacuateAllData
2017-04-18 21:48:55 +0000: Check cluster status for disk format conversion.
2017-04-18 21:48:55 +0000: Update vSAN system settings.
2017-04-18 21:48:55 +0000: No disk conversion performed, all mounted disk groups on host are compliant
2017-04-18 21:48:59 +0000: Check cluster status for disk format conversion.
2017-04-18 21:48:59 +0000: Update vSAN system settings.
2017-04-18 21:48:59 +0000: No disk conversion performed, all mounted disk groups on host are compliant
2017-04-18 21:48:59 +0000: Check cluster status for disk format conversion.
2017-04-18 21:48:59 +0000: Update vSAN system settings.
2017-04-18 21:48:59 +0000: No disk conversion performed, all mounted disk groups on host are compliant
2017-04-18 21:48:59 +0000: Disk format conversion is done.
2017-04-18 21:49:02 +0000: Check existing objects on vSAN.
2017-04-18 21:49:02 +0000: Object conversion is done.
2017-04-18 21:49:02 +0000: Waiting for upgrade task to finish
2017-04-18 21:49:02 +0000: Done vSAN upgrade
Depending on your vSAN size, this task may take a lot of time.
- Use the vsan.obj_status_report command to verify that the object versions are upgraded to the new on-disk format.
> vsan.obj_status_report ~vsan
2017-04-18 21:50:13 +0000: Querying all VMs on vSAN ...
2017-04-18 21:50:13 +0000: Querying all objects in the system from vesx1.virten.lab ...
2017-04-18 21:50:14 +0000: Querying all disks in the system from vesx1.virten.lab ...
2017-04-18 21:50:14 +0000: Querying all components in the system from vesx1.virten.lab ...
2017-04-18 21:50:15 +0000: Querying all object versions in the system ...
2017-04-18 21:50:18 +0000: Got all the info, computing table ...

Histogram of component health for non-orphaned objects

+-------------------------------------+------------------------------+
| Num Healthy Comps / Total Num Comps | Num objects with such status |
+-------------------------------------+------------------------------+
| 3/3 (OK)                            |  3                           |
+-------------------------------------+------------------------------+
Total non-orphans: 3


Histogram of component health for possibly orphaned objects

+-------------------------------------+------------------------------+
| Num Healthy Comps / Total Num Comps | Num objects with such status |
+-------------------------------------+------------------------------+
+-------------------------------------+------------------------------+
Total orphans: 0

Total v1 objects: 0
Total v2 objects: 0
Total v2.5 objects: 0
Total v3 objects: 0
Total v5 objects: 3
The Virtual SAN cluster upgrade is now completed. Verify the vSAN license as in some cases, you must reapply licenses.
Thanks for the nice article.
Upgrading the vSAN on-disk format to version 5.0 will cause downtime or Performance hit on running guest
read your step 4 "Start the upgrade with vsan.ondisk_upgrade". Have you noticed that it took only 2 minutes and really no disk conversion was done since they were already compliant?
That does not make sense.
Any comment?
Some ondisk updates do only change meta information, so no data needs to be moved. This usually takes a few minutes.
However, in that case, the output looks odd. It might be possible that I've copied two outputs together...