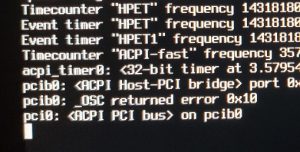
When you try to install FreeNAS 11 on the new HPE ProLiant MicroServer Gen10 X3216, the installer stops booting and appears to be stuck at:
pcib0: <ACPI Host-PCI bridge> port 0xcf8-0xcff on acpi0
pcib0: _OSC returned error 0x10
pci0: <ACPI PCI bus> on pcib0
This article explains how to fix the issue during the installation and how to apply the fix at an installed system using the FreeNAS Web Interface.
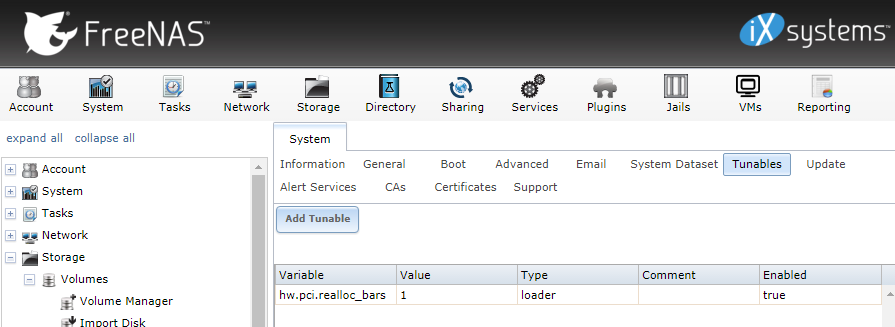
Fix the Problem from the FreeNAS Web Interface
When you've already installed FreeNAS, the problem can be fixed by adding the tunable hw.pci.realloc_bars=1 to the Boot Loader config. This step can be easily done from the Web-Gui:
- Open FreeNAS Web-Interface
- Login as root
- Navigate to System > Tunables
- Click Add Tunable
- Add the following tunable:Variable: hw.pci.realloc_bars
Value: 1
Type: Loader
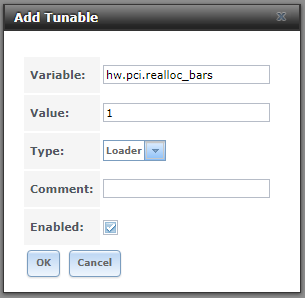
- Reboot FreeNAS
After rebooting FreeNAS, the Console should be functional. Tested with FreeNAS 11.0-U4.
Installation Option 1 - Edit Grub Config during Startup
The problem can be permanently fixed by editing the configuration from the Grub Menu.
- When the Grub Bootloader shows up, press e to edit the configuration
- Add set kFreeBSD.hw.pci.realloc_bars=1 to the configuration
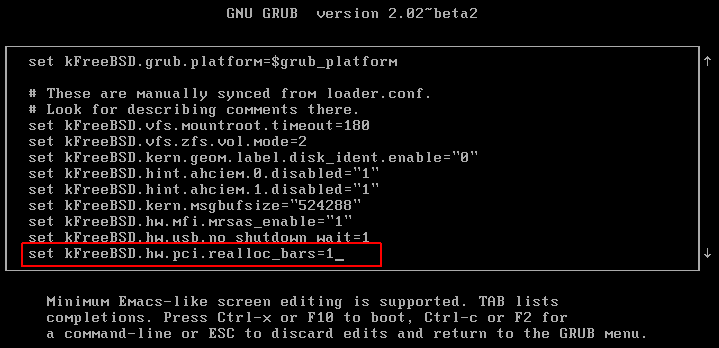
Note: My system failed to display the underline character. It shows a blank, instead of the underscore. However, it still works.

- Press F10 to boot
- Install FreeNAS
Installation Option 2 - Customized FreeNAS Installer ISO
You can also customize the FreeNAS Installer ISO to make manual changes in the grub config obsolete. This requires a Linux machine with the ISO management tool Xorriso.
- Download FreeNAS ISO:
# cd /tmp/;wget https://download.freenas.org/11/latest/x64/FreeNAS-11.0-U4.iso
- Create a mount point for the ISO:
# mkdir /mnt/freenas
- Extract the MBR from the ISO:
# dd if=/tmp/FreeNAS-11.0-U4.iso bs=512 count=1 of=/tmp/freenas.mbr
- Identify Volume id und Modification time from the ISO:
# xorriso -indev /tmp/FreeNAS-11.0-U4.iso -toc -pvd_info |egrep 'Volume id|Modif. Time'
Volume id: FreeNAS
Modification time: 2017092507154900 - Mount the ISO file
mount -o loop /tmp/FreeNAS-11.0-U4.iso /mnt/freenas
- Copy end edit grub.cfg
cp /mnt/freenas/boot/grub/grub.cfg /tmp/
sed -i s/set\ kFreeBSD.hw.usb.no_shutdown_wait=1/set\ kFreeBSD.hw.usb.no_shutdown_wait=1\\n\ \ set\ kFreeBSD.hw.pci.realloc_bars=1/g /tmp/grub.cfg
- Create variables containing the paths from both, the old and the new, grub config.
oldg=/boot/grub/grub.cfg
newg=/tmp/grub.cfg
- Create the custom ISO with changed grub.cfg. Make sure to keep original Volume ID and timestamp.
xorriso -as mkisofs -o /tmp/FreeNAS-11.0-U4-Gen10.iso -r -V 'FreeNAS' --grub2-mbr /tmp/freenas.mbr --protective-msdos-label -efi-boot-part --efi-boot-image -c '/boot.catalog' -b '/boot/grub/i386-pc/eltorito.img' -no-emul-boot -boot-load-size 4 -boot-info-table --grub2-boot-info -eltorito-alt-boot -e '/efi.img' -no-emul-boot --modification-date=2017092507154900 /mnt/freenas/ -graft-points "$oldg"="$newg"
- Write the Image using dd or Image Writer to a flash drive.
- Use the flash drive to install FreeNAS
Expected Xorriso output:
#Output von xorriso:
Drive current: -outdev 'stdio:/tmp/FreeNAS-11.0-U4-Gen10.iso'
Media current: stdio file, overwriteable
Media status : is blank
Media summary: 0 sessions, 0 data blocks, 0 data, 126g free
xorriso : WARNING : -volid text does not comply to ISO 9660 / ECMA 119 rules
Added to ISO image: directory '/'='/mnt/freenas'
xorriso : UPDATE : 637 files added in 1 seconds
Added to ISO image: file '/boot/grub/grub.cfg'='/tmp/grub.cfg'
xorriso : UPDATE : 638 files added in 1 seconds
xorriso : NOTE : Copying to System Area: 512 bytes from file '/tmp/freenas.mbr'
xorriso : UPDATE : 1.31% done
xorriso : UPDATE : 2.96% done
xorriso : UPDATE : 8.87% done
xorriso : UPDATE : 14.79% done, estimate finish Fri Oct 27 13:47:19 2017
xorriso : UPDATE : 20.70% done, estimate finish Fri Oct 27 13:47:19 2017
xorriso : UPDATE : 26.62% done, estimate finish Fri Oct 27 13:47:19 2017
xorriso : UPDATE : 31.78% done, estimate finish Fri Oct 27 13:47:19 2017
xorriso : UPDATE : 35.49% done, estimate finish Fri Oct 27 13:47:20 2017
xorriso : UPDATE : 39.24% done, estimate finish Fri Oct 27 13:47:21 2017
xorriso : UPDATE : 44.36% done, estimate finish Fri Oct 27 13:47:21 2017
xorriso : UPDATE : 47.32% done, estimate finish Fri Oct 27 13:47:22 2017
xorriso : UPDATE : 53.23% done, estimate finish Fri Oct 27 13:47:22 2017
xorriso : UPDATE : 59.15% done, estimate finish Fri Oct 27 13:47:21 2017
xorriso : UPDATE : 62.10% done, estimate finish Fri Oct 27 13:47:22 2017
xorriso : UPDATE : 68.02% done, estimate finish Fri Oct 27 13:47:22 2017
xorriso : UPDATE : 72.42% done, estimate finish Fri Oct 27 13:47:21 2017
xorriso : UPDATE : 76.89% done, estimate finish Fri Oct 27 13:47:22 2017
xorriso : UPDATE : 80.79% done, estimate finish Fri Oct 27 13:47:22 2017
xorriso : UPDATE : 85.76% done, estimate finish Fri Oct 27 13:47:22 2017
xorriso : UPDATE : 93.05% done
xorriso : UPDATE : 100.00% done
ISO image produced: 277008 sectors
Written to medium : 277008 sectors at LBA 0
Writing to 'stdio:/tmp/FreeNAS-11.0-U4-Gen10.iso' completed successfully.
Installation Option 3 - Use another System
Use another System to Install FreeNAS and transfer the flash drive to the Gen10 Microserver. The problem only affects Display and VGA output. The system will boot headless. You can't see console output, but the system will be available on the network.
Installation Option 4 - Install FreeNAS with VMware Workstation
Use VMware Workstation to install FreeNAS to a USB flash drive, transfer it to the System and boot it:
- Create a New Virtual Machine
- OS-Type: Other > FreeBSD 64-bit
- 2 vCPU / 4GB Memory
- No HDD required - Mount the FreeNAS Installer ISO file and select "Connect at power on"
- Power on the Virtual Machine
- Connect a USB Flash Drive to the Virtual Machine. Make sure that it is connected by verifying the Disk Icon in the bottom right corner.
- Boot the Installer
- Select Install/Upgrade
- You can safely ignore the memory warning.
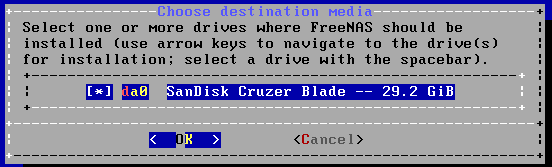
- Select your USB drive as destination media
- Enter your desired root password
- Select "Boot via UEFI". (The Gen10 Microserver comes with UEFI enabled by default. You use BIOS mode if you prefer, but then you have to configure the Microserver to use BIOS too.)
- Wait until the Installer has finished.

You do now have FreeNAS installed to a flash drive. Power off the virtual machine, plug the drive into your Gen10 Microserver and boot from it. The system still apears to be stuck at pci0: <ACPI PCI bus> on pcib0 (We will fix that later!), but it will silently boot in the background. If you have a DHCP server, check the log and wait until FreeNAS gets an IP Address. You should be able to acces the web interface and do the configuration.
If you don't have a DHCP server, alternatively boot the flash drive in VMware Workstation. (Booting from USB drives in VMware Workstation)
Thank you to Tobias Riewoldt for providing the Grub and Custom ISO fix.
Thank you to Bob Bishop for pointing me in the right direction.
Just wanted to throw out a random THANK YOU for this. I can't belive how obscure this error was. I was helping my dad with the installation and we got stuck booting the installer USB drive.
Editing the grub config as stated in option 1 worked perfectly! Just had to do it on both the installer USB drive and then again on the USB drive we installed it on
A big thank you, an excellent procedure with attention to detail, I wish all such assistance was written to this standard
What a well done article! Your solution worked flawlessly.
Thank you very much!
Thank you very much for first of all debugging the problem, and then providing a clear guide for numpties like myself to follow!
May your networks never be clogged and the processors run cool for you!
Bullseye!
Thank you man!
Thanks! It worked and saved my day!
In the section "Installation Option 1 - Edit Grub Config during Startup" the second image that shows a close in crop of "set..." is missing the 'kFreeBSD.' part.
Wow! Again a super thank you for such a great fix and well documented how to!
Pat
In order to boot into FreeNAS that is now installed on the system I have to enter the set kFreeBSD.hw.pci.realloc_bars=1 every time. Is there a way to save that entry permanently?
It should be permanent if you add it to the Web Interface as explained in the article.
Many thanks for excellent instructions :-)
FreeBSD Bug #221350 is still unresolved, and this method is no longer working as of FreeNAS 11.2-RC2. The boot loader has changed from GRUB to the native FreeBSD boot loader.
New work around may be to extract the iso and use a hex editor to change the value of realloc_bars to zero in boot/kernel/kernel and/or add the options to boot/loader.conf. Haven't had success with either.
Just use default ISO. Press "3" at boot, then "Esc", then type "set hw.pci.realloc_bars=1" followed by "boot". Then you can apply the work-around in the GUI still in 11.2 from web panel after a successful boot.
Perfect It worked!
Thank you!!!
So simple! Thank You very much Sir !
Oh, god! It worked! Thanks a lot.
For Freenas 11.2 the grub file does not exist anymore and was changed into /mnt/freenas/boot/loader.conf
Thanks for this! Even though the 11.2 doesn't use GRUB anymore, with a tiny bit of additional research, I was able to figure out how to add the configuration change to the BSD bootloader (just drop "kFreeBSD.") and install FreeNAS with UEFI. Then the same procedure to get THAT to boot, then your instructions on the running system.
Thanks for doing the research legwork on that!
Thanks a lot for the guide!
Thank you thank you THANK YOU! Worked great on my HPE ProLiant Microserver Gen10 with FreeNAS 11.3 U1: the at-boot flag got the system up and running, and i was able to make the change permanent via the GUI.
What do I do for an exisiting freenas 11.3 installation? I just tried to upgrade from a g7 microserver to a gen10. Now I'm getting this Pci0 hanging issue.
Is there a way to edit the boot somehow? Or do I need to reinstall?
got it, thanks to DD4711 on the ixsystems forum
Do this on boot:
Wait for the FreeBSD Boot menu
press 3
Press 6 to select "Escape to loader prompt"
enter: set hw.pci.realloc_bars=1
enter: boot
option 3 and fixing from the web interface works for me .... thanks a lot ...