VMware is moving their vCenter Server from Windows to the Linux based Photon OS. The following tips and tricks might come handy when working with the vCenter Service Appliance 6.7:
- Enable SSH
- File Transfer with SCP/SFTP
- Public Key Authentication
- Disable or Increase Shell Session Timeout
- Password expiration
- Reset vCenter Server Appliance 6.7 root password
- Create a Backup Job
- Certificate Warning
Enable SSH
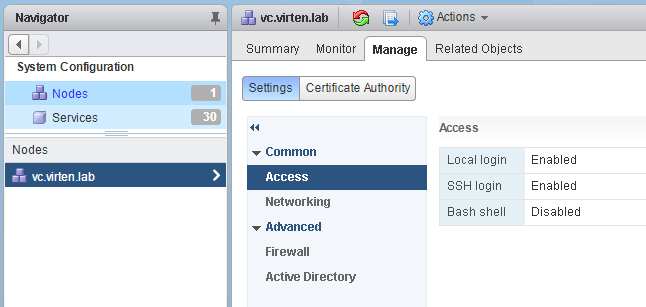
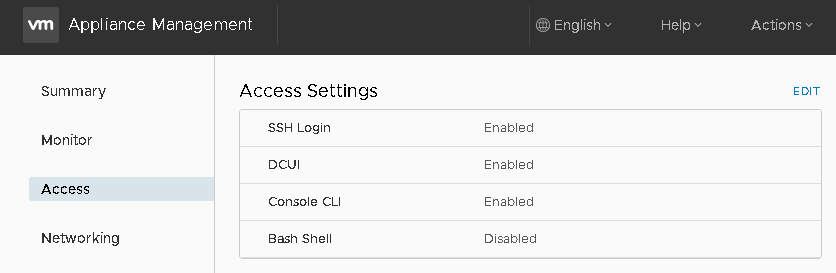
For troubleshooting vCenter and ESXi hosts, SSH is essential. SSH access to the vCenter Server Appliance is disabled by default but can be activated during the deployment wizard. To enable SSH later you can either activate the service from the DCUI (Troubleshooting Options), from the Appliance Management or from the vSphere Web Client. I haven't found the option in the HTML5 Client yet.
Web Client > Administration > Deployment > System Configuration > Nodes > vCenter > Manage > Settings > Access
Appliance Management (https://[VCENTER]:5480/) > Access
After connecting to the vCSA with SSH you see the proprietary Appliance Shell. To open the fully featured Bash, just type "shell".
File Transfer with SCP/SFTP
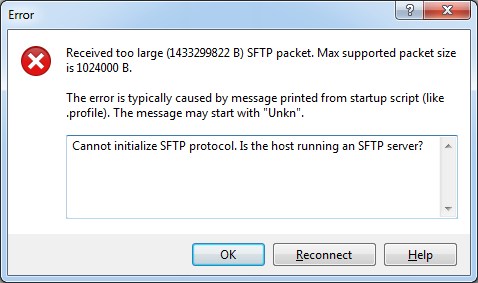
To transfer files between your PC and the vCSA you typically use WinSCP or similar tools. This does not work out of the box because the default shell for the root user has been configured to Appliance Shell instead of Bash. When you use WinSCP to connect to the vCSA, the following error is displayed:
Received too large SFTP packet. Max supported packet site is 1024000 B.
Cannot initialize SFTP Protocol. Is this host running an SFTP Server?
To be able to connect with WinSCP, the default shell has to be configured to /bin/bash:
# chsh -s "/bin/bash" root
If you want to revert this change later and reactivate the Appliance Shell, change the default shell back to /bin/appliancesh:
# chsh -s /bin/appliancesh root
Public Key Authentication
When working with Linux you typically use SSH keys instead of passwords to log in. Public Key authentication is an authentication method that relies on a generated public/private key pair and enables the login without entering a password. If you are not familiar with SSH Public Key Authentication, read this post where I am explaining the basics.
The vCSA 6.7 already has a preconfigured authorized_keys file. Just add your key to the file by editing it with vi, or with echo/pipe:
echo "ssh-rsa AAAAB[....] fgrehl" >> /root/.ssh/authorized_keys
Now you should be able to connect to the vCSA with your key. Please note that you can't use the Appliance Shell when you log in without your key.
Disable or Increase Shell Session Timeout
As a security feature, you are automatically logged out after being inactive for 15 minutes. You can view the current configuration with echo $TMOUT. The value is in seconds (900 seconds = 15 minutes):
root@vc [ ~ ]# echo $TMOUT
900
The timeout can be modified in /etc/profile.d/tmout.sh:
- Open /etc/profile.d/tmout.sh with an editor
- change the line TMOUT=900 to the desired value
- Save and close the file
- Log out and log back in
If you want to completely disable session timeout, delete the tmout.sh script:
root@vc [ ~ ]# rm /etc/profile.d/tmout.sh
Password expiration
There are two authentication sources where passwords are configured to expire by default. The root user configured in the Appliance Management and all SSO users expire after 90 days. This behavior can be configured:
Root password:
Appliance Management (https://[VCENTER]:5480/) > Administration > Password expiration settings
SSO Users (eg. administrator@vsphere.local):
Web Client > Administration > Single Sign-On > Configuration > Policies
Reset vCenter Server Appliance 6.7 root password
The following method provides steps to recover the vCenter Server Appliance (vCSA) root password. The process is identical to the previous version (vCenter 6.5). The method is officially supported by VMware and documented in KB2147144.
- Take a snapshot of the vCSA to be able to rollback in case of any problems during password recovery.
- Connect to the ESXi Host that runs the vCSA and open a remote console.
- Reboot the vCSA
- Press e immediately after the system starts (When the Photon screen shows up)

- Append rw init=/bin/bash to the line starting with linux
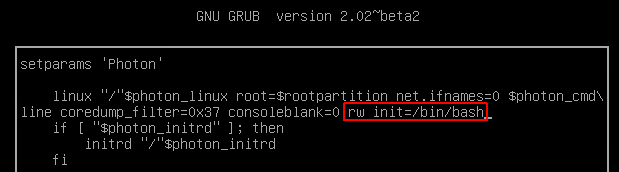
- Press F10 to boot
- In the command prompt, enter passwd and enter a new root password twice
- Enter umount / to unmount the root filesystem
- Reboot the vCSA by running the command reboot -f
- Verify that you can log in with the new root password and delete the snapshot created in step 1.
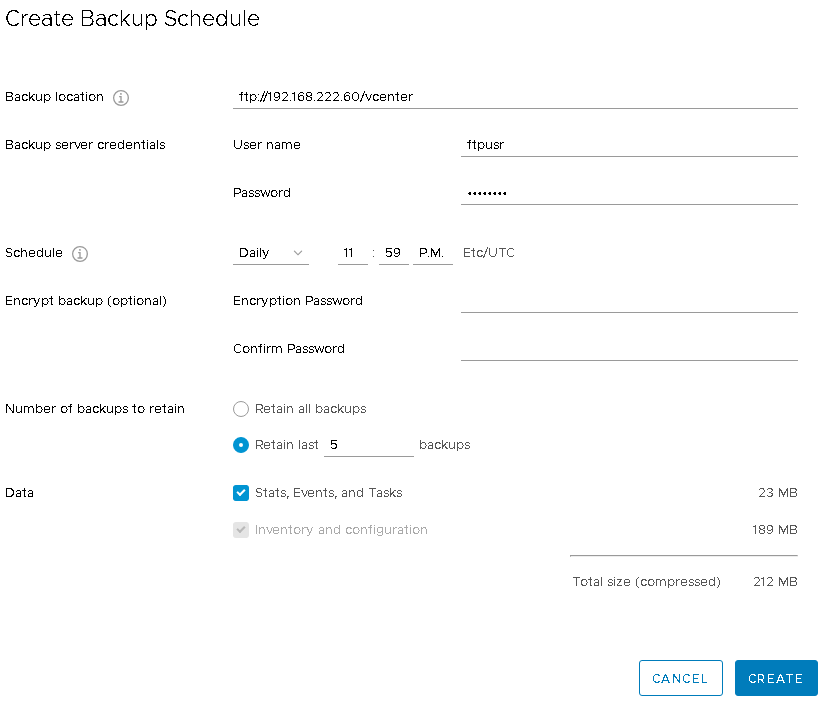
Create a Backup Job
Don't forget to backup your vCenter Server Appliance. The Appliance has an embedded backup scheduler that allows you to create backups without 3rd party tools:
Open Appliance Management (https://[VCENTER]:5480/) and navigate to Backup > Configure
 Configure a backup target (FTP, FTPS, HTTP, HTTP or SCP), the backup schedule and a retention policy.
Certificate Warning
To get rid of browser security certificate warnings you have to add the VMCA Root certificate to your local Trusted Root Certificate store. You can either download the certificate from the vCenter Website:

Your section for Certificate Warning is in a non-English language (possibly German). Please provide a translation. Thanks!
Replaced the image with the English version. Hadn't noticed, thanks.
Great post, THX!
I know you're not a VMWare supports person but I tried replacing the vCenter SSL certificates with a signed cert from a 3rd party CA (CACert) for my Lab machine. "Failed to connect to VMWare loopup service - https:///loopkupservice/sdk." is what I get when trying to log in. The regular vCenter Website and Appliance MGMT site can be opened just fine without errors. Resetting all vCenter appliance certificates work nicely.
good info thanks! how do you config the log browser for vcsa version 6.7?
Thanks for sharing!
Reset vCenter Server Appliance 6.7 root password:
This is missing before running passwd
mount -o remount,rw /
that command is not necessary because the read/write parameter is already given through kernel parameters at boot time (step 5)