
Many people are using the USB NIC Fling by William Lam and Songtao Zheng in homelabs. To make a fresh installation or upgrade as simple as possible, I've created a new Image Profile that contains the USB NIC driver.
This article explains how to create a custom ESXi 7.0 Image including the NIC driver to either upgrade previous versions of ESXi or make a fresh ESXi installation with USB NIC support.
Create a custom ESXi 7.0 Images including the USB NIC Driver
- Download USB NIC Fling (ESXi700-VMKUSB-NIC-FLING-34491022-component-15873236.zip)
- Copy the USB NIC Driver to your build directory (eg. c:\esx\
- Open PowerShell
- (optional) Install VMware PowerCLI from the PowerShell Gallery
Install-Module -Name VMware.PowerCLI -Scope CurrentUser
- Change to your build directory
cd c:\esx\
- Clone the original Image Profile, add the driver and export to ISO and Zip Bundle.
Add-EsxSoftwareDepot https://hostupdate.vmware.com/software/VUM/PRODUCTION/main/vmw-depot-index.xml
Export-ESXImageProfile -ImageProfile "ESXi-7.0.0-15843807-standard" -ExportToBundle -filepath ESXi-7.0.0-15843807-standard.zip
Remove-EsxSoftwareDepot https://hostupdate.vmware.com/software/VUM/PRODUCTION/main/vmw-depot-index.xml
Add-EsxSoftwareDepot .\ESXi-7.0.0-15843807-standard.zip
Add-EsxSoftwareDepot .\ESXi700-VMKUSB-NIC-FLING-34491022-component-15873236.zip
New-EsxImageProfile -CloneProfile "ESXi-7.0.0-15843807-standard" -name "ESXi-7.0.0-15843807-USBNIC" -Vendor "virten.net"
Add-EsxSoftwarePackage -ImageProfile "ESXi-7.0.0-15843807-USBNIC" -SoftwarePackage "vmkusb-nic-fling"
Export-ESXImageProfile -ImageProfile "ESXi-7.0.0-15843807-USBNIC" -ExportToIso -filepath ESXi-7.0.0-15843807-USBNIC.iso
Export-ESXImageProfile -ImageProfile "ESXi-7.0.0-15843807-USBNIC" -ExportToBundle -filepath ESXi-7.0.0-15843807-USBNIC.zip
- You should now have two files in your build directory:
ESXi-7.0.0-15843807-USBNIC.iso
ESXi-7.0.0-15843807-USBNIC.zip
With the two files, you can either make a fresh ESXi 7.0 install or upgrade from previous versions.
Create a Bootable ESXi 7.0 Installer USB Flash Drive
- Download Rufus
- Connect the USB flash drive to your computer
- Open Rufus
- Select your Device
- Select your custom ISO file as Boot selection
- Do not change anything else
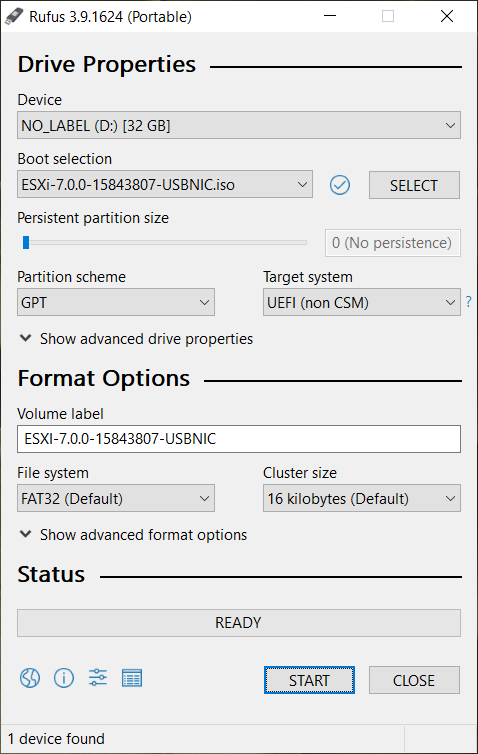
- Press START
- Use the Flash Drive to install ESXi 7.0.
In some cases, ESXi Installation might fail at 81%. See here for a solution.
Upgrade to ESXi 7.0 with USB NIC Driver
Updating previous versions is very simple. Copy the zip bundle to a datastore and run the following command and reboot the host:
# esxcli software profile install -p ESXi-7.0.0-15843807-USBNIC -d /vmfs/volumes/[datastore]/ESXi-7.0.0-15843807-USBNIC.zip
Are there some additional steps? I mean, it definitely works in that it gets me past the initial error where it says no compatible NIC is detected.
But then about 81% into the install, there's an error that about "Exception: No vmknic tagged for management was found"
I have the same problem at 81%
I figured it out. When the install completes, push Alt+F1 to get to a shell.
Use root for username, just press enter for password (blank password).
Then you want to follow the instructions available at https://flings.vmware.com/usb-network-native-driver-for-esxi#instructions
Run the command: vi /etc/rc.local.d/local.sh
Essentially you're going to manually type in the code for Standard Virtual Switch.
This must be done at the end of the install (prior to re-booting) otherwise you will have to re-do the install, since Alt+F1 won't give you an option to login.
Hope this helps!
---
There's probably a way to modify local.sh in the image rather than typing it manually, but I don't know how to do that.
See here: https://www.virten.net/2020/07/solution-esxi-installation-with-usb-nic-only-fails-at-81/
Worked a treat:) Here's an updated script with the current (March'21) updates -
Add-EsxSoftwareDepot https://hostupdate.vmware.com/software/VUM/PRODUCTION/main/vmw-depot-index.xml
Export-ESXImageProfile -ImageProfile "ESXi-7.0U1d-17551050-standard" -ExportToBundle -filepath ESXi-7.0U1d-17551050-standard.zip
Remove-EsxSoftwareDepot https://hostupdate.vmware.com/software/VUM/PRODUCTION/main/vmw-depot-index.xml
Add-EsxSoftwareDepot .\ESXi-7.0U1d-17551050-standard.zip
Add-EsxSoftwareDepot .\ESXi701-VMKUSB-NIC-FLING-40599856-component-17078334.zip
New-EsxImageProfile -CloneProfile "ESXi-7.0U1d-17551050-standard" -name "ESXi-7.0U1d-17551050-USBNIC" -Vendor "virten.net"
Add-EsxSoftwarePackage -ImageProfile "ESXi-7.0U1d-17551050-USBNIC" -SoftwarePackage "vmkusb-nic-fling"
Export-ESXImageProfile -ImageProfile "ESXi-7.0U1d-17551050-USBNIC" -ExportToIso -filepath ESXi-7.0U1d-17551050-USBNIC.iso
Export-ESXImageProfile -ImageProfile "ESXi-7.0U1d-17551050-USBNIC" -ExportToBundle -filepath ESXi-7.0U1d-17551050-USBNIC.zip
@Brada
Add-EsxSoftwareDepot : The 'Add-EsxSoftwareDepot' command was found in the module 'VMware.ImageBuilder', but the
module could not be loaded. For more information, run 'Import-Module VMware.ImageBuilder'.
At line:1 char:1
+ Add-EsxSoftwareDepot https://hostupdate.vmware.com/software/VUM/PRODU ...
+ ~~~~~~~~~~~~~~~~~~~~
+ CategoryInfo : ObjectNotFound: (Add-EsxSoftwareDepot:String) [], CommandNotFoundException
+ FullyQualifiedErrorId : CouldNotAutoloadMatchingModule
That's on very first command?!?! I'm stuck at 1st step (after the install module and cd c:\esx)
Given that ESXi 7.0 is a free download I really dont get why we can't make "fixed" ISOs available for download?!
Did you run 'Import-Module VMware.ImageBuilder', as stated in the error message?
Which PowerShell Version are you using? Did you try with Core and/or 32bit version?
Thanks, no I didn't cos I assumed the script would work as it claimed. I just tried that Import-module and that also errored. I am losing the will to live!
Why so bitter? IT is all about reading and understanding error messages...
Please try with 32bit version of Powershell. You might have hit the PowerCLI 64bit bug.
Thanks, I did try x86 version and no joy. Same error regarding import. I noticed it says \Documents\WindowsPowerShell\Modules\VMware.VimAutomation.Sdk\12.2.0.17531155\VMware
.VimAutomation.Sdk.psm1 cannot be loaded because running scripts is disabled on this system. For more information, see
about_Execution_Policies at https:/go.microsoft.com/fwlink/?LinkID=135170."
So I am guessing it needs something at beginning of the scripts... seen it on many PS scripts about execution policy
Run as administrator:
Set-ExecutionPolicy RemoteSignedTrying my hand at a ESXi 7.0 install, and I'm fresh noob here. Assuming I need to build a new ISO from a Win10 box... but... um, how do I get the necessary Powershell commands? Is that the VMWare.PowerCLI component?
Yes. As explained in Step 4.
Install-Module -Name VMware.PowerCLI -Scope CurrentUser
Got it built and the ISO went in nicely. However, the adapter I have (a AmazonBasics USB 3.0 GigE using an ASIX88179 chip) seems to drop out when moving heavy loads (like an ISO). I've ordered a new adapter based on the RTL chipset.
Got the RTL-chipset based adapter in and it is much more stable now. Time to get the show on the road.
Thanks, that did it... sorry, feeling grumpy today. Your help appreciated. I have an ISO now and as soon as my USB NIC arrives I can try ESXi :-)
Sounds like you’re under control. As a FYI: If you don’t have the PowerCLI installed & need to retrieve it from MS PS gallery, I had to force TLS 1.2 to establish a connection.
[Net.ServicePointManager]::SecurityProtocol = [Net.ServicePointManager]::SecurityProtocol -bor [Net.SecurityProtocolType]::Tls12
Register-PSRepository -Default -Verbose
Set-PSRepository -Name "PSGallery" -InstallationPolicy Trusted
Install-Module -Name VMware.PowerCLI -Scope CurrentUser
Does someone have the ISO hosted somewhere (Latest 7.0 U2 with the USB Fling drivers). I've tried on three different machines and I cannot for the life of me get the scripts to run. Even doing it manually fails.
Or, can someone provide step by step instructions/commands to run in PSConsole to create the ISO for a clean install? I know my USB Ethernet dongle is supported (TP Link) but I've spent 2 days on this so far without luck. Really need a precompiled ISO here which would be best.
This article is actually a "step by step" instruction with the commands you have to run. Can you elaborate what "fails" means? Which command fails and what error message do you get?
I'm not allowed to publish ISO files.
Would you be able to post the steps/Powershell commands for the latest USB Fling and VMWare ESXI ESXi-7.0U2d-18538813-standard?
Everything works except for the part where I try to add the USB Fling drivers to the ESXi-7.0U2d-18538813-standard zip. Spits out the error:
PS D:\> Add-EsxSoftwarePackage -ImageProfile "ESXi-7.0U2d-18538813-standard-ryzen" -SoftwarePackage "vmkusb-nic-fling"
Add-EsxSoftwarePackage : VIB VMW_bootbank_vmkusb-nic-fling_1.8-3vmw.703.0.15.51233328 requires vmkapi_2_9_0_0, but the requirement
cannot be satisfied within the ImageProfile.
At line:1 char:1
+ Add-EsxSoftwarePackage -ImageProfile "ESXi-7.0U2d-18538813-standard-r ...
+ ~~~~~~~~~~~~~~~~~~~~~~~~~~~~~~~~~~~~~~~~~~~~~~~~~~~~~~~~~~~~~~~~~~~~~
+ CategoryInfo : InvalidData: (VMware.ImageBuilder.Types.ImageProfile:ImageProfile) [Add-EsxSoftwarePackage], Exception
+ FullyQualifiedErrorId : EsxImageProfileValidationError,VMware.ImageBuilder.Commands.AddProfilePackage
Add-EsxSoftwarePackage : VIB VMW_bootbank_vmkusb-nic-fling_1.8-3vmw.703.0.15.51233328 requires vmkapi_incompat_2_9_0_0, but the
requirement cannot be satisfied within the ImageProfile.
At line:1 char:1
+ Add-EsxSoftwarePackage -ImageProfile "ESXi-7.0U2d-18538813-standard-r ...
+ ~~~~~~~~~~~~~~~~~~~~~~~~~~~~~~~~~~~~~~~~~~~~~~~~~~~~~~~~~~~~~~~~~~~~~
+ CategoryInfo : InvalidData: (VMware.ImageBuilder.Types.ImageProfile:ImageProfile) [Add-EsxSoftwarePackage], Exception
+ FullyQualifiedErrorId : EsxImageProfileValidationError,VMware.ImageBuilder.Commands.AddProfilePackage
I've tried adding the 702 fling drviers but get the same error. Is there a way to remove the 703 drivers via Remove-EsxSoftwarePackage? I've tried a few commands but all fail to remove it. My though was if I can remove it, I can try with the 702 fling drivers.
Been working on this now for 2 days, multiple guides on the Internet. Either I'm dumb or something is broken somewhere. And obviously I cannot try with 7.0U3 as it was pulled.
I figured it out by using the Remove-EsxSoftwareDepot command. ISO Created.
If my USB NIC doesn't work, I'm done LOL
I need to install ESXi7 to a barebone machine it has RealTek 8168 series. ESXi boot fails. Can I download a compatible driver and add to the Bootable USB or the ISO so ESXi can find native support for thedriver and installation succeeds?
There are no Realtek drivers for ESXi 7.0. You have to stick to ESXi 6.7 or use USB-based network adapters.
What I am looking for, and I need your guidance if that's a way to do it, is to
1. download driver package, keep on separate removable media
2. Boot from a ESXi 7.0 USB
3. When installation complains about no network,open prompt and load driver package.
Or, add the driver package to ISO file and make fresh esxi 7 bootable usb.
please advise
Thats not the way to go in ESXi. You have to inject the Image into your ESXi Image as described in the article.
Thanks, works the script bellow works for 7.02a
Add-EsxSoftwareDepot https://hostupdate.vmware.com/software/VUM/PRODUCTION/main/vmw-depot-index.xml
Export-ESXImageProfile -ImageProfile "ESXi-7.0U2a-17867351-standard" -ExportToBundle -filepath ESXi-7.0U2a-17867351-standard.zip
Remove-EsxSoftwareDepot https://hostupdate.vmware.com/software/VUM/PRODUCTION/main/vmw-depot-index.xml
Add-EsxSoftwareDepot .\ESXi-7.0U2a-17867351-standard.zip
Add-EsxSoftwareDepot .\ESXi702-VMKUSB-NIC-FLING-47140841-component-18150468.zip
New-EsxImageProfile -CloneProfile "ESXi-7.0U2a-17867351-standard" -name "ESXi-7.0U2a-17867351-USBNIC" -Vendor "virten.net"
Add-EsxSoftwarePackage -ImageProfile "ESXi-7.0U2a-17867351-USBNIC" -SoftwarePackage "vmkusb-nic-fling"
Export-ESXImageProfile -ImageProfile "ESXi-7.0U2a-17867351-USBNIC" -ExportToIso -filepath ESXi-7.0U2a-17867351-USBNIC.iso
Export-ESXImageProfile -ImageProfile "ESXi-7.0U2a-17867351-USBNIC" -ExportToBundle -filepath ESXi-7.0U2a-17867351-USBNIC.zip
Cool tutorial, you're my savior. I tried adopting what I found in your article and in the comments for the most recent release but I failed. This is what I tried.
Add-EsxSoftwareDepot https://hostupdate.vmware.com/software/VUM/PRODUCTION/main/vmw-depot-index.xml
Export-ESXImageProfile -ImageProfile "ESXi-7.0U3d-19482537-standard" -ExportToBundle -filepath ESXi-7.0U3d-19482537-standard.zip
Remove-EsxSoftwareDepot https://hostupdate.vmware.com/software/VUM/PRODUCTION/main/vmw-depot-index.xml
Add-EsxSoftwareDepot .\ESXi-7.0U3d-19482537-standard.zip
Add-EsxSoftwareDepot .\ESXi703-VMKUSB-NIC-FLING-51233328-component-18902399.zip
New-EsxImageProfile -CloneProfile "ESXi-7.0U3d-19482537-standard" -name "ESXi-7.0U3d-19482537-USBNIC" -Vendor "virten.net"
Add-EsxSoftwarePackage -ImageProfile "ESXi-7.0U3d-19482537-USBNIC" -SoftwarePackage "vmkusb-nic-fling"
Export-ESXImageProfile -ImageProfile "ESXi-7.0U3d-19482537-USBNIC" -ExportToIso -filepath ESXi-7.0U3d-19482537-USBNIC.iso
Export-ESXImageProfile -ImageProfile "ESXi-7.0U3d-19482537-USBNIC" -ExportToBundle -filepath ESXi-7.0U3d-19482537-USBNIC.zip
Running
Export-ESXImageProfile -ImageProfile "ESXi-7.0U3d-19482537-USBNIC" -ExportToIso -filepath ESXi-7.0U3d-19482537-USBNIC.iso
gives me this:
Export-ESXImageProfile : Error retrieving file for VIB 'VMW_bootbank_vmkusb-nic-fling_1.8-3vmw.703.0.15.51233328':
("", "Error opening file object for VIB
'VMW_bootbank_vmkusb-nic-fling_1.8-3vmw.703.0.15.51233328': Expected value '[]' for attribute 'swplatforms', but found
value '[]'.").
In Zeile:1 Zeichen:1
+ Export-ESXImageProfile -ImageProfile "ESXi-7.0U3d-19482537-USBNIC" -E ...
+ ~~~~~~~~~~~~~~~~~~~~~~~~~~~~~~~~~~~~~~~~~~~~~~~~~~~~~~~~~~~~~~~~~~~~~
+ CategoryInfo : NotSpecified: (:) [Export-EsxImageProfile], SoapException
+ FullyQualifiedErrorId : System.Web.Services.Protocols.SoapException,VMware.ImageBuilder.Commands.ExportProfile
What am I doing wrong? The file 'vib20/vmkusb-nic-fling/VMW_bootbank_vmkusb-nic-fling_1.8-3vmw.703.0.15.51233328.vib' is in the ZIP archive.
I figured it out. On this line use Vendor "VMW"
New-EsxImageProfile -CloneProfile "ESXi-7.0U3d-19482537-standard" -name "ESXi-7.0U3d-19482537-USBNIC" -Vendor "VMW"
This is the Vendor name inside the VIB file.
Unfortunately not for me. Same error:
I used
New-EsxImageProfile -CloneProfile "ESXi-7.0U3d-19482537-standard" -name "ESXi-7.0U3d-19482537-USBNIC" -Vendor "VMW"
and then
Add-EsxSoftwarePackage -ImageProfile "ESXi-7.0U3d-19482537-USBNIC" -SoftwarePackage "vmkusb-nic-fling"
and finally
Export-ESXImageProfile -ImageProfile "ESXi-7.0U3d-19482537-USBNIC" -ExportToIso -filepath ESXi-7.0U3d-19482537-USBNIC.iso
gave me this:
Export-ESXImageProfile : Error retrieving file for VIB
'VMW_bootbank_vmkusb-nic-fling_1.8-3vmw.703.0.15.51233328': ("", "Error opening file object for VIB
'VMW_bootbank_vmkusb-nic-fling_1.8-3vmw.703.0.15.51233328': Expected value '[]' for attribute 'swplatforms', but
found value '[]'.").
In Zeile:1 Zeichen:1
+ Export-ESXImageProfile -ImageProfile "ESXi-7.0U3d-19482537-USBNIC" -E ...
+ ~~~~~~~~~~~~~~~~~~~~~~~~~~~~~~~~~~~~~~~~~~~~~~~~~~~~~~~~~~~~~~~~~~~~~
+ CategoryInfo : NotSpecified: (:) [Export-EsxImageProfile], SoapException
+ FullyQualifiedErrorId : System.Web.Services.Protocols.SoapException,VMware.ImageBuilder.Commands.ExportProf
ile
But it doesn't work for me after I change vendor to "VMW"...
I tried different ways, I don't know what happened.
I tried getting this to work on my MacBook Pro (14,3) and I'm not having any luck. I created the custom ISO with the latest ESXI 7.03d and the latest version of the FLING for 7.03. I have created custom ISO's with custom drivers before (specifically for 10GB NIC on cisco UCS) so I'm pretty sure I'm doing this right and I don't get any errors building the ISO. I See the vmkusb-n being loaded (flashes by real quick when booting the installer). I'm trying to install it on a MacBook Pro with a Belkin USB-C 1gb NIC (macbook pro only has built-in WIFI) and added "usbBusFullScanOnBootEnabled=1" to boot options to ensure it scans the USB. I think I see an error flash right before it blanks the screen and comes back with "no network device found". The Belkin is using this VID and PID "REALTEK;RTL8156;0x0bda;0x8156" When I look at the hardware ID's on another system which is on the support matrix. Got any suggestions?
i'm guessing the issue is that VMware does not like realtek nics
I am able to generate zip file, but not image file. Other commands work well, but I got the error messages. Anyone can advise please?
PS E:\esx> Export-ESXImageProfile -ImageProfile "ESXi-7.0U3d-19482537-USBNIC" -ExportToIso -filepath ESXi-7.0U3d-19482537-USBNIC.iso
Export-ESXImageProfile : Error retrieving file for VIB 'VMW_bootbank_nenic_1.0.33.0-1vmw.703.0.20.19193900':
('vib20/nenic/VMW_bootbank_nenic_1.0.33.0-1vmw.703.0.20.19193900.vib', "Unable to open VIB archive in streaming mode:
'_SharedFile' object has no attribute 'writing'").
At line:1 char:1
+ Export-ESXImageProfile -ImageProfile "ESXi-7.0U3d-19482537-USBNIC" -E ...
+ ~~~~~~~~~~~~~~~~~~~~~~~~~~~~~~~~~~~~~~~~~~~~~~~~~~~~~~~~~~~~~~~~~~~~~
+ CategoryInfo : NotSpecified: (:) [Export-EsxImageProfile], FaultException
+ FullyQualifiedErrorId : System.ServiceModel.FaultException,VMware.ImageBuilder.Commands.ExportProfile
PS E:\esx> Export-ESXImageProfile -ImageProfile "ESXi-7.0U3d-19482537-USBNIC" -ExportToBundle -filepath ESXi-7.0U3d-19482537-USBNIC.zip
Hi,
Any luck with building 7.0u3d?
@JACK and Toni : You have to use ESXi-7.0U2e-19290878-standard (wich is PATCH download) . You can get the Correspondent Fling file at https://download3.vmware.com/software/vmw-tools/USBNND/ESXi702-VMKUSB-NIC-FLING-47140841-component-18150468.zip
First build an image, then convert it to ISO.
Export-ESXImageProfile -ImageProfile "ESXi-7.0U3o-22348816-custom-NIC" -ExportToBundle -filepath ESXi-7.0U3o-22348816-custom-NIC.zip
exit
Add-EsxSoftwareDepot .\ESXi-7.0U3o-22348816-custom-NIC.zip
Export-ESXImageProfile -ImageProfile "ESXi-7.0U3o-22348816-custom-NIC" -ExportToISO -filepath ESXi-7.0U3o-22348816-custom-NIC.iso -force -NoSignatureCheck