When you try to install a VMware ESXi Update using esxcli, the upgrade fails with the following error message:
"[Errno 28] No space left on device"

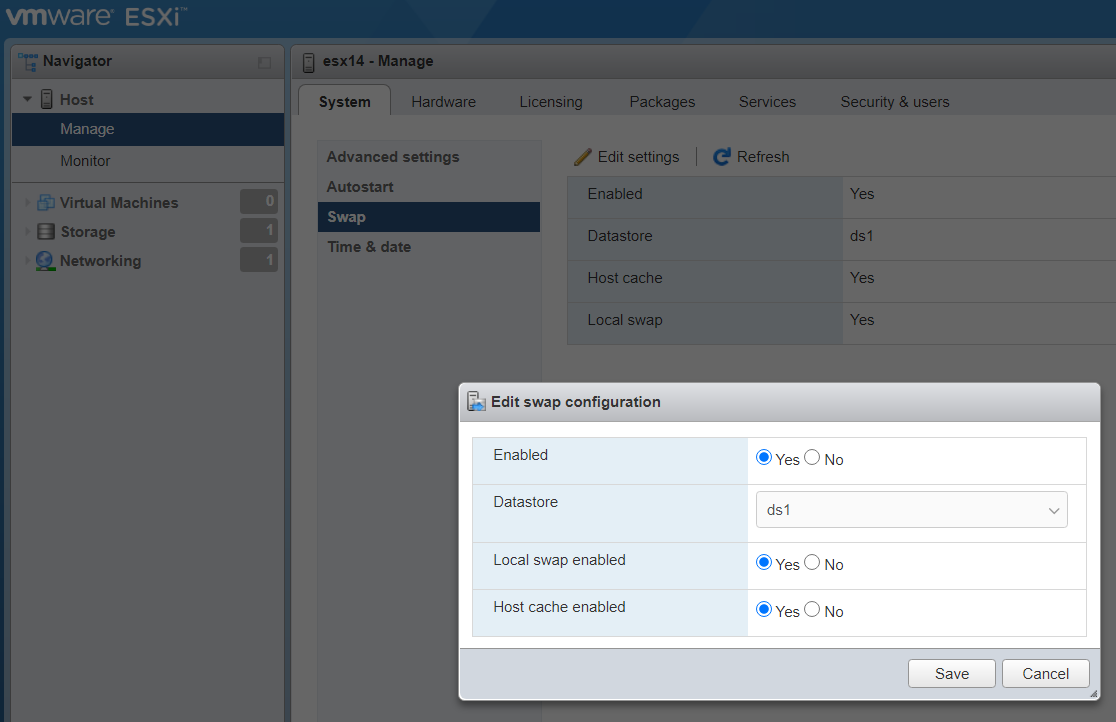
The problem is caused by ESXi not having enough free space available to extract the installation packages. This article explains how to solve the issue by enabling swapping to a Datastore.
GUI Method
You do not need a vCenter to enable host swapping. It can be done from the ESXi Host Client.
- Open ESXi UI (https://[ESXi-IP-Address]/ui/)
- Navigate to Host > Manage > System > Swap
- Click Edit settings
- Enable Swapping and select a datastore (ds1 in that example)

- Click Save
- Changes are active immediately, there is no need to reboot the host.
CLI Method
You can also activate Datastore Swapping with the esxcli sched swap system command:
# esxcli sched swap system set -n ds1 -d y
# esxcli sched swap system get
   Datastore Active: true
   Datastore Enabled: true
   Datastore Name: ds1
   Datastore Order: 1
   Hostcache Active: false
   Hostcache Enabled: true
   Hostcache Order: 0
   Hostlocalswap Active: false
   Hostlocalswap Enabled: true
   Hostlocalswap Order: 2
Another workaround that worked for me on vmware 67u3 iso to latest patch (I got the same error) was to first manually upgrade vmware tools light to latest version. Then the "esxcli software profile update" command workde.
Good advice, thanks. Helped me on a 4 GB stick, and now running 7.0b on my NUC7i3BNH.
In my case this didn't work. I ended up manually downloading the VIBs on a datastore in a directory and doing a loop install of the VIBs:
for i in $(cat *.vib); do esxcli software vib install -f -v /vmfs/volumes/datastore1/scratch/$i; donesame here none of the described work arounds worked for me.
manually downloading the depot (ESXi670-202103001.zip in my case) and installing it from the local datastore finally did the job ...
The workaround from this article did not work for me but i used a couple of the comments to find a solution. Will elaborate more than they did. I downloaded the ESXi670-202103001.zip from the VMware site https://customerconnect.vmware.com/patch/#search
I extracted this and uploaded it to a datastore, example: /vmfs/volumes/datastore/Update/ESXi670-202103001/vib20/
made an input file containing only the paths to the .vib files:
find /vmfs/volumes/datastore/Update/ESXi670-202103001/vib20/ -type f > update.in
Created a script (update.sh) with a for loop:
for i in `cat update.in`
do
package=$i
esxcli software vib install -f -v $package
done
Made script executable: chmod 755 update.sh
Ran script: ./update.sh
ESXi host now showing: ESXi670-202103001 2021/03/18 17700523
None of the above worked for me. In fact, the prior solution above crashed my particular instance of ESXi 6.7 (requiring a recovery [SHIFT+R] in order to regain access). It is said "YMMV" and my mileage did indeed vary.
What did work in my case was to do an "offline update" (as described here)
https://virtualg.uk/upgrading-esxi-to-7-0-with-esxcli/)
USING THE example paths from the prior example above, my steps were:
1) Download ESXi670-202111001.zip to my local harddrive.
2) Upload ESXi670-202111001.zip from local HD to ESXi datastore directory
(for example to /vmfs/volumes/datastore/Update/)
3) Enable SSH on the ESXi host and SSH to the host
4) Check what profiles are available in the offline bundle
esxcli software sources profile list -d /vmfs/volumes/datastore/Update/ESXi670-202111001.zip
5) Dry-run the upgrade (replacing {#######} with an actual profile Number
esxcli software profile update -p ESXi-6.7.0-{#######}-standard /vmfs/volumes/datastore/Update/ESXi670-202111001.zip --dry-run
6) Place the host into maintenance mode
vim-cmd /hostsvc/maintenance_mode_enter
7) Run the upgrade (replacing {#######} with an actual profile Number
esxcli software profile update -p ESXi-6.7.0-{#######}-standard /vmfs/volumes/datastore/Update/ESXi670-202111001.zip
8) Reboot using "reboot" from the command line
9) Reconnect to esxi via SSH and exit Maintenance Mode
vim-cmd /hostsvc/maintenance_mode_exit
10 Reboot (in order to auto-restart all the the VMs that normally auto-start)
-OR- manually restart the VMs.
Thanks for the fix Anonymous! You save me a night's sleep!