This is Part 3 of my "VMware vSphere with Kubernetes" Guide. In the previous parts, I've explained how to enable Kubernetes in vSphere, deploy the Harbor Registry, and create a namespace in the Supervisor Cluster. Now it's time to get familiar with the Kubernetes CLI Tool kubectl and to deploy your first pod.
If you do not have a Kubernetes activated vSphere Cluster, refer to Part 1 and Part 2 for instructions.
Install and configure kubectl
VMware vSphere with Kubernetes supports the standard command-line tool kubectl. If you've already installed kubectl on your system, you still need to download the vSphere Plugin for kubectl. The Plugin is required to authenticate with the SSO-backed Supervisor Cluster. You can download kubectl, including the vSphere Plugin, from Supervisor Clusters Control Plane.
Get the Supervisor Cluster Control Plane IP Address
The Control Plane IP Address is required to download kubectl and it's also the endpoint where you connect to with kubectl. There are 3 options to get the address (It is usually the first available address from the initially configured Ingress Pool):
- Using the vSphere Client, navigate to Menu > Workload Management > Clusters.
Note the IP address in the "Control Plane Node IP" column.

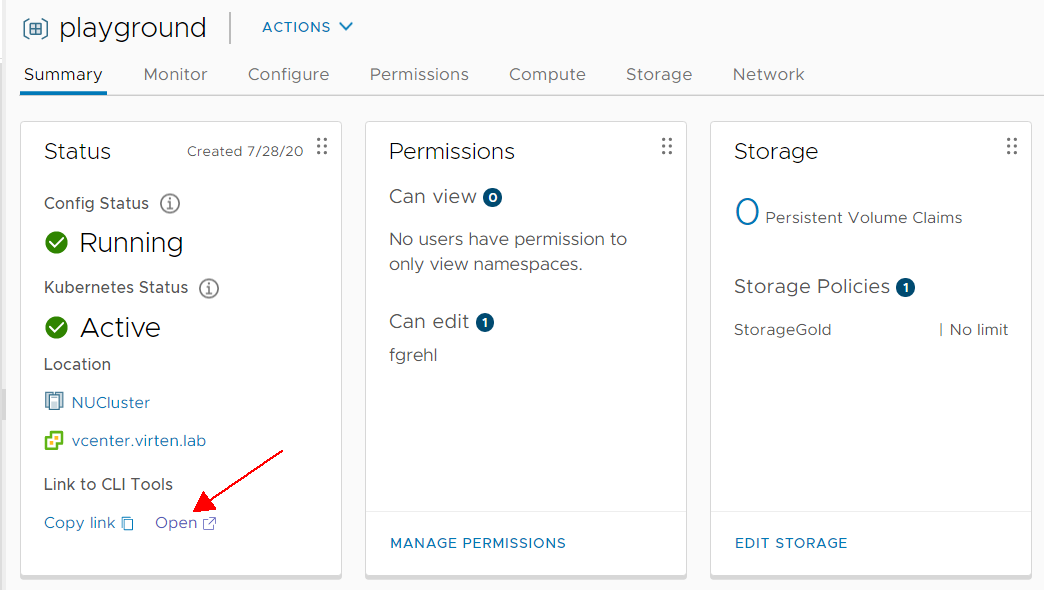
- A link to the Control Plane IP is on each Namespaces summary page. Navigate to either Menu > Workload Management > Namespaces or Menu > Hosts and Clusters and select a Namespace.
Use the Link to CLI Tools to open the Page and Note the IP Address.
- If you want to use the API, you can get the address with the following API call:
/api/vcenter/namespace-management/clusters/[CLUSTER]
Note the api_server_cluster_endpoint IP Address.Example:# curl -s -X GET 'https://vcenter.virten.lab/api/vcenter/namespace-management/clusters/domain-c46' -H 'vmware-api-session-id: 4ad6facf0c66471845b296f1a2ffae8a' --insecure | python -m json.tool { "api_server_cluster_endpoint": "192.168.250.129", [...]
Download kubectl (Windows / Linux / Mac OS)
You should see the Kubernetes CLI Tools Download page when you open the Control Plane IP Address in a browser:

Select your Operating System and click DOWNLOAD CLI PLUGIN. If you are using the embedded Harbor registry, scroll down and also download the vSphere Docker Credential Helper.
Extract both files (vsphere-plugin.zip and vsphere-docker-credential-helper.zip). You should have 3 executables:
- kubectl
- kubectl-vsphere
- docker-credential-vsphere
Copy all 3 files to your operating systems executable search path, eg C:\Windows\System32 (Windows), or /usr/bin/ (Linux). If you are using Linux, you have to make the files executable:
# chmod +x /usr/bin/kubectl-vsphere
# chmod +x /usr/bin/docker-credential-vsphere
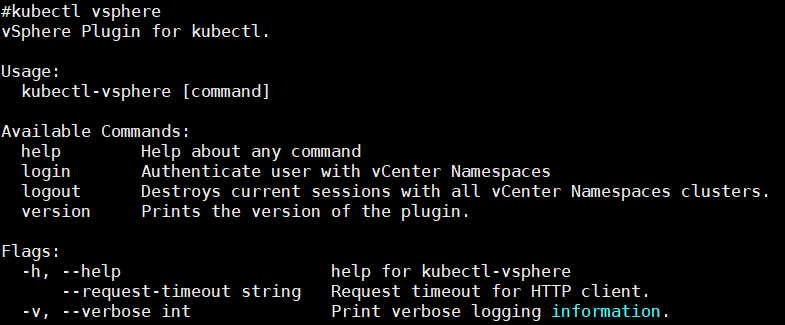
Open a Shell and verify that you can run kubectl vsphere
Log in to the Supervisor Cluster with kubectl
Use the following command to log in to the Supervisor Cluster. You can log in with users given permissions for a namespace, or with a user from the default SSO Administrators group.
# kubectl vsphere login --server=192.168.250.129 -u administrator@vsphere.local
Kubectl validates the certificate. I highly recommend adding the vCenters root certificate to your trusted root store. If you haven't imported the certificate, you get the following error message:
ERRO[0000] Error occurred during HTTP request: Get https://<ADDRESS>/wcp/loginbanner: x509: certificate signed by unknown authority
There was an error when trying to connect to the server.\n
Please check the server URL and try again.FATA[0000] Error while connecting to host <ADDRESS>: Get https://<ADDRESS>/wcp/loginbanner: x509: certificate signed by unknown authority.
If for any reason you can't add the certificate, you can also use the --insecure-skip-tls-verify flag when using kubectl.
# kubectl vsphere login --server=192.168.250.129 -u administrator@vsphere.local --insecure-skip-tls-verify
When the login was successful, you see a list of contexts.
# kubectl vsphere login --server=192.168.250.129 -u administrator@vsphere.local

Password:
Logged in successfully.

You have access to the following contexts:
   192.168.250.129
   playground

If the context you wish to use is not in this list, you may need to try
logging in again later, or contact your cluster administrator.

To change context, use `kubectl config use-context `
A context is a local element in kubeconfig, used to group access parameters under a convenient name. Each context has three parameters: cluster, namespace, and authinfo. Use kubectl config get-contexts to get context information:
# kubectl config get-contexts
CURRENT   NAME              CLUSTER           AUTHINFO                                          NAMESPACE
          192.168.250.129   192.168.250.129   wcp:192.168.250.129:administrator@vsphere.local
*         playground        192.168.250.129   wcp:192.168.250.129:administrator@vsphere.local   playground
The context name is only a local construct. It's usually the same name as the namespace, as long as there are no conflicts. When you are logged in with multiple users, or to different clusters, the context name also includes cluster and/or authentication information to distinct from each other.
To change the active context, use kubectl config use-context <CONTEXT>
# kubectl config use-context playground
Switched to context "playground".
If you have the choice, I recommend a Linux system to run kubectl. It's more comfortable and has more options. From here, I'm using a Debian Linux for command examples, so if you are using Windows, some commands might differ.
A common practice when working with kubectl is to activate autocompletion and create an alias. These two options can save a lot of time. Make sure to have the bash-completion package installed (eg. "apt install bash-completion" for Debian bases systems).
# source <(kubectl completion bash)
# alias k=kubectl
# complete -F __start_kubectl k
To make these changes persistent, add them to your ~/.bashrc config.
# echo "source <(kubectl completion bash)" >> ~/.bashrc
# echo "alias k=kubectl" >> ~/.bashrc
# echo "complete -F __start_kubectl k" >> ~/.bashrc
You can now use "k" instead of "kubectl" and press <TAB> to see available commands, or autocomplete.
# k config <TAB><TAB>
current-context  delete-context   get-contexts     set              set-context      unset            view
delete-cluster   get-clusters     rename-context   set-cluster      set-credentials  use-context
# k config current-context
playground
You are now ready to deploy the first pod.
Deploy the first Pod
When working with Kubernetes, you can either deploy Pods or Deployments. When you create a Pod, Kubernetes doesn't care about it. The Pod is started, but when it crashes, or the process ends the pod is gone. While this is fine for tests, you typically use deployments which is some kind of wrapper around pods. When a deployment is added, Kubernetes will automatically create the defined number of pods and then monitor them. If a pod in a deployment fails, Kubernetes will recreate it.
Create a Deployment named "webserver" with the Nginx image. The image will be pulled from Docker Hub.
# kubectl create deployment webserver --image nginx
It shouldn't take longer than 30 seconds to complete the deployment. List pods and deployments to verify that it has been deployed successfully.
# kubectl get deployment
NAME        READY   UP-TO-DATE   AVAILABLE   AGE
webserver   1/1     1            1           2m51s
# kubectl get pods
NAME                        READY   STATUS    RESTARTS   AGE
webserver-d698d7bd6-xckmc   1/1     Running   0          2m53s
Now you have an Nginx webserver, but you can't access it yet. Before making it available outside of Kubernetes, I scale it to 2 replicas. Kubernetes will now make sure that there are always 2 redundant pods available, so when the ESXi running the Pod crashes, the second Pod can still serve the content. The second pod is automatically restarted on another ESXi host.
# kubectl scale deployment webserver --replicas 2
deployment.apps/webserver scaled
# kubectl get deployment
NAME        READY   UP-TO-DATE   AVAILABLE   AGE
webserver   2/2     2            2           16m
# kubectl get pods
NAME                        READY   STATUS    RESTARTS   AGE
webserver-d698d7bd6-jhjl6   1/1     Running   0          13s
webserver-d698d7bd6-xckmc   1/1     Running   0          12m
To make the webserver available outside of Kubernetes deploy a Load Balancer service.
# kubectl expose deployment webserver --port=80 --type=LoadBalancer
service/webserver exposed
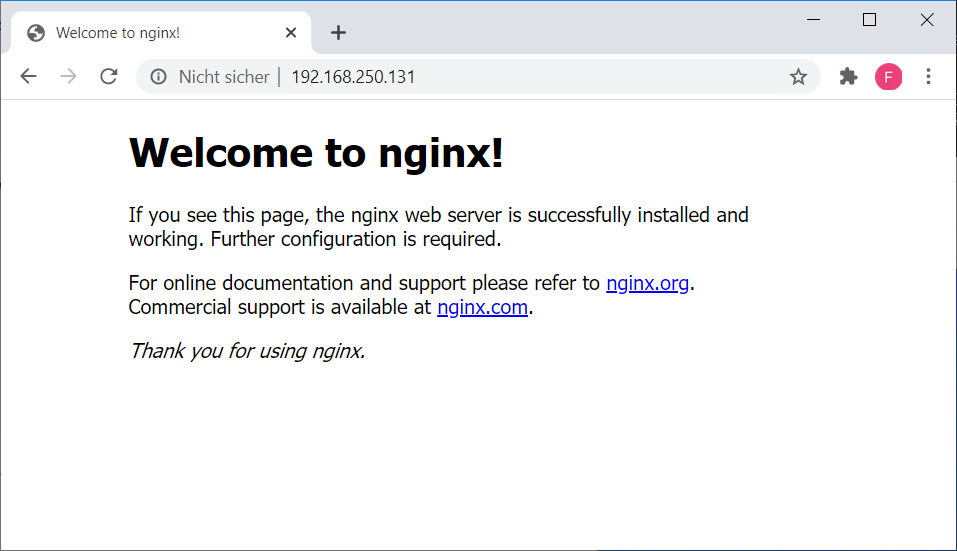
Kubernetes uses an IP address from the Ingress CIDR pool to deploy the Load Balancer. Use the kubectl get services command to find out the external IP address and verify that nginx is running with a browser.
root@lux:~# kubectl get services
NAME        TYPE           CLUSTER-IP    EXTERNAL-IP       PORT(S)        AGE
webserver   LoadBalancer   10.96.0.212   192.168.250.131   80:32692/TCP   12s
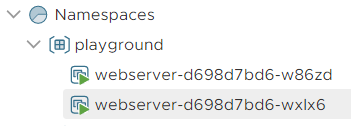
You can also see the two deployed pods in the vSphere Client:
Delete deployment and service with kubectl delete. We are going to recreate it with declarative configuration files.
# kubectl delete service webserver
service "webserver" deleted
# kubectl delete deployment webserver
deployment.apps "webserver" deleted
Kubernetes objects can also be created and updated with declarative configuration files. Create a file with the following content and save it as nginx.yaml.
apiVersion: apps/v1
kind: Deployment
metadata:
  name: webserver
spec:
  replicas: 2
  selector:
    matchLabels:
      app: webserver
  template:
    metadata:
      labels:
        app: webserver
    spec:
      containers:
      - image: nginx
        name: nginx
---
apiVersion: v1
kind: Service
metadata:
  labels:
    app: webserver
  name: webserver
spec:
  ports:
  - port: 80
    protocol: TCP
    targetPort: 80
  selector:
    app: webserver
  sessionAffinity: None
  type: LoadBalancer
Deploy the file in with kubectl apply.
# kubectl apply -f nginx.yaml
deployment.apps/webserver created
service/webserver created
Verify that the deployment is running.
# kubectl get deployment webserver
NAME        READY   UP-TO-DATE   AVAILABLE   AGE
webserver   2/2     2            2           33m
When working with declarative configuration files you can change the file and update the configuration on-the-fly. Open nginx.yaml and change replicas: 2 to replicas: 3. Save the file and run kubectl apply again. After applying the change, verify that the number of pods has increased to 3.
# kubectl apply -f nginx.yaml
deployment.apps/webserver configured
service/webserver unchanged

# kubectl get deployment
NAME        READY   UP-TO-DATE   AVAILABLE   AGE
webserver   3/3     3            3           38m

# kubectl get pods
NAME                        READY   STATUS    RESTARTS   AGE
webserver-d698d7bd6-h495m   1/1     Running   0          37s
webserver-d698d7bd6-w86zd   1/1     Running   0          38m
webserver-d698d7bd6-wxlx6   1/1     Running   0          38m
vSphere with Kubernetes Guide |
Very good blog series.
One Feedback , In this line - "Kubernetes uses an IP address from the Egress CIDR pool to deploy the Load Balancer."
It uses IP from ingress CIDR Pool
Here is an example- Ingress.
status:
loadBalancer:
ingress:
- ip: 40.0.168.7
Thank you, fixed it. Of course, it is the ingress pool.