This is Part 5 of my "VMware vSphere with Kubernetes" Guide. In this article, I'm going to create a custom Docker image, push it to the embedded Harbor Registry, and deploy it to the Supervisor Cluster.
This is a part of a series. If you do not have a Kubernetes activated vSphere Cluster, refer to Part 1 to get started with the deployment.
In previous parts, I've used the standard Nginx Image from Docker Hub to test deployments. Based on this Image, I'm going to create a Demo Environment as explained in Nginx Demo Environment to demonstrate how to create Docker Images, push them to the Harbor Registry and deploy them to the Supervisor Cluster.
I'm assuming that you already have Docker installed. If not, please refer to the official documentation for instructions. I recommend using the same system where you also have kubectl, kubectl-vsphere, and docker-credential-vsphere.
Create Nginx Docker Image
Create a Docker build directory containing 3 files:
- Dockerfile (Docker Build File)
- app.conf (Nginx Configuration)
- demo-index.html (Website)
You can create the files as explained in this article, or just clone from GitHub:
# git clone https://github.com/fgrehl/nginx-demo.git
# cd nginx-demo
Take a look at the Dockerfile to understand what happens when creating the custom image:
FROM nginx
RUN mv /etc/nginx/conf.d/default.conf /etc/nginx/conf.d/default.conf.bak
ADD app.conf /etc/nginx/conf.d/
ADD demo-index.html /usr/share/nginx/html/
Docker will pull the original Nginx Image, replace the configuration, and add the demo page. Now it's time to build the Container Image with docker build.
# docker build --tag nginx-demo:latest .
Sending build context to Docker daemon  3.072kB
Step 1/4 : FROM nginx
latest: Pulling from library/nginx
6ec8c9369e08: Pull complete
d3cb09a117e5: Pull complete
7ef2f1459687: Pull complete
e4d1bf8c9482: Pull complete
795301d236d7: Pull complete
Digest: sha256:0e188877aa60537d1a1c6484b8c3929cfe09988145327ee47e8e91ddf6f76f5c
Status: Downloaded newer image for nginx:latest
 ---> 8cf1bfb43ff5
Step 2/4 : RUN mv /etc/nginx/conf.d/default.conf /etc/nginx/conf.d/default.conf.bak
 ---> Running in b1aa9ef7b73a
Removing intermediate container b1aa9ef7b73a
 ---> ff8108efd374
Step 3/4 : ADD app.conf /etc/nginx/conf.d/
 ---> 33992e4daebf
Step 4/4 : ADD demo-index.html /usr/share/nginx/html/
 ---> 2230da0f769c
Successfully built 2230da0f769c
Successfully tagged nginx-demo:latest
Before I'm pushing the image to Harbor, I'm verifying that it works as expected. Run the following command to start the container.
# docker run --rm -it --name nginx-demo nginx-demo:latest
/docker-entrypoint.sh: /docker-entrypoint.d/ is not empty, will attempt to perform configuration
/docker-entrypoint.sh: Looking for shell scripts in /docker-entrypoint.d/
/docker-entrypoint.sh: Launching /docker-entrypoint.d/10-listen-on-ipv6-by-default.sh
10-listen-on-ipv6-by-default.sh: error: /etc/nginx/conf.d/default.conf is not a file or does not exist
/docker-entrypoint.sh: Launching /docker-entrypoint.d/20-envsubst-on-templates.sh
/docker-entrypoint.sh: Configuration complete; ready for start up
The command will attach to the container's stdout. If you close it (CTRL+C), the container will be removed automatically (--rm Option). Open a new terminal and verify that Nginx is working with curl.
# docker inspect -f "{{ .NetworkSettings.IPAddress }}" nginx-demo
172.17.0.2
# curl 172.17.0.2
Push the Image to Harbor
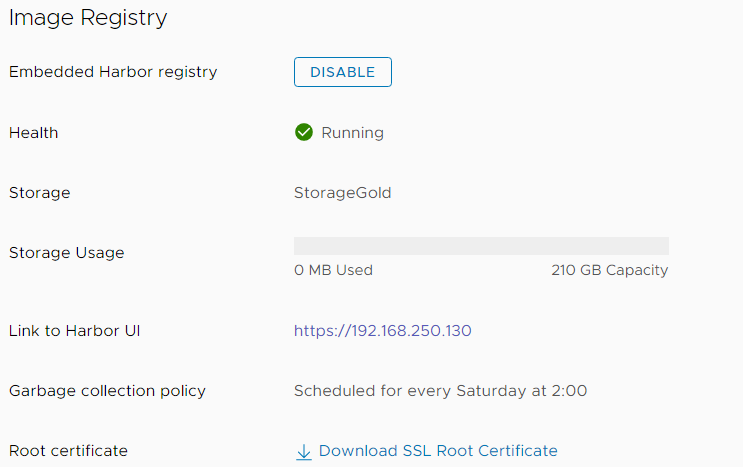
To push images to the embedded Harbor registry you need the docker-credential-vsphere tool. To get the Harbor Address, open the vSphere Client and navigate to Hosts and Clusters > Cluster > Configure > Namespaces > Image Registry and note the IP Address.
Use docker-credential-vsphere to login.
# docker-credential-vsphere login 192.168.250.130 -u administrator@vsphere.local
Note: If you get an "x509: certificate signed by unknown authority" error, make sure to add the vCenters root CA to your trusted store.
- Debian: Copy the root CA certificate to /usr/local/share/ca-certificates/ and run update-ca-certificates.
- CentOS: Copy the root CA certificate to /etc/pki/ca-trust/source/anchors and run update-ca-trust extract
Make sure to restart the Docker service after adding new certificates.
If you are using Windows, copy the CA Certificate to C:\ProgramData\Docker\certs.d\ and run the following command to login:
# docker-credential-vsphere login 192.168.250.130 --tlscacert C:\ProgramData\Docker\certs.d\10.24.69.130.crt -u administrator@vsphere.local
When you are successfully logged in, you can tag and push images to Harbor. When creating new Namespaces using the vSphere Client, a Harbor Project is automatically created and named after the namespace. I'm working with the "playground" namespace, created in Part 2.
The image was created as "nginx-demo:latest". Create a new tag in the format:
<HARBOR-ADDRESS>/<PROJECT>/<IMAGE>:<TAG>.
Harbor IP: 192.168.250.130
Namespace/Project: playground
Image: nginx-demo
Tag: latest
# docker tag nginx-demo:latest 192.168.250.130/playground/nginx-demo:latest
Push the Image:
# docker push 192.168.250.130/playground/nginx-demo:latest
Login to Harbor and verify that the image is available (Harbor > Projects > playground > Repositories > playground/nginx-demo).

Deploy the Image from Harbor
Create a deployment, scale it to 2 replicas and expose the deployment using a LoadBalancer.
# kubectl create deployment nginx-demo --image 192.168.250.130/playground/nginx-demo:latest
# kubectl scale deployment nginx-demo --replicas 2
# kubectl expose deployment nginx-demo --port=80 --type=LoadBalancer
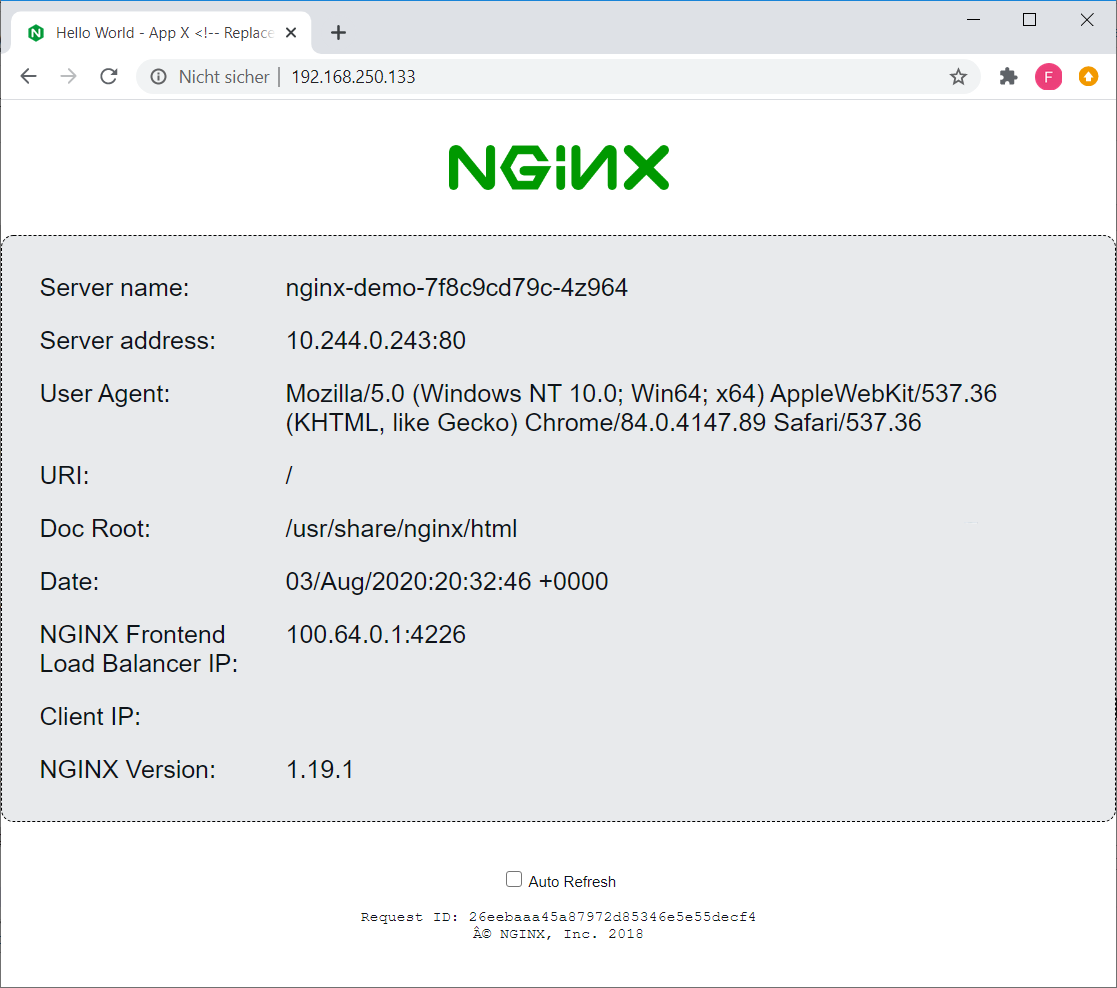
Get the external IP address:
# kubectl get services nginx-demo
NAME         TYPE           CLUSTER-IP    EXTERNAL-IP       PORT(S)        AGE
nginx-demo   LoadBalancer   10.96.0.201   192.168.250.133   80:31097/TCP   5h10m
Verify that you can access the Nginx Demo.
vSphere with Kubernetes Guide |
Thanks for your great post. i appretiate it