
In the last article, I've explained how to automate the preparation that is required to install ESXi on a Raspberry Pi using the ESXi on ARM Fling. This article covers the last step, the ESXi installation itself.
I'm covering 2 installation examples:
- Basic installation, resulting in an ESXi with DHCP enabled
- Advanced installation including static IP address, Datastore, NTP, SSH key, and SSH enabled.
I highly recommend using the second example as the Pi needs an NTP Server to run with the correct time after reboots. You can just remove any configuration snippets that you don't need.
Prerequisites
To get started with ESXi on Raspberry Pi you need:
- Raspberry Pi 4 Model B (With proper cooling and power supply)
- Latest available EEPROM (Instructions)
- SD Card with Raspberry Pi EFI Firmware (Instructions)
- 3GB Limit disabled in Raspberry Pi BIOS (Instructions)
- USB Flash Drive
- ESXi on ARM ISO
Kickstart File Examples
Example 1 - Simple Kickstart File
vmaccepteula
rootpw VMware1!
install --firstdisk=usb --overwritevmfs
network --bootproto=dhcp
reboot
Example 2 - Advanced Kickstart File (Static IP address, Datastore, NTP, SSH key, and SSH enabled.)
vmaccepteula
install --firstdisk=usb --overwritevmfs

network --bootproto=static --ip=192.168.0.10 --netmask=255.255.255.0 --gateway=192.168.0.1 --hostname=esxpie.virten.lab --nameserver=192.168.0.1
rootpw VMware1!
keyboard German

reboot

%firstboot --interpreter=busybox

# Enable SSH
vim-cmd hostsvc/enable_ssh
vim-cmd hostsvc/start_ssh

# Enable ESXi Shell
vim-cmd hostsvc/enable_esx_shell
vim-cmd hostsvc/start_esx_shell

# Suppress Shell warning
esxcli system settings advanced set -o /UserVars/SuppressShellWarning -i 1

# SSH Key
cat > /etc/ssh/keys-root/authorized_keys <<EOF
ssh-rsa AAAAB[...]
EOF

# NTP
esxcli system ntp set -s pool.ntp.org
esxcli system ntp set -e 1
Instructions
This article explains the scripted ESXi installation from a USB drive. I'm installing ESXi to the same USB device where I'm installing from. This is a very common method for homelab installations.
- Write the ESXi Image to a USB Flash drive. You can use any imaging tool. My favorite tools are Rufus and UNetbootin. Just select your Image, the USB drive, and stick with the default settings. For further instructions refer to this article.
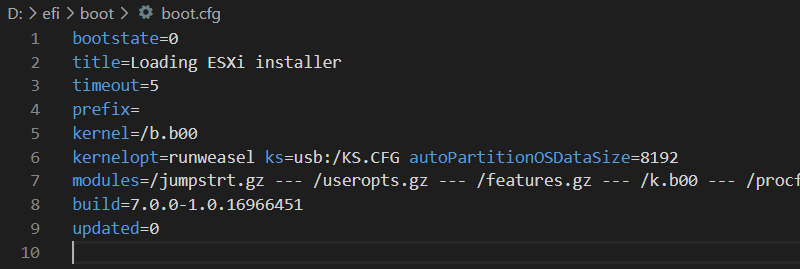
- Navigate to the efi\boot directory on the USB drive and open boot.cfg with a Unix-compatible editor like Notepad++ or Visual Studio Code.
- In line 6, replace cdromBoot with ks=usb:/KS.CFG
- If you want to use the remaining capacity on the USB drive as Datastore you have to limit the VMFS-L partition with the kernel option autoPartitionOSDataSize=8192
- The boot.cfg should look like this:
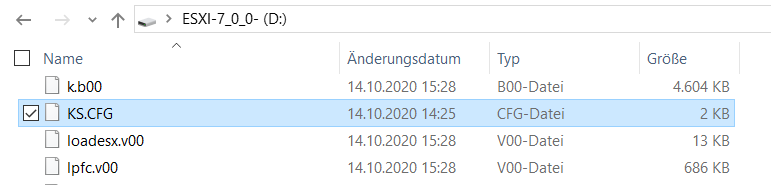
- Create a kickstart file (see Kickstart File Examples), named KS.CFG in the root directory of your USB drive.
- Remove the USB drive from your PC
- Insert the USB drive to your Raspberry Pi
- Power on Raspberry Pi
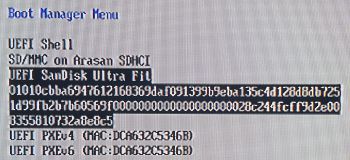
- If the Pi does not boot from the USB drive, press ESC to enter the BIOS, select Boot Manager, and manually select your USB drive.
The ESXi installer should now load the kickstart file and perform an unattended installation. After the final reboot, you can access the ESXi using SSH or the Web Interface.
Id like to know if RPi 3 B+ is capable of running ESXi server.
No, you need the RPi 4B