In NSX-T, you can't create local users. Except for the three default users admin, root, and audit, you have to connect to an LDAP server or integrate NSX-T with VMware Identity Manager to authenticate with additional users. Additionally to normal users, NSX-T has the concept of Principal Identities, which are certificate-based users that can create objects that only the user itself can modify or delete.
This article explains how to create and work with a principal identity.
A principal identity...
- ...is a secure certificate-based user.
- ...does not require LDAP or VMware Identity Manager.
- ...can have multiple certificates.
- ...requires a SHA256 based RSA/DSA key with at least 2048 bits.
- ...can't delete objects created with the NSX-T Policy GUI.
- ...creates objects that can't be deleted with the NSX-T policy GUI.
- ...can be used with the Policy and Manager API.
- ...can't be used with the NSX-T CLI.
- ...can't be used with the NSX-T GUI.
Create a Principal Identity
As mentioned above, a principal identity is a certificate-based user that works similar to SSH keys or certificates used at websites. The first step is to create a private and public keypair. This can be done on the NSX-T manager itself (Login with SSH as the root user), or on any Linux system.
Step 1 - Create Key and X.509 Certificate
# openssl req -newkey rsa:2048 -sha256 -x509 -days 90 -subj "/CN=virten" -extensions usr_cert -nodes -keyout virten.key -out virten.crt
This command creates two files:
- virten.key - Private key. Keep this file as secure as your password!
- virten.crt - X.509 certificate to be imported in NSX-T
Step 2 - Export the certificate into a PKCS #12 archive
Combine both files into the PKCS #12 archive. This step is not required to add the principal identity, but to use and transport the certificate later.
# openssl pkcs12 -export -in virten.crt -inkey virten.key -out virten.pfx
# openssl pkcs12 -in virten.pfx -out virten.pem -nodes
You should now have two additional files:
- virten.pfx - Binary encoded PKCS #12 archive
- virten.pem - Base64 encoded PKCS #12 archive
Based on the tool you are using to access the NSX-T API, you either need the binary or base64 encoded PKCS #12 file.
Step 3 - Get the content of the certificate
For the principal identity in NSX-T, you need the certificate in PEM format. Display the content of the certificate and copy everything (including the BEGIN CERTIFICATE and END CERTIFICATE lines). Make sure to not use the certificate file created in Step 1 and not the PKCS #12 archive, which also includes the private key.
# cat virten.crt
-----BEGIN CERTIFICATE-----
MIIDIDCCAgigAwIBAgIJAIBcN+XiZ7mKMA0GCSqGSIb3DQEBCwUAMBExDzANBgNV
BAMMBnZpcnRlbjAeFw0yMDExMjkxNjAzMjZaFw0yMTAyMjcxNjAzMjZaMBExDzAN
BgNVBAMMBnZpcnRlbjCCASIwDQYJKoZIhvcNAQEBBQADggEPADCCAQoCggEBANRP
nJUnz6FhiSWdyabvptmhLo1pVK7f0qGszy60WpUAK4pZQFzng+ZJPxNnjt4T+Xu/
Z0T6aGf9RmbIkgp4KCUgkLKTD8abHB1LdKytpUQrWQTkIpT0MQqKJoEHXsn19IH5
Mdxr78K2053hJxJF1+TRLzRuBpM+ULlC/VSWjCB5cKy57bOgw/voef1nkgjpvrSt
K9UDhuNNt32Rs13QMeEG/SJ67kJYPJX644kjm2xj3eNraHa7MTGdSE8ix4o0nzJI
4ghWLL1zdycRjrBgw1zX1qWWsNatyLZa0uWWONIDaw0qarvUJ8GMDI01bqQ2wtMx
cLY3q8DXrLVp6nLFCtUCAwEAAaN7MHkwCQYDVR0TBAIwADAsBglghkgBhvhCAQ0E
HxYdT3BlblNTTCBHZW5lcmF0ZWQgQ2VydGlmaWNhdGUwHQYDVR0OBBYEFAV+22Y+
ZpbhjvUAUbvjXyLE3M1gMB8GA1UdIwQYMBaAFAV+22Y+ZpbhjvUAUbvjXyLE3M1g
MA0GCSqGSIb3DQEBCwUAA4IBAQCcRrTugQIoXLVeKpHxWPMSS8ht2Ui1hhhyUHzY
3GCNUc716oVPf6s01xOp8t8X9uBw9UwWo+/usnPQDJk0WLiGfnobfSLDWL0iN/v2
ATmoPvnKaz6ty56u4cWnNnAO9ssosr+fSaUhTk0Pgju37/6X/igZEBZrFXTtl7AW
rLIDOv6uKAyqWvZQpwaP7B5BixMPcZ0TC3bDDLBQW5vP22Aq/p8Nxisw6EUmxWdG
iSJhTwbRpRagbHI13IGsXAQLIMzZ5Myq0CGG597EiyRJjB6yOmFGKa4UlBgSMUj8
kk4coMNCh1mhsZ+DXR2WOgMGeLVbiLV048xZFW35WjfkjvVB
-----END CERTIFICATE-----
Step 4 - Add a Principal Identity in NSX-T
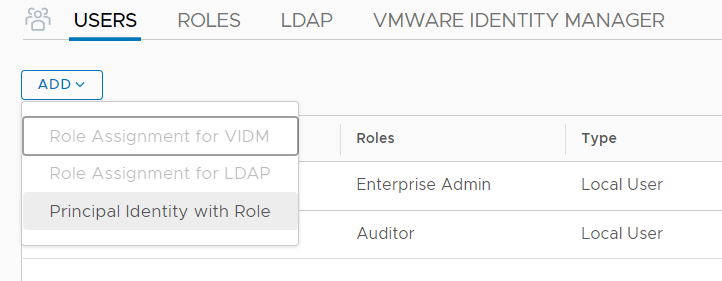
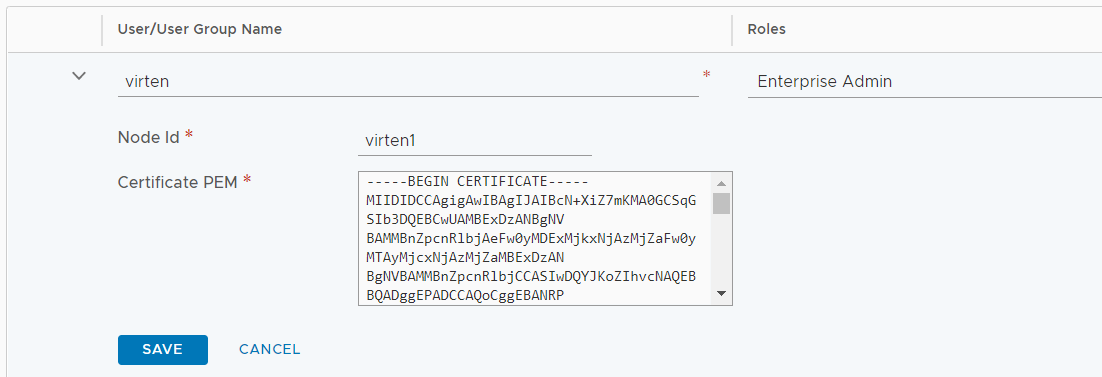
Open the NSX-T GUI, navigate to System > Settings > Users and press ADD > Principal Identity with Role. Fill out the form to create the Identity and press SAVE.
- Principal Identity: Name for the Principal Identity
- Node Id: Alphanumerical Node Id. Each Identity can have multiple Node IDs. If you want to add additional certificates to the same Identity, choose different Node Ids.
- Role: Role for the
- Certificate PEM: Certificate content from step 4.
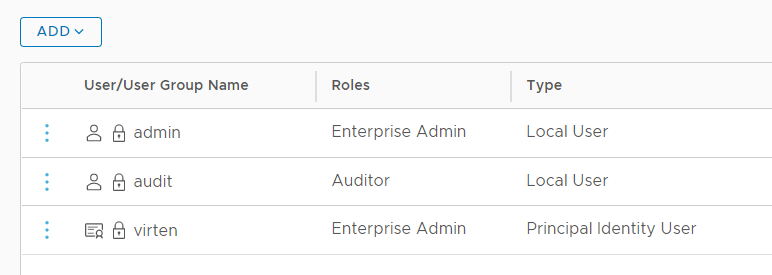
That's it. You can now use the certificate to connect with the NSX-T API.
Using Principal Identities
Using Principal Identities with curl
Curl supports user certificates with the --cert option. Make sure to use the Base64 encoded PKCS #12 archive:
Get Segments:
# curl --cert ./virten.pem -k -X GET https://nsx1.virten.lab/policy/api/v1/infra/segments
Create Segments (Policy API):
# curl --cert ./virten.pem -k -X PATCH -d '{"display_name":"testSegment"}' -H "Accept: application/json" -H "Content-Type: application/json" https://nsx1.virten.lab/policy/api/v1/infra/segments/testSegmentUsing Principal Identities with PowerShell
The PowerShell command Invoke-RestMethod supports the usage of Client Certificates with the -Certificate option. The binary encoded certificate needs to be added as an object with the Get-PfxCertificate command.
$pfx = Get-PfxCertificate '.\virten.pfx'
Invoke-RestMethod -uri "https://nsx1.virten.lab/policy/api/v1/infra/tier-0s" -Certificate $pfx
Using Principal Identities with Insomnia
Insomnia is a powerful Open Source API Client. If you're working with API regularly, give it a try. In Insomnia, Client Certificates are added per Domain in the Workspace configuration. Open Workspace Settings, select Client Certificates and press New Certificate.
Enter the Hostname and select the PFX Certificate. For Insomnia, you have to use the binary encoded PKCS #12 archive:
Make sure to set the Auth to "No Authentication" to allow certificate-based authentication.
Using Principal Identities in Policy and Manager API
NSX-T has two API endpoints. The "Manager API" and the "Policy API". The API endpoints are similar to the Policy and Manager modes in the GUI.
Both APIs have completely different endpoints. You can easily identify which API a call is using by the beginning of the API endpoint.
/policy/api/ -> Policy API
/api/ -> Manager API
When you are using the Policy API in the GUI, it uses an internal principal named nsx_policy. Objects created in Policy Mode (or with the Policy API) are displayed as protected objects in the Manager view. They can't be deleted from the GUI. Objects created in the Manager view are not visible in the Policy view.
Objects created with custom Principal Identifications are neither deletable in the Manager Mode, nor in the Policy Mode. They can only be modified or deleted by the owning Principal Identity.
Additional Notes
When you delete a Principal ID, you can delete objects owned by the Principal using the GUI.
Do not create a Principal ID with the default policy name "nsx_policy". It works but will create problems when modifying objects.