 With the release of Cloud Director 10.2, the Container Service Extension 3.0 has been released. With CSE 3.0 you can extend your cloud offering by providing Kubernetes as a Service. Customers can create and manage their own K8s clusters directly in the VMware Cloud Director portal.
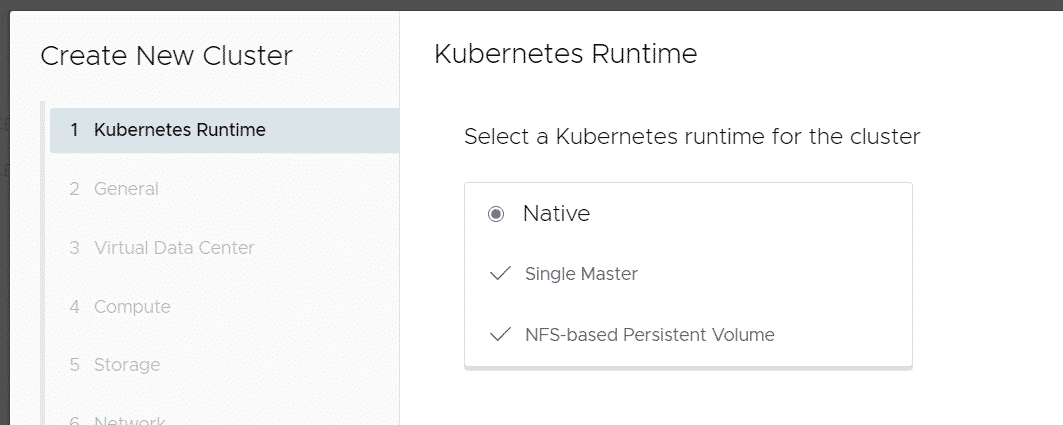
I've already described how to deploy vSphere with Tanzu based Kubernetes Clusters in VCD. CSE 3.0 with the "Native K8s Runtime" is is a neat alternative that allows you to deploy K8s directly into the customer's Organization networks, which is currently not possible with Tanzu.
This article explains how to integrate CSE 3.0 in VMware Cloud Director 10.2.
Introduction
Container Service Extension (CSE) is a VMware Cloud Director extension that allows tenants to create and work with Kubernetes clusters. CSE 3.0 brings Kubernetes as a Service to VCD using 3 different runtimes:
- Native Kubernetes Cluster
- TKG Cluster (vSphere with Tanzu)
- TKGIE Cluster (Enterprise PKS)
This guide explains how to prepare your VCD to support Native Kubernetes Clusters. If you want to use the vSphere 7.0 integrated Tanzu Kubernetes, see this guide.
Native Kubernetes Clusters are deployed into the customer's Organization networks. You do not need vSphere with Tanzu to deploy Native Kubernetes Clusters. The following workflow diagram explains the communication between Cloud Director and the CSE Server when a new Kubernetes Cluster is deployed: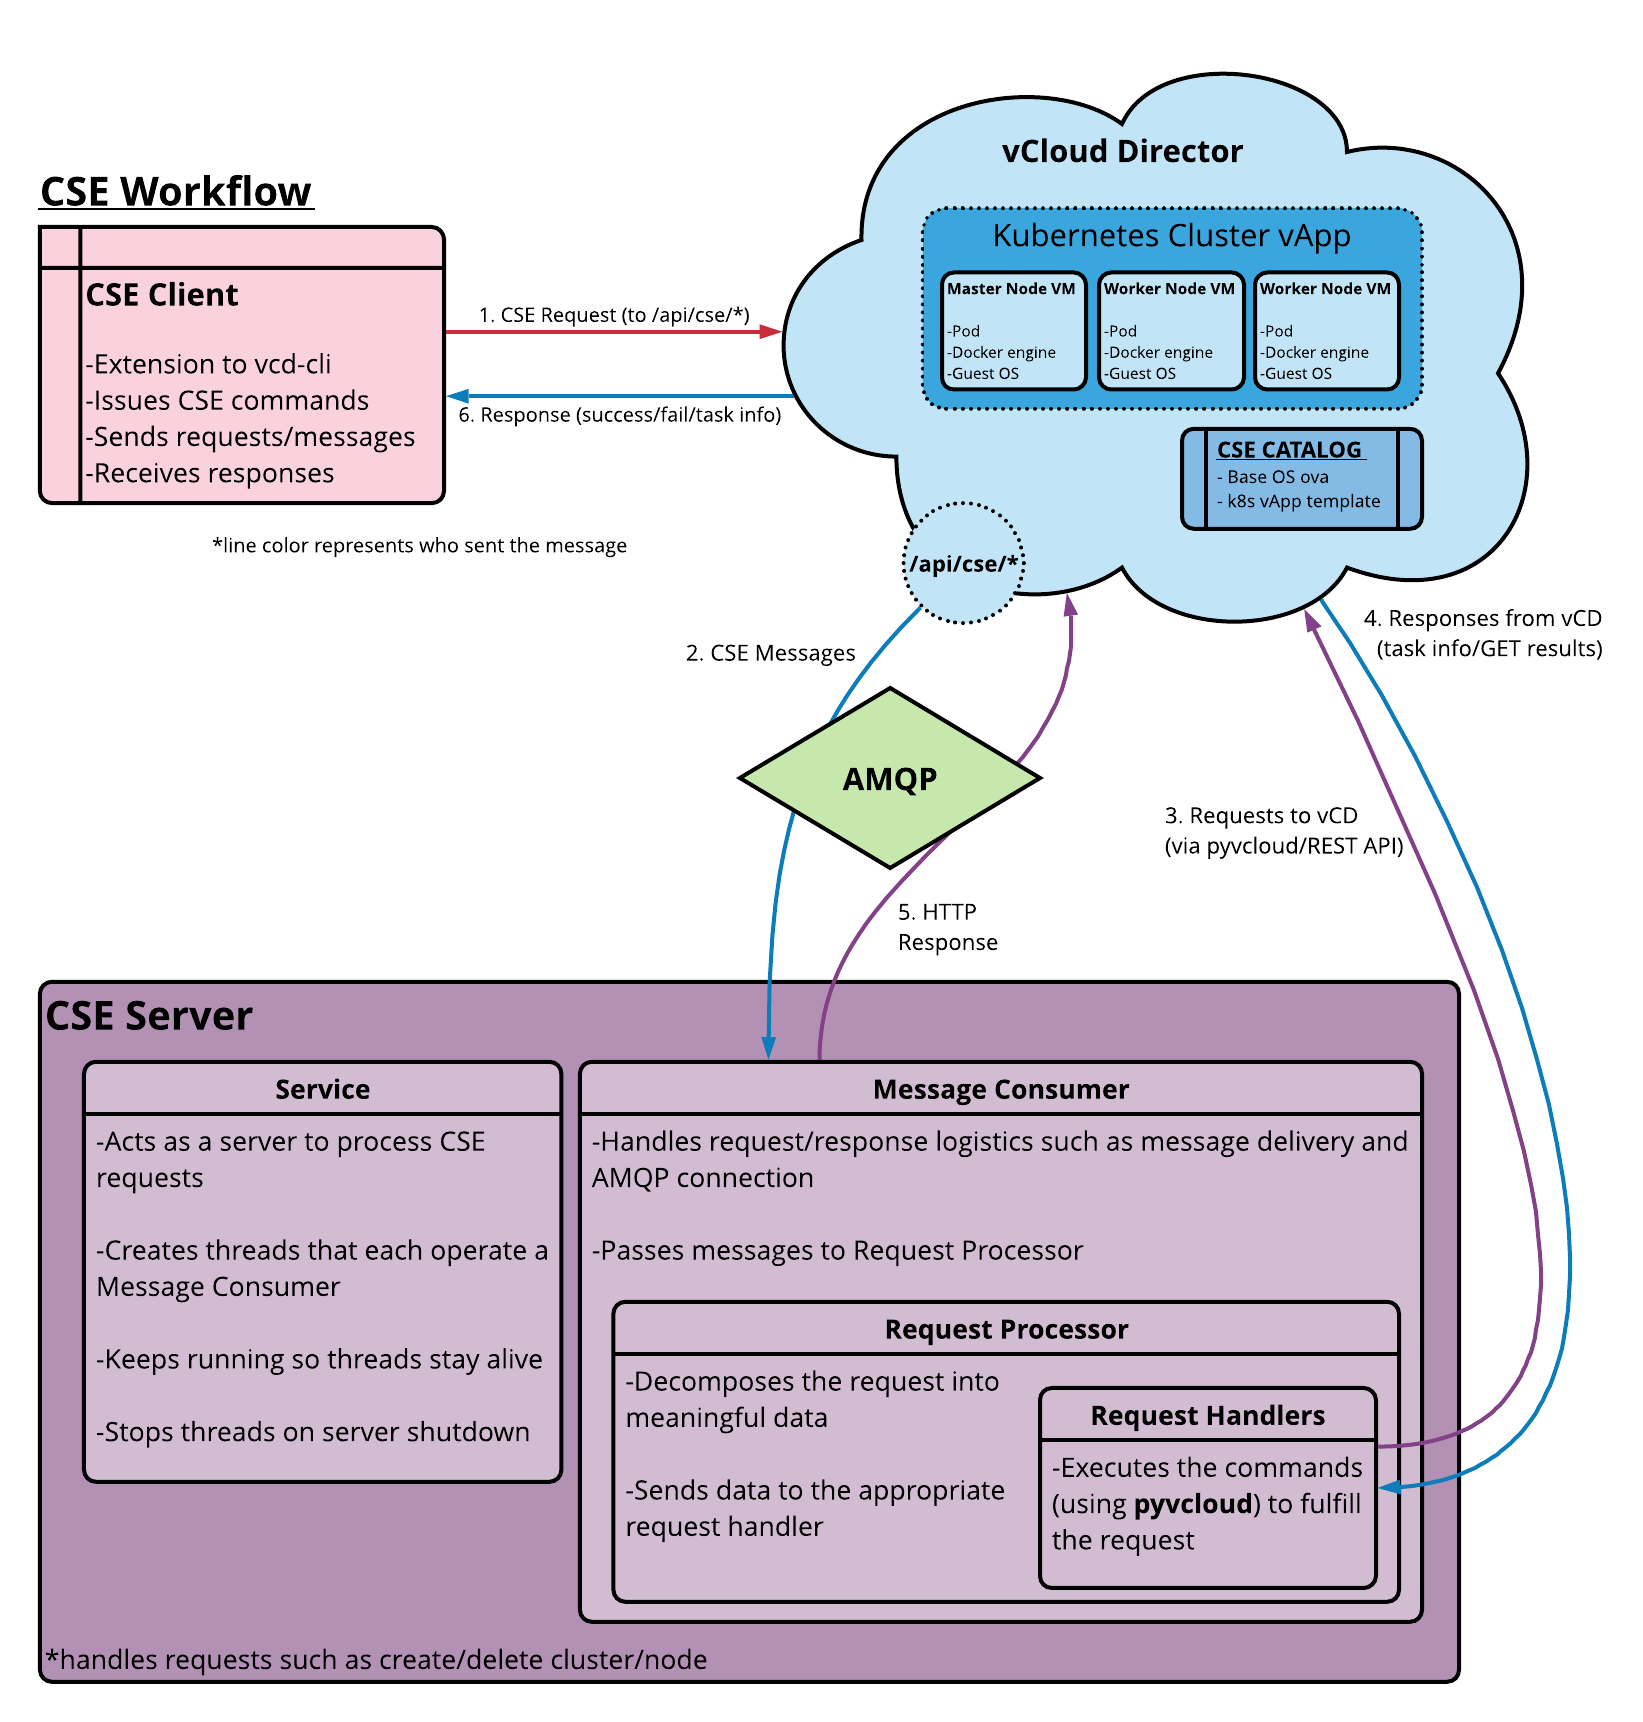
The CSE Server is only required for Native and TKGIE Clusters. TKG Clusters (vSphere with Tanzu) can be deployed with the VCD itself.
Please be aware that I'm using the root user and administrator credentials everywhere. This is a bad idea and only suitable for testing purposes. If you are going to deploy CSE to production, follow the principle of least privilege.
Install CentOS 8
I'm using CentOS 8 to run the CSE 3.0 Server. Download and install the latest version from centos.org.
Install and Configure RabbitMQ
CSE 3.0 requires RabbitMQ to communicate with VMware Cloud Director. If you already have RabbitMQ/AMQP running and configured in VCD you can skip this step. For evaluation purposes, I'm installing it on the same machine as the CSE server.
Add the RabbitMQ Repository
# dnf install https://dl.fedoraproject.org/pub/epel/epel-release-latest-8.noarch.rpm
# dnf config-manager --set-enabled PowerTools
# yum -y update
# curl -s https://packagecloud.io/install/repositories/rabbitmq/rabbitmq-server/script.rpm.sh | bash
VCD requires RabbitMQ 3.8.x, so make sure that you are going to install the correct version.
# yum info rabbitmq-server
Available Packages
Name : rabbitmq-server
Version : 3.8.9
Install RabbitMQ Server, enable the service, and create firewall rules to allow external communication.
# yum -y install rabbitmq-server
# rpm -qi rabbitmq-server
# systemctl enable --now rabbitmq-server.service
# systemctl status rabbitmq-server.service
# rabbitmq-plugins enable rabbitmq_management
# firewall-cmd --add-port={5672,15672}/tcp --permanent
# firewall-cmd --reload
Create a RabbitMQ User. I'm using the same user for VCD and CSE3.0. In a production setup, you should use different users for VCD and CSE. You just have to make sure that both users have access to the same RabbitMQ vHost.
# rabbitmqctl add_user admin '********'
# rabbitmqctl set_user_tags admin administrator
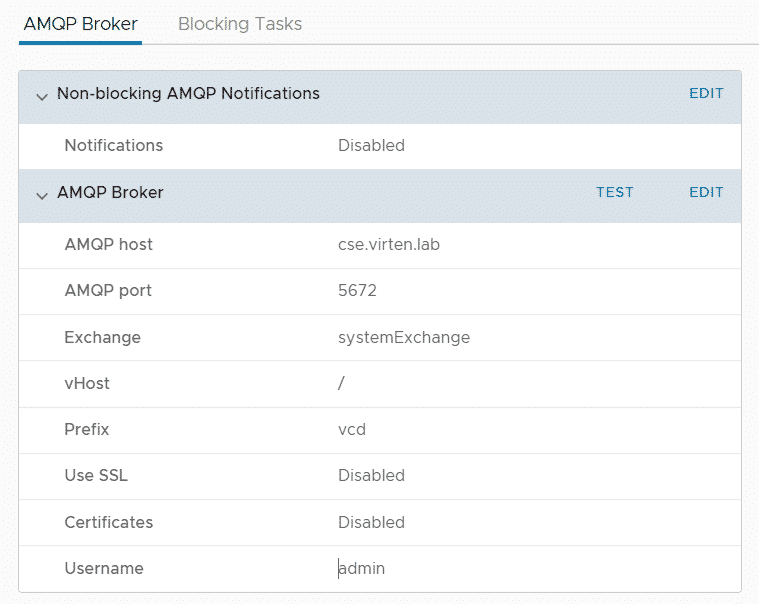
Configure the RabbitMQ Server in VCD. Navigate to Administration > Settings > Extensibility and setup the AMQP Broker. This is what the configuration should look like:
Install Kubectl
The Kubernetes command-line tool (kubectl) allows you to run commands against Kubernetes clusters. Install kubectl as explained in the official documentation. It is not required for CSE itself, but useful to manage Kubernetes Clusters deployed with CSE. For CentOS 8, I've used the following commands:
# cat <<EOF > /etc/yum.repos.d/kubernetes.repo
[kubernetes]
name=Kubernetes
baseurl=https://packages.cloud.google.com/yum/repos/kubernetes-el7-x86_64
enabled=1
gpgcheck=1
repo_gpgcheck=1
gpgkey=https://packages.cloud.google.com/yum/doc/yum-key.gpg https://packages.cloud.google.com/yum/doc/rpm-package-key.gpg
EOF
# yum install -y kubectl
Install vcd-cli
vcd-cli is a command-line interface for VMware Cloud Director. The CSE extension includes a client plugin for vcd-cli so don't skip this step.
# yum install -y yum-utils
# yum groupinstall -y development
# yum -y install python38 python38-pip python38-devel
# easy_install-3.8 pip
# pip3 install --user vcd-cli
WARNING: The script keyring is installed in '/root/.local/bin' which is not on PATH.
Consider adding this directory to PATH or, if you prefer to suppress this warning, use --no-warn-script-location.
To solve the warning, add the /root/.local/bin directory to the path variable.
# PATH=$PATH:/root/.local/bin
# export PATH
Changing the path variable this way is only valid during the current session. To make it persistent, add the same two commands to the .bash_profile file in the user's home directory.
Make sure that the installation was successful by running vcd version:
Install Container Service Extension (CSE)
CSE requires python 3.7.3 or later. It's not clear in the documentation if that means 3.7.x or 3.x.x. As of writing this article, python 3.8 was the default in CentOS 8 so I'm using 3.8.
# python3 --version
Python 3.8.0
Install CSE using pip3. Pip should automatically install additional packages that are required by CSE.
# pip3 install container-service-extension
When you are running into dependency errors you can use pip to force the correct version. In my case, I had to downgrade cryptography and humanfriendly.
# pip3 install container-service-extension
# cse version
pkg_resources.ContextualVersionConflict: (cryptography 3.1.1 (/root/.local/lib/python3.8/site-packages), Requirement.parse('cryptography<3.0,>=2.8'), {'container-service-extension'})

# pip uninstall cryptography
# pip install -Iv cryptography==2.9.2

ERROR: container-service-extension 3.0.0 has requirement humanfriendly<5.0,>=4.8, but you'll have humanfriendly 8.2 which is incompatible.

# pip uninstall humanfriendly
# pip install -Iv humanfriendly==4.18
After the installation of CSE, you are going to see the following error message when running vcd cse:
# vcd cse
Error: No such command 'cse'.
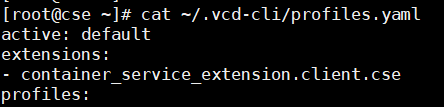
To enable the CSE client in vcd-cli, edit ~/.vcd-cli/profiles.yaml to include the following:
extensions:
- container_service_extension.client.cse
The vcd cse command should now work:
# vcd cse version
CSE, Container Service Extension for VMware vCloud Director, version 3.0.0
Cloud Director Preparation (Org, OVDC, Catalog, Network)
The CSE extension requires a preconfigured tenant in Cloud Director to download and store templates. The following components need to be configured prior to start with the CSE Server Configuration:
- Organization
- Organization Virtual Data Center
- Network with Internet Connectivity (Imported or routed network)
- Catalog
A good practice is to use a dedicated tenant for that purpose. Make sure that the network has a configured pool or DHCP configuration. This is crucial as the CSE needs to deploy virtual machines to this network, install Kubernetes from the internet, and convert them to templates. Deploy a virtual machine to the network and test Internet connectivity when you are not 100% sure.
CSE Server Configuration
The CSE server is controlled by a YAML configuration file. You can generate a skeleton file with the cse sample command:
# cse sample -o config.yaml
Edit the file to configure RabbitMQ, Cloud Director, vCenter login information, and the values from the tenant configured in the previous step.
amqp:
exchange: cse-ext <-- Exchange name for CSE. Must be different as configured in VCD.
host: cse.virten.lab
password: ********
port: 5672
prefix: vcd
routing_key: cse
ssl: false
ssl_accept_all: false
username: admin
vhost: / <-- Needs to be the same as configured in VCD
vcd:
api_version: '35.0'
host: vcloud.virten.lab
log: true
password: ********
port: 443
username: administrator
verify: false
vcs:
- name: vcenter.virten.lab
password: ********
username: administrator@vsphere.local
verify: false
service:
enforce_authorization: false
listeners: 10
log_wire: false
telemetry:
enable: true
broker:
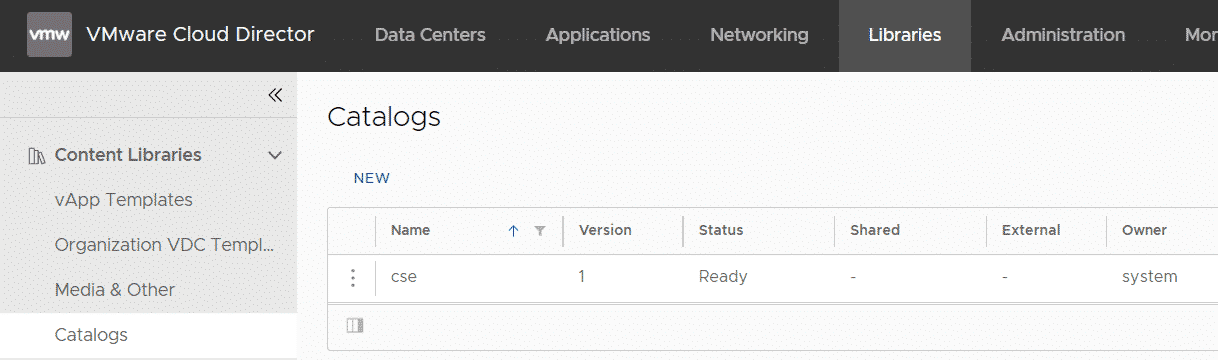
catalog: cse <-- Catalog Name from the VCD Tenant
default_template_name: photon-v2_k8-1.14_weave-2.5.2
default_template_revision: 3
ip_allocation_mode: pool <-- pool or dhcp, as configured in the network
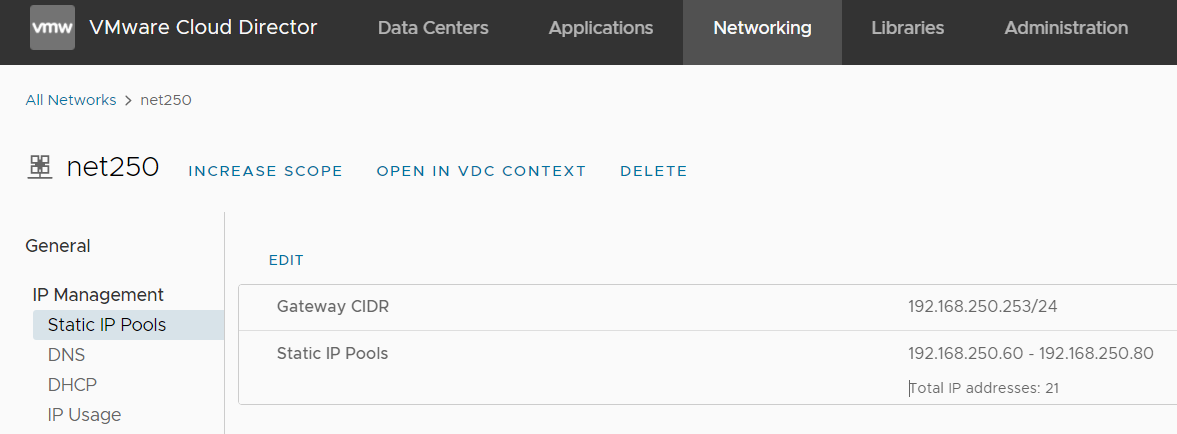
network: net250 <-- network name
org: cse <-- VCD Organization name
remote_template_cookbook_url: http://raw.githubusercontent.com/vmware/container-service-extension-templates/master/template.yaml
storage_profile: 'StorageGold' <-- Storage Profile name
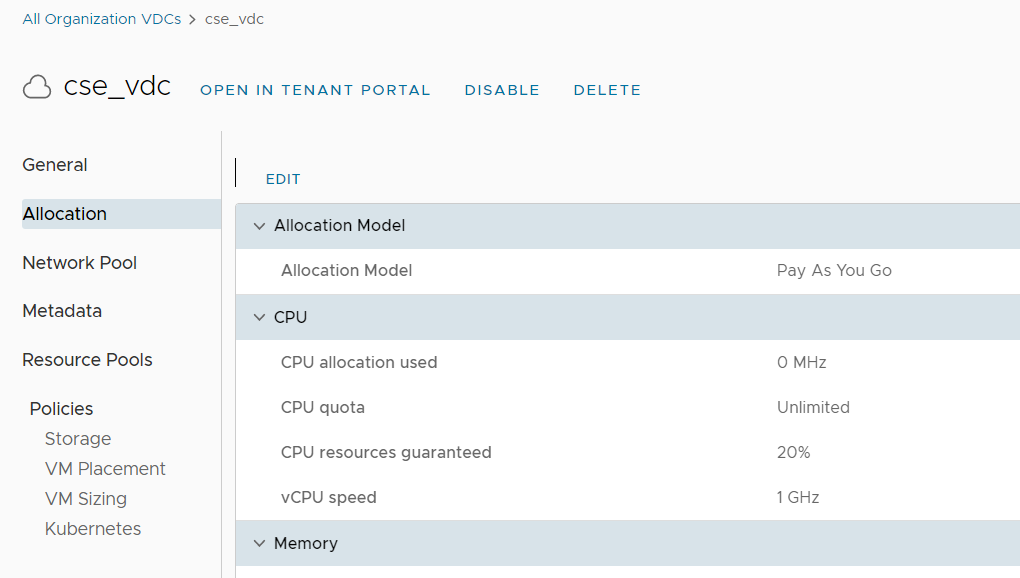
vdc: cse_vdc <-- Org VCD Name
With the default_template_name setting, the default template for Kubernetes deployments is configured. See this YAML file, for a complete list of available templates.
Note: If you are using CSE 3.0.1, replace "listeners: 10" with "processors: 15" in the service section.
When everything is filled out, you have to encrypt the config. The CSE Server will not accept unencrypted configuration files.
# cse encrypt config.yaml --output encrypted-config.yaml
Now you are ready to start the installation:
# cse install -c encrypted-config.yaml
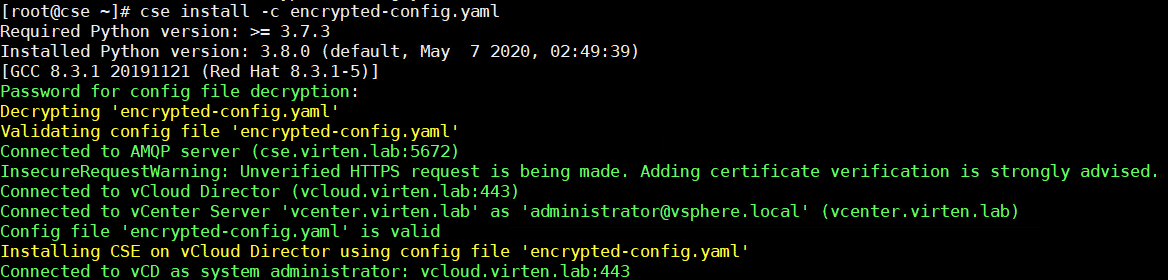
CSE does now start to download and prepare templates. This step will take a lot of time. Be patient and watch the output for errors.
During my deployments, I had two issues:
Issue 1 - VM not connected to the org network
The task where VCD reconfigured the Virtual Machine to set the NIC from "none" to the Organization network failed. With no network, the VM couldn't access the internet. The following error messages were displayed:
process [2, , ] on vm 'vim.VirtualMachine:vm-18054' finished, exit code: 2
Result: [2, , ]
stderr:
resize2fs 1.42.13 (17-May-2015)
The filesystem is already 2593019 (4k) blocks long.  Nothing to do!

W: Failed to fetch http://archive.ubuntu.com/ubuntu/dists/xenial/InRelease  Temporary failure resolving 'archive.ubuntu.com'
W: Failed to fetch http://archive.ubuntu.com/ubuntu/dists/xenial-updates/InRelease  Temporary failure resolving 'archive.ubuntu.com'
W: Failed to fetch http://archive.ubuntu.com/ubuntu/dists/xenial-backports/InRelease  Temporary failure resolving 'archive.ubuntu.com'
W: Failed to fetch http://security.ubuntu.com/ubuntu/dists/xenial-security/InRelease  Temporary failure resolving 'security.ubuntu.com'
W: Some index files failed to download. They have been ignored, or old ones used instead.
curl: (6) Could not resolve host: download.docker.com
gpg: no valid OpenPGP data found.
If you are quick enough, you can configure the network manually in the vCenter when you see the failed task. Try the installation again when it already failed.
Issue 2 - Clone to Template Failed
When CSE finished the preparation, it uses the "Clone to Catalog" function. This process failed with the following error message:
Captured Virtual Application Template ubuntu-16.04_k8-1.17_weave-2.6.0_rev2(19ebeda8-d26b-4646-9727-ad5ebbc8b615)

CSE Installation Error. Check CSE install logs
VcdTaskException; 500/INTERNAL_SERVER_ERROR: error ([ 52ca9aad-78cb-4de8-83c6-30beec6bc1b2 ] Platform config fault reported by vCenter Server.
Platform Config fault occurred.
An error occurred during host configuration.

[ 52ca9aad-78cb-4de8-83c6-30beec6bc1b2 ] Platform config fault reported by vCenter Server.
Platform Config fault occurred.
There were no log entries in CSE/vCenter/VCD that might explain why the clone failed. However, after a second try, it worked.
When the installation is finished you can start CSE in interactive mode by using the following command:
# cse run --config encrypted-config.yaml
Enable Tenants to use Native K8s
To allow tenants to deploy Kubernetes Clusters you have to enable the K8s runtime. This is a per Org VDC configuration. Use the following command to enable native-k8s for the virten oVDC:
# vcd cse ovdc list
Name         ID                                    K8s Runtime
-----------  ------------------------------------  -------------
ovdc-virten  3ca06cf8-84a4-4234-b1c4-63b32896a303  []
native-k8s   e4b70f18-757c-4424-af69-ab52c7ffce2c  []
cse_vdc_1    76fa583f-b727-401a-8c9a-b2a3b2a56238  []


# vcd org use virten
# vcd ovdc use ovdc-virten
# vcd cse ovdc enable ovdc-virten -n
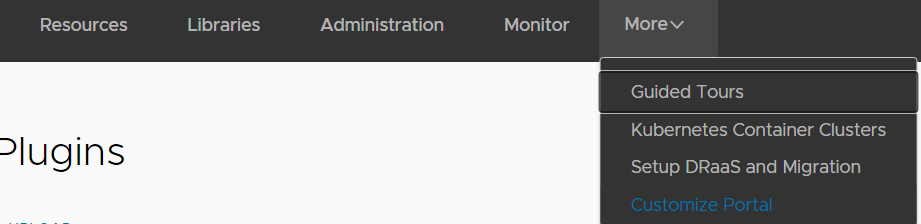
The tenant also needs access to the Kubernetes Container Cluster Plugin. This can be published from the VCD UI:
- Navigate to More > Customize Portal
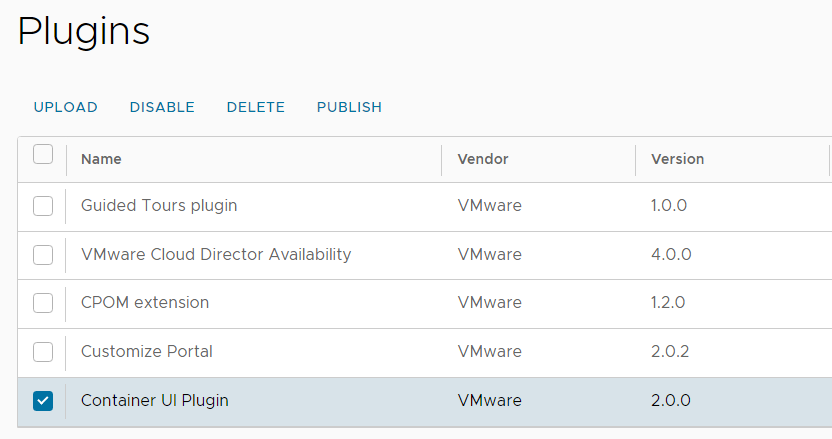
- Select the Container UI Plugin and press PUBLISH
- Select the Tenant and press SAVE
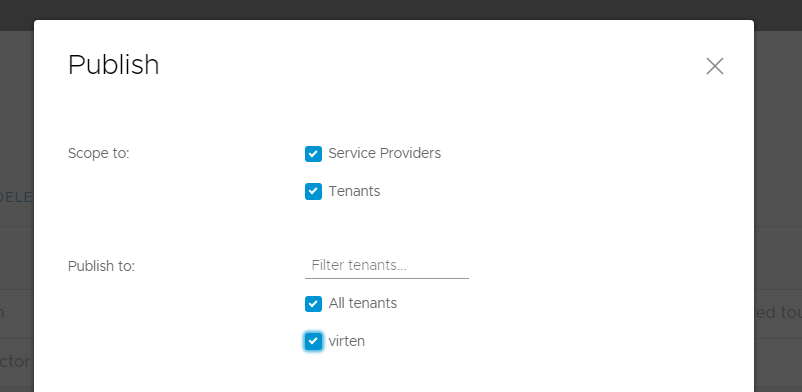
At this point, the tenant should be able to deploy Kubernetes Clusters using the VCD UI.