After upgrading a vCenter Server Appliance (vCSA) multiple times, it might result in having very large virtual disks. The reason for the growth is, whenever you upgrade the vCenter you have to select a bigger size. In some cases, you might end up with a vCenter that has over 1TB of storage allocated, but less than 100GB in use.
When upgrading vCenter 6.7 to vCenter 7.0, the upgrader calculates the source machine size based on the old Virtual Machines Disks and allocated memory. It doesn't matter how much is actually in use. Here is an example of a "Tiny" vCSA 6.7 that I want to upgrade. The system currently has 416 GB allocated, which means that I can't upgrade to "Tiny".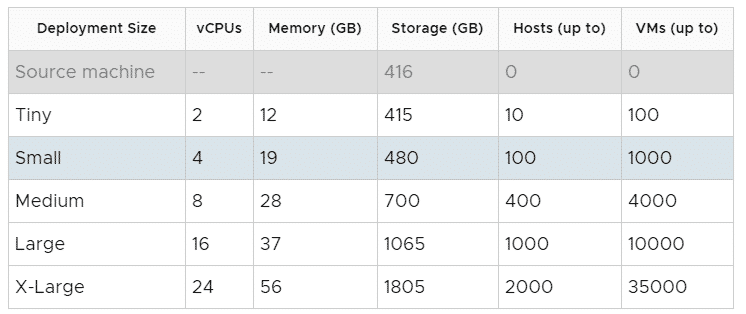
In this article, I'm describing how to shrink the Virtual machine to prevent it from growing during the upgrade. I recommend using this method only before an upgrade because it will change the order of VMDKs attached to the vCenter. While this shouldn't be a problem for the vCenter itself, it might result in problems when you need VMware GSS.
Warning: The procedure described here is not supported by VMware. Currently, there is no supported way to shrink a vCenter Server.
First of all, you should make sure that you have a working backup. I'm not a fan of snapshots when you are changing the Virtual Machine itself (adding and removing virtual disks). Creating and working with a clone is a good practice here.
When you are familiar with Linux and LVM, nothing special is going to happen here. You just have to shrink the filesystem, reduce the logical volume size, and migrate the logical volume to a smaller virtual disk.
- Make a backup or create a clone. I recommend using a clone because when the process fails, you can simply delete the clone and start the working original.
- Connect to the vCSA using SSH and login as root.
- Stop all Services.
# service-control --stop --all
- Select the filesystem you want to shrink. In this example, /storage/seat has a size of 296GB but only 67 MB in use. Note the filesystem and mount point you want to shrink.
Filesystem: /dev/mapper/seat_vg-seat
Mount point: /storage/seat
From the Filesystem name, you can also identify the Volume Group (seat_vg) and Logical Volume (seat)# df -h Filesystem Size Used Avail Use% Mounted on devtmpfs 4.9G 0 4.9G 0% /dev tmpfs 4.9G 588K 4.9G 1% /dev/shm tmpfs 4.9G 696K 4.9G 1% /run tmpfs 4.9G 0 4.9G 0% /sys/fs/cgroup /dev/sda3 11G 4.4G 5.7G 44% / tmpfs 4.9G 1.6M 4.9G 1% /tmp /dev/sda1 120M 34M 78M 31% /boot /dev/mapper/core_vg-core 25G 44M 24G 1% /storage/core /dev/mapper/log_vg-log 9.8G 72M 9.2G 1% /storage/log /dev/mapper/db_vg-db 9.8G 101M 9.1G 2% /storage/db /dev/mapper/dblog_vg-dblog 15G 86M 14G 1% /storage/dblog /dev/mapper/seat_vg-seat 296G 67M 283G 1% /storage/seat <--- This is going to be shrinked /dev/mapper/netdump_vg-netdump 985M 1.3M 916M 1% /storage/netdump /dev/mapper/autodeploy_vg-autodeploy 9.8G 23M 9.2G 1% /storage/autodeploy /dev/mapper/imagebuilder_vg-imagebuilder 9.8G 23M 9.2G 1% /storage/imagebuilder /dev/mapper/updatemgr_vg-updatemgr 99G 75M 94G 1% /storage/updatemgr /dev/mapper/archive_vg-archive 50G 64M 47G 1% /storage/archive
- Unmount the filesystem.
# umount /storage/seat/
- Run a filesystem check.
# e2fsck -f /dev/mapper/seat_vg-seat
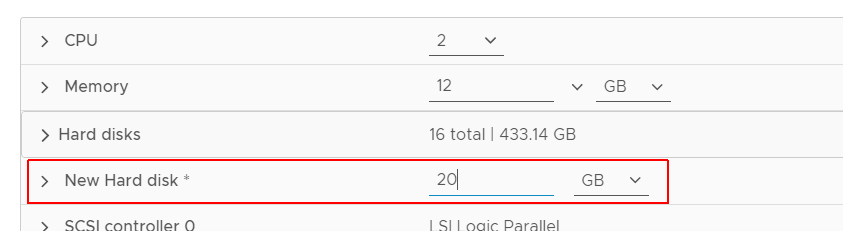
- I want to resize to a 20GB disk. Don't make the filesystem too small.
Due to overhead, the filesystem and Logical Volume needs to be slightly slower. To not waste any space, this will be resized at the end. - Resize the filesystem to the intended size -2GB (=18 GB)
resize2fs /dev/mapper/seat_vg-seat 18G
- Resize the Logical Volume to the intended size -1GB (=19GB)
lvreduce -L 19G /dev/seat_vg/seat
- Add a New Virtual Disk to the virtual machine with 20GB. T
- Rescan the SCSI Bus
# echo "- - -" > /sys/class/scsi_host/host2/scan
Additional note: You have to rescan host adapter ID 2 (host2). If you want to figure out the host adapter that is in use for virtual disks, run "lsscsi". Don't use "rescan-scsi-bus.sh".
- Run dmesg to identify the latest device. (sdn)
# dmesg
[...]
[ 7649.086349] sd 2:0:14:0: Attached scsi generic sg17 type 0
[ 7649.087607] sd 2:0:14:0: [sdn] Attached SCSI disk
- Initialize the device to be used by LVM.
# pvcreate /dev/sdn
- Add the sdn device to the Volumegroup (Identified in step 4: seat_vg)
# vgextend seat_vg /dev/sdn
- Now you should have to devices in the seat_vg - sdh (old large disk) and sdn (new small disk).
# pvs |grep seat_vg
/dev/sdh seat_vg lvm2 a-- 299.99g 279.99g
/dev/sdn seat_vg lvm2 a-- 24.99g 24.99g
- Move all physical extends from sdh to sdn
# pvmove /dev/sdh /dev/sdn
- When the migration is finished, sdh should be empty. Verify that there are no physical segments.
(Check that Allocated PE = 0 and nothing except FREE is listed in physical segments)# pvdisplay -m /dev/sdh --- Physical volume --- PV Name /dev/sdh VG Name seat_vg PV Size 300.00 GiB / not usable 7.00 MiB Allocatable yes PE Size 8.00 MiB Total PE 38399 Free PE 38399 Allocated PE 0 PV UUID V7lkDg-Fxyr-qX4x-d3oi-KhNO-XZyT-EHgibI --- Physical Segments --- Physical extent 0 to 38398: FREE - Remove sdh from the Volume Group
# vgreduce seat_vg /dev/sdh
- Remove LVM labels from sdh
# pvremove /dev/sdh
- Run the autogrow.sh script to resize all filesystems to the virtual disk size.
/usr/lib/applmgmt/support/scripts/autogrow.sh
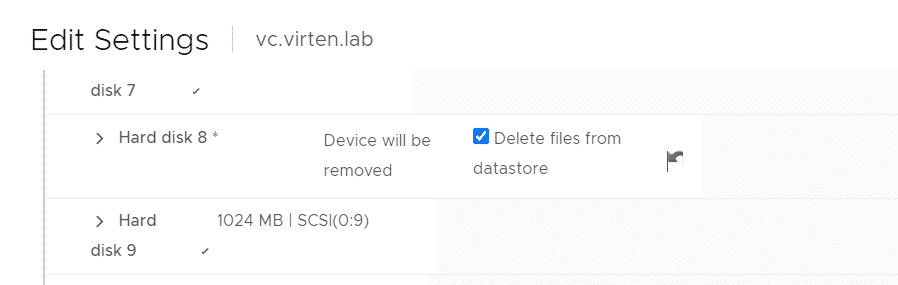
- The last step is critical. You have to delete the old disk from the vCenter Virtual Machine. Double-check to delete the right disk! Identify the SCSI ID with lsscsi:
# lsscsi |grep sdh
[2:0:8:0] disk VMware Virtual disk 1.0 /dev/sdh
- Delete the virtual disk with the SCSI ID [2:0:8:0]. Please keep in mind that the Hard Disk number is not necessarily the SCSI ID! Delete the Hard Disk with SCSI(0:8).
- That's it. Reboot the vCenter Server Appliance to make sure everything works as expected.
I can now upgrade my vCenter Server Appliance to Tiny: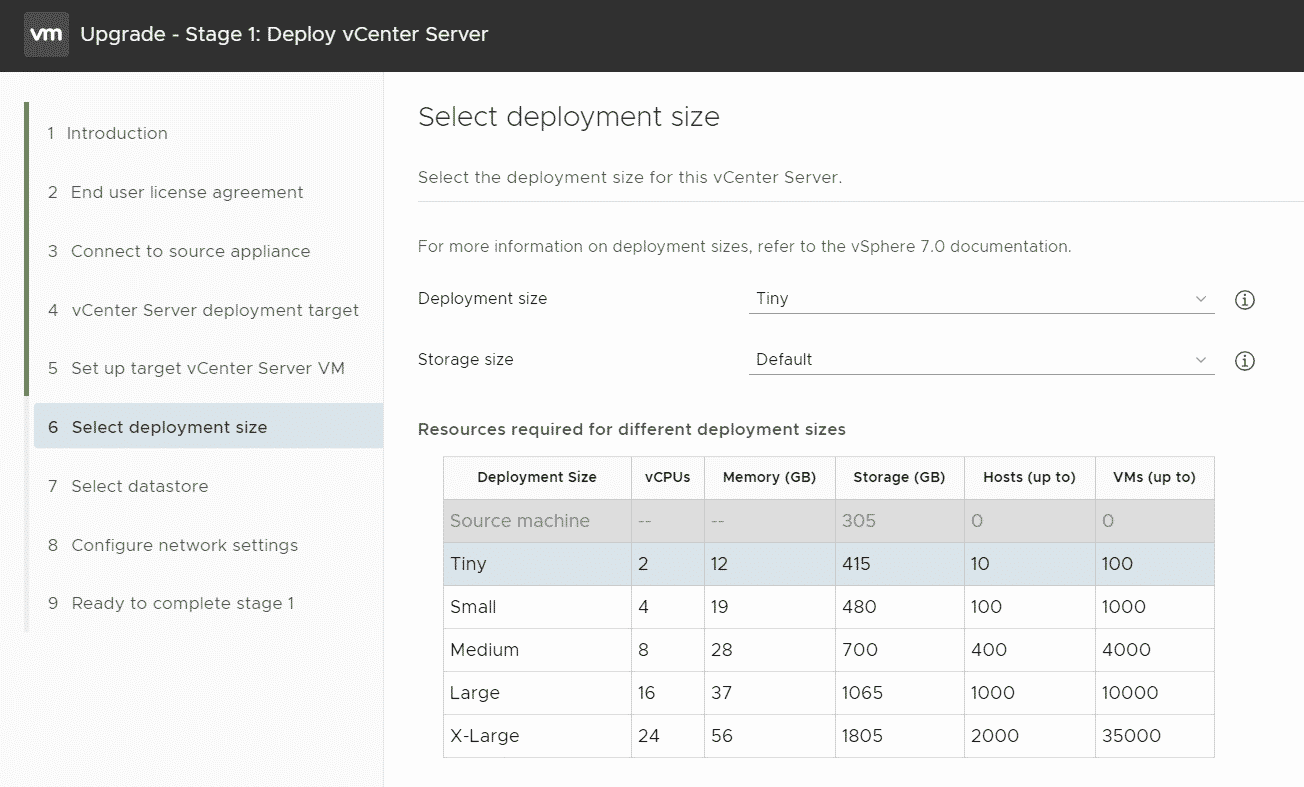
When you want to shrink another filesystem, make sure to use the corresponding Logical Volume, Volume Group, and Virtual Disk. Use the following commands to identify the correct values:
List Filesystem size and mount points
# df -h
Filesystem                                Size  Used Avail Use% Mounted on
devtmpfs                                  4.9G     0  4.9G   0% /dev
tmpfs                                     4.9G  588K  4.9G   1% /dev/shm
tmpfs                                     4.9G  696K  4.9G   1% /run
tmpfs                                     4.9G     0  4.9G   0% /sys/fs/cgroup
/dev/sda3                                  11G  4.4G  5.7G  44% /
tmpfs                                     4.9G  1.6M  4.9G   1% /tmp
/dev/sda1                                 120M   34M   78M  31% /boot
/dev/mapper/core_vg-core                   25G   44M   24G   1% /storage/core
/dev/mapper/log_vg-log                    9.8G   72M  9.2G   1% /storage/log
/dev/mapper/db_vg-db                      9.8G  101M  9.1G   2% /storage/db
/dev/mapper/dblog_vg-dblog                 15G   86M   14G   1% /storage/dblog
/dev/mapper/seat_vg-seat                  296G   67M  283G   1% /storage/seat
/dev/mapper/netdump_vg-netdump            985M  1.3M  916M   1% /storage/netdump
/dev/mapper/autodeploy_vg-autodeploy      9.8G   23M  9.2G   1% /storage/autodeploy
/dev/mapper/imagebuilder_vg-imagebuilder  9.8G   23M  9.2G   1% /storage/imagebuilder
/dev/mapper/updatemgr_vg-updatemgr         99G   75M   94G   1% /storage/updatemgr
/dev/mapper/archive_vg-archive             50G   64M   47G   1% /storage/archive
List SCSI Devices with SCSI ID and their device name
# lsscsi
[0:0:0:0]    cd/dvd  NECVMWar VMware IDE CDR00 1.00  /dev/sr0
[2:0:0:0]    disk    VMware   Virtual disk     1.0   /dev/sda
[2:0:1:0]    disk    VMware   Virtual disk     1.0   /dev/sdb
[2:0:2:0]    disk    VMware   Virtual disk     1.0   /dev/sdc
[2:0:3:0]    disk    VMware   Virtual disk     1.0   /dev/sdd
[2:0:4:0]    disk    VMware   Virtual disk     1.0   /dev/sde
[2:0:5:0]    disk    VMware   Virtual disk     1.0   /dev/sdf
[2:0:6:0]    disk    VMware   Virtual disk     1.0   /dev/sdg
[2:0:8:0]    disk    VMware   Virtual disk     1.0   /dev/sdh
[2:0:9:0]    disk    VMware   Virtual disk     1.0   /dev/sdi
[2:0:10:0]   disk    VMware   Virtual disk     1.0   /dev/sdj
[2:0:11:0]   disk    VMware   Virtual disk     1.0   /dev/sdk
[2:0:12:0]   disk    VMware   Virtual disk     1.0   /dev/sdl
[2:0:13:0]   disk    VMware   Virtual disk     1.0   /dev/sdm
List Logical Volumes
# lvs
  LV           VG              Attr       LSize    Pool Origin Data%  Meta%  Move Log Cpy%Sync Convert
  archive      archive_vg      -wi-ao----   49.99g
  autodeploy   autodeploy_vg   -wi-ao----    9.99g
  core         core_vg         -wi-ao----   24.99g
  db           db_vg           -wi-ao----    9.99g
  dblog        dblog_vg        -wi-ao----   14.99g
  imagebuilder imagebuilder_vg -wi-ao----    9.99g
  log          log_vg          -wi-ao----    9.99g
  netdump      netdump_vg      -wi-ao---- 1016.00m
  seat         seat_vg         -wi-ao----   20.00g
  swap1        swap_vg         -wi-ao----   24.99g
  updatemgr    updatemgr_vg    -wi-ao----   99.99g
List Volume Groups
# vgs
  VG              #PV #LV #SN Attr   VSize    VFree
  archive_vg        1   1   0 wz--n-   49.99g      0
  autodeploy_vg     1   1   0 wz--n-    9.99g      0
  core_vg           1   1   0 wz--n-   24.99g      0
  db_vg             1   1   0 wz--n-    9.99g      0
  dblog_vg          1   1   0 wz--n-   14.99g      0
  imagebuilder_vg   1   1   0 wz--n-    9.99g      0
  log_vg            1   1   0 wz--n-    9.99g      0
  netdump_vg        1   1   0 wz--n- 1016.00m      0
  seat_vg           1   1   0 wz--n-  299.99g 279.99g  <--- THIS
  swap_vg           1   1   0 wz--n-   24.99g      0
  updatemgr_vg      1   1   0 wz--n-   99.99g      0
List Disks and their corresponding Volume Group
# pvs
  PV         VG              Fmt  Attr PSize    PFree
  /dev/sdc   swap_vg         lvm2 a--    24.99g      0
  /dev/sdd   core_vg         lvm2 a--    24.99g      0
  /dev/sde   log_vg          lvm2 a--     9.99g      0
  /dev/sdf   db_vg           lvm2 a--     9.99g      0
  /dev/sdg   dblog_vg        lvm2 a--    14.99g      0
  /dev/sdh   seat_vg         lvm2 a--   299.99g 279.99g
  /dev/sdi   netdump_vg      lvm2 a--  1016.00m      0
  /dev/sdj   autodeploy_vg   lvm2 a--     9.99g      0
  /dev/sdk   imagebuilder_vg lvm2 a--     9.99g      0
  /dev/sdl   updatemgr_vg    lvm2 a--    99.99g      0
  /dev/sdm   archive_vg      lvm2 a--    49.99g      0
Find all disks that in a Volume Group
# pvs |grep seat_vg
  /dev/sdh   seat_vg         lvm2 a--   299.99g 279.99g
  /dev/sdn   seat_vg         lvm2 a--    24.99g  24.99g
Display LVM information from the perspective of the disk
# pvdisplay -m /dev/sdh
  --- Physical volume ---
  PV Name               /dev/sdh
  VG Name               seat_vg
  PV Size               300.00 GiB / not usable 7.00 MiB
  Allocatable           yes
  PE Size               8.00 MiB
  Total PE              38399
  Free PE               35839
  Allocated PE          2560
  PV UUID               V7lkDg-Fxyr-qX4x-d3oi-KhNO-XZyT-EHgibI

  --- Physical Segments ---
  Physical extent 0 to 2559:
    Logical volume      /dev/seat_vg/seat
    Logical extents     0 to 2559
  Physical extent 2560 to 38398:
    FREE
Thank you Florian for this post which clarifies a lot of things for me
Very useful info, thanks a lot!
trying to use your workflow to reduce size of seat_vg from over 500GB to 20GB like in your example on a migrated vcsa7. it seems pvmove is not working any longer.
pvmove throws errors that dm-mirror module is not found. seems like this module has been dropped. :(
It seems i have to revert back to my clone/backup.
Any ideas?
Hi there,
I add this error too and figured out that I did not use the latest kernel image using uname -r and ls -l /lib/modules
What I did there is a reboot and restarted the proc (service stop, umount, fsck) and retried successfully the pvmove.
Regards,
lifesaver! or better, spacesaver. I had a 550GB seat and succesfully reduced it to 20GB.
thanks for the info.
Thanks a lot Florian for this very helpful Post - i have also the Problem with a very big seat Disk and i could shrink them from 500GB to 20GB!
Thanks for this very detailed step by step. My seat disk was 1.4TB and I reduced it to 20GB. How did that happen? lol
Fantastic guide! I had to shrink down a VCSA 6.7 seat disk from 500 GB. After that, I was able to deploy a Medium/Default-sized VCSA 7.0.3 VM and successfully upgrade! Thank you!
great article...and appreciate everyone's information. Glad this is out there as an unofficial option. I had a 6.7 instance that I upgraded and was forced to have a large storage disk layout for some reason. Instead of resizing the disks per this guide, I documented what disk sizes were for what (seat, lvm_snapshot, dblog, etc.) and used a backup/restore process to get me back up and going on a new instance using my preferred config size.
I just backed up the upgraded vCenter 7 instance, shut it down, and then deployed a new one. On my newly deployed 7.0 instance using my preferred Tiny/Default setup, the restored backup wouldn't take until I edited the backup-metadata.json file and fixed the "SizeInfo" values to match what my current sizes were on the new instance. In the backed up JSON, seat was 550, but in the current Tiny config, it was only 150. After fixing those values matching them all up, the restore went through and I was back up and running with my preferred config pretty quickly.
Unfortunately this process no longer works. Good news is you do not need to delete the old /dev/sdh nor do you need to add another virtual disk. Keep it simple and resize!
Resize the filesystem and make it a bit smaller than the size the volume will eventually become: resize2fs /dev/mapper/seat_vg-seat 9G
Set the logical volume to the desired size: lvreduce -L 10G /dev/seat_vg/seat
Now let the filesystem fill the rest of the logical volume: resize2fs /dev/mapper/seat_vg-seat
Mount the filesystem(s) you resized: mount /storage/seat/
And restart the services: service-control --start --all
Boom! All works as expected and the deployment process will allow you to pick a smaller size.
Cheers!
You're a lifesaver! Thanks for commenting on an old thread!
Thank you for this detailed article! It helps me a lot with my vCenter 7 before I upgrade it to vCenter 8 :)
IDKW, but this KB article can be challenging to locate. Here's the link: https://kb.vmware.com/s/article/78914
Quotes from the KB:
"...Workaround
Note: while there are articles available on the Internet, describing how to shrink the disks of the VCSA after you finished the upgrade, please be aware that none of them are officially supported.
Instead, to work around the issue, you can follow this two-stages approach during upgrade:..."
"Related Information
Note: The same approach can be used to downsize a VCSA during the upgrade.
For example, consider a scenario where the VCSA was originally deployed with XLarge storage size, and the new VCSA should only have a "Large" or "Normal" storage size. However, keep in mind that the new VCSA needs to have enough storage space to accommodate the data imported from the source appliance."