NSX-T is a critical infrastructure component and it is crucial to have a working backup and restore plan. With complex products, the backup and restore strategy gets more complicated. When working with Virtual Machines, the backup is usually done with VMware Snapshots, which is super convenient. Unfortunately, with the complexity of NSX-T which has many components like clustered Managers, Transport Nodes, and ESXi Kernel Modules, you can't use snapshots as a backup strategy.
This article provides an overview of how to backup NSX-T, and how the restore is done properly.
NSX-T Managers
N.SX-T Managers .are the only component that needs to be backed up in an NSX-T setup. While you can't use Snapshots to backup managers, NSX-T has a built-in application backup.
Edge Transport Nodes (Edge VMs)
It is not required to backup Edge Transport Nodes. Edge Transport nodes are virtual machines that are managed by the NSX-T Manager. If an Edge Transport node fails you can simply redeploy a new VM using the Manager, add it to the Edge Cluster, and delete the failed node.
Host Transport Nodes (ESXi Hosts)
All ESXi host-related configurations are managed by NSX-T Managers. In a production environment, you are typically working with Transport Nodes Profiles that are applied on cluster level. If an ESXi host fails and needs to be reinstalled, all NSX-T related configurations are automatically applied when the host is added to the cluster.
Configure NSX-T Manager Backup
The only supported backup protocol for NSX-T is SFTP, which is a common file transfer protocol in Linux-based operating systems. Depending on your requirements, you can either use a dedicated system for NSX-T backups or a shared system. If you want to use a dedicated system and you don't already have a deployment mechanism in place, I recommend taking a look at PhotonOS, which is a very lightweight and secure Linux-based Operating System by VMware. Whatever system you are using, make sure to include it in your standard backup process.
- Create a Backup User on the Backup Target Host.
# adduser nsxbackup
Adding user `nsxbackup' ...
Adding new group `nsxbackup' (1001) ...
Adding new user `nsxbackup' (1001) with group `nsxbackup' ...
Creating home directory `/home/nsxbackup' ...
# mkdir /home/nsxbackup/nsx.virten.lab/
# chown nsxbackup:nsxbackup /home/nsxbackup/nsx.virten.lab/
- Get the SSH Thumbprint from the Backup Target Host.
# ssh-keygen -l -f /etc/ssh/ssh_host_ecdsa_key.pub
256 SHA256:x+rL2/hyw4+x7Zu6J36sLgnXv7+gAB8cmfRSS9Cg22w (ECDSA)
- Open NSX-T Manager UI and navigate to System > Lifecycle Management > Backup & Restore
- Press EDIT
- Fill out the Backup Configuration form:
- FQDN or IP Address
- Port
- Directory Path (The Directory will not be created automatically)
- Username
- Password
- SSH Fingerprint (From Step 2)
- Passphrase (Make sure to write down the passphrase as it is required to restore)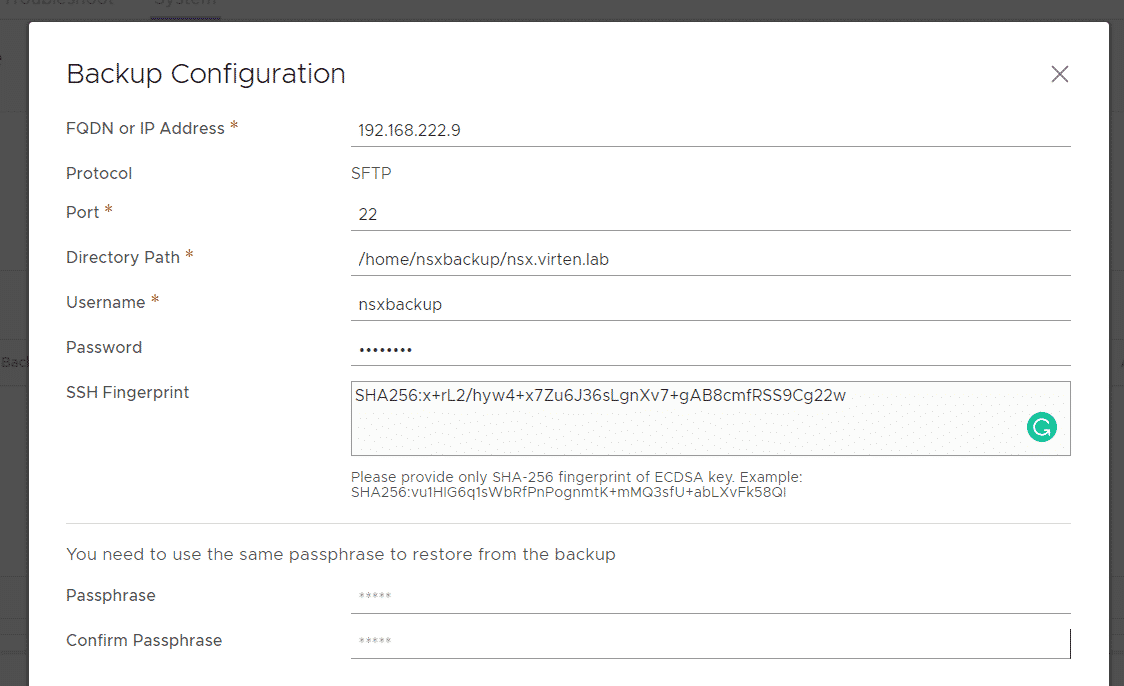
- Press SAVE
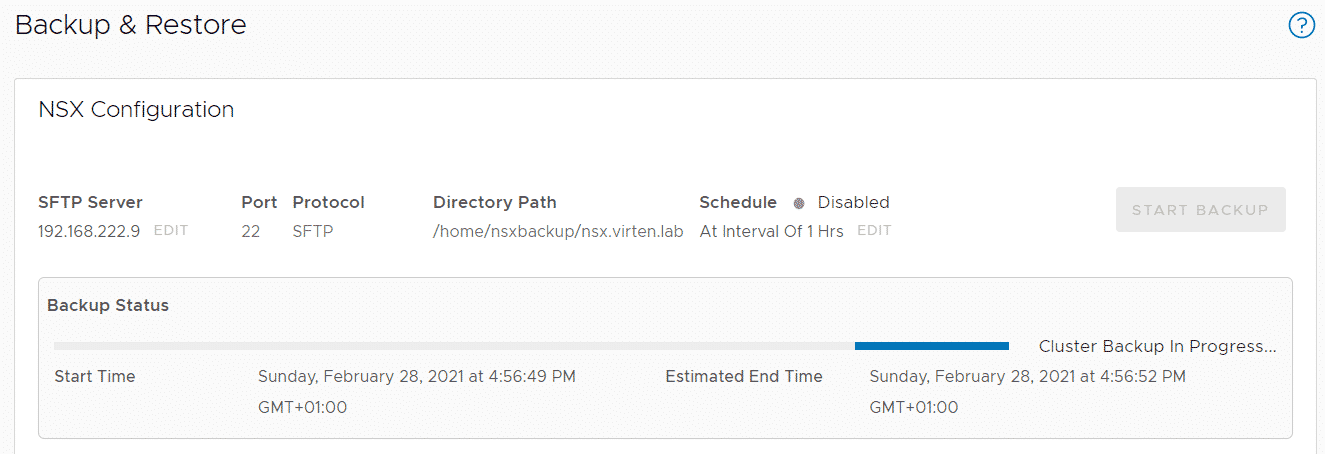
- Back at the Backup & Restore page, click START BACKUP to verify that you can run a backup successfully.
When the backup wasn't successful, login to the NSX-T Manager as root and check the following log files for errors:
- /var/log/proton/nsxapi.log (Search for NapiBackupGenerationServiceImpl or the FQDN/IP of your Backup Host)
- /var/log/nvpapi/api_server.log (Search for backup)
Example:
# grep -i '192.168.222.9' /var/log/proton/nsxapi.log
# grep -i NapiBackupGenerationServiceImpl /var/log/proton/nsxapi.log
# grep -i backup /var/log/nvpapi/api_server.log
Configure Automatic Backups
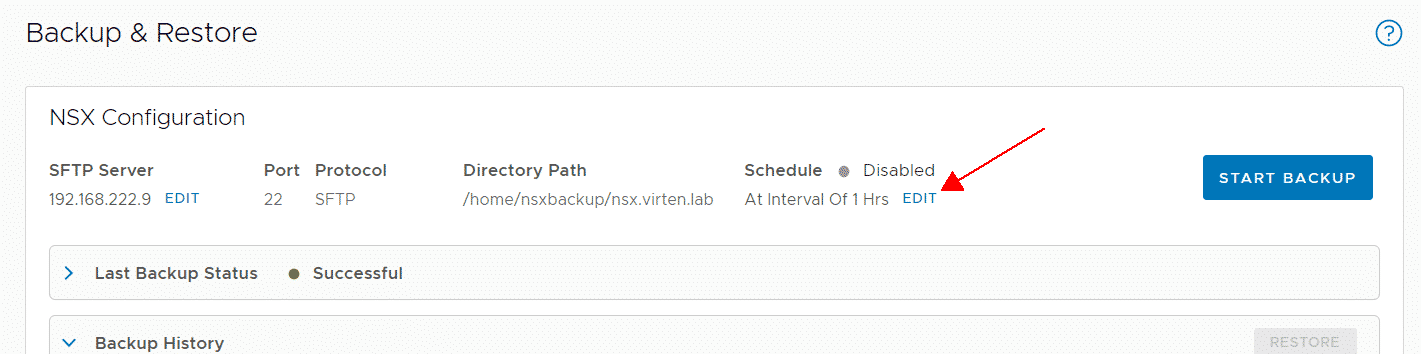
When the initial backup was successful, you should configure the backup scheduler to perform automatic Backups.
- Within Backup & Restore press EDIT, next to Schedule
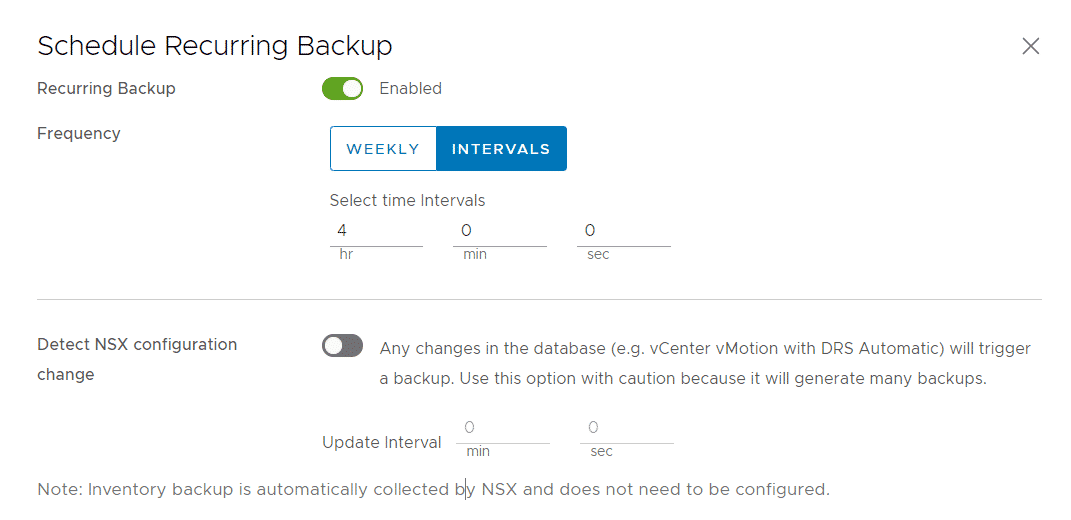
- Activate Recurring Backups and set an Interval. The default is to run backups every hour.Choosing the right backup interval for NSX-T is not an easy task. NSX-T backups are only configuration backups and did not take much space. A small environment starts somewhere at 10MB per backup. Keep in mind that when you are working with other tools like VMware Cloud Director or vSphere with Tanzu, missing objects between backups might result in inconsistent objects when you need to restore NSX-T. You can also activate "Detect NSX configuration change" to create backups after every change to the database, but be warned, this will create a huge amount of backups.
NSX-T itself does not have the ability to configure a retention policy for backups. That means that all backups will be kept forever, unless you clean them up manually, or implement the nsx_backup_cleaner.py script.
Automatically Remove Old Backups
As mentioned above, there is no configurable retention policy in NSX-T which means that all backups will be kept forever. You can find a Python script named nsx_backup_cleaner.py in the directory /var/vmware/nsx/file-store on NSX-T Manager. This script can be used on the backup target to automatically delete old backups.
nsx_backup_cleaner.py has 3 Options:
- -d/--dir: Backup root directory
- -k/--retention-period: Delete backups that are older than the given number of days.
- -l/--min-count: (Optional) Minimum number of backup files to be kept. You should always keep a specific amount of backups because when the backup fails without you noticing it, older backups will be kept. The default value is 100.
Setup a Cronjob:
- SSH to the NSX-T Manager and login as root
# ssh root@nsx1.virten.lab
- Copy the Cleaner Script (/var/vmware/nsx/file-store/nsx_backup_cleaner.py) to the backup user's home directory on your backup host.
# scp /var/vmware/nsx/file-store/nsx_backup_cleaner.py nsxbackup@192.168.222.9:~
- SSH to the backup host and login with your backup user
# ssh nsxbackup@192.168.222.9
- Run the script to verify
~$ ./nsx_backup_cleaner.py -d ~/nsx.virten.lab/ -k 7
Keeping the following backup files for folder /home/nsxbackup/nsx.virten.lab/cluster-node-backups
/home/nsxbackup/nsx.virten.lab/cluster-node-backups/3.1.1.0.0.17483186-5cf21742-091a-b9b9-1f24-ad75ede2d23b-192.168.222.16/backup-2021-02-28T15_56_49UTC
/home/nsxbackup/nsx.virten.lab/cluster-node-backups/3.1.1.0.0.17483186-5cf21742-091a-b9b9-1f24-ad75ede2d23b-192.168.222.16/backup-2021-02-28T16_42_23UTC
Keeping the following backup files for folder /home/nsxbackup/nsx.virten.lab/inventory-summary
/home/nsxbackup/nsx.virten.lab/inventory-summary/3.1.1.0.0.17483186-5cf21742-091a-b9b9-1f24-ad75ede2d23b-192.168.222.16/inventory-2021-02-28T16_50_22UTC.json
- Create a cronjob to run the script daily at 2 AM.
~$ crontab -e
Add the following for daily cleanup jobs that will delete backups older than 7 days.
0 2 * * * /home/nsxbackup/nsx_backup_cleaner.py -d /home/nsxbackup/nsx.virten.lab/ -k 7
Restore NSX-T Manager
A restore is only required when the whole NSX-T installation is broken. When a single manager in a cluster fails you simply redeploy it using the NSX-T UI. Use the following procedure to restore NSX-T from backup.
- Power off all NSX-T manager appliances in the cluster that you are restoring.
- Deploy a fresh Manager using the old IP address and name. Make sure to deploy the same version where the backup was taken from. The version can be easily identified by the backup name. In that example, deploy NSX-T 3.1.1:
cluster-node-backups$ ls
3.1.1.0.0.17483186-5cf21742-091a-b9b9-1f24-ad75ede2d23b-192.168.222.16
- When the new manager is running, do not change anything. Open the UI and navigate to System > Lifecycle Management > Backup & Restore.
- Press EDIT and configure the Backup Host.
- Select a Backup from the Backup History and press RESTORE
- Follow the instructions to perform the restore.
- When the restore is finished, deploy additional NSX-T Managers using the known procedure to form a cluster.
It is very useful article for me.
When i configure backup for nsx-t, as a result, I did that with your article
Thanks