When you are running an NSX-T backed VMware Cloud Director, your customers might have the requirement to implement a remote access VPN solution. While Client VPN was possible with NSX-v, it is completely missing in NSX-T. This article explains how a customer can implement a Client VPN solution based on WireGuard. The implementation is fully in the hand of the customer and does not need any VCD modification or Service Provider interaction.
Wireguard is not part of VMware Cloud Director but can be installed easily on a Virtual Machine in the tenant's network. The following diagram shows the environment that is used throughout the article.
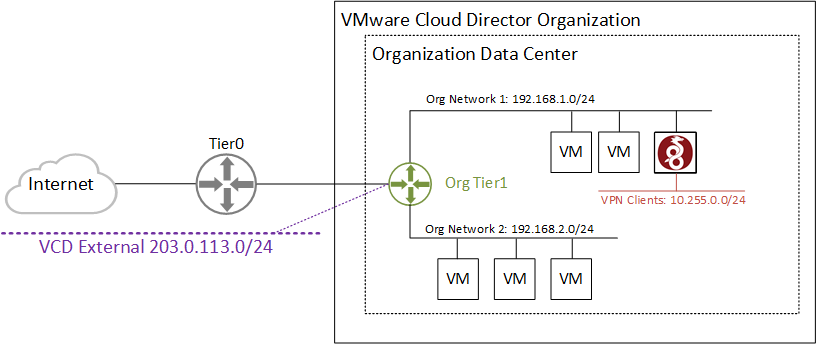
When implementing a Client VPN solution in VCD, you should make yourself aware that you can't add static routes on the Tier 1 Gateway. To make the VPN Client network (10.255.0.0/24) reachable for all Organization networks, you need to add a static route to either the default gateway (not possible with NSX-T) or on each VM (very impractical). To solve this limitation, you have to use masquerading/NAT on the VPN Server. This will hide the VPN Client Network from the organization and use the VPN Servers IP address instead. Of course, with masquerading, you can't access VPN Clients from Org Networks, but this usually isn't a requirement in remote access VPN.
WireGuard Installation on CentOS 8
WireGuard is available for all common Linux distributions. In this example, I'm using a CentOS 8 Virtual Machine. Refer to the official documentation for installation instructions on other distributions. A CentOS 8 Virtual Machine is already prepared and available in the Org Network 1 using the IP address 192.168.1.250.
# yum install elrepo-release epel-release -y
# yum install kmod-wireguard wireguard-tools -y
WireGuard Server Configuration
Create Public and Private Keys
First, you have to create a private and public key using the wg tool. In WireGuard, you can always derive the public key from the private key. You don't create a "keypair" like in SSL, you just generate a private key and derive the public key from the private key using wg pubkey.
# wg genkey | tee /etc/wireguard/privatekey | wg pubkey | tee /etc/wireguard/publickey
# cat /etc/wireguard/privatekey
8AqJCXhEjvR6F6yglZ96LULpeK31MmL2VuV3oBMSXXQ=
# cat /etc/wireguard/publickey
c+xGx+Xu0lVeJUI9ZrCIhZOAPUgIqm5qlP32WKAR1hQ=
Create the Tunnel Configuration
The tunnel is configured in a simple configuration file. Create the configuration file /etc/wireguard/wg0.conf with the following content:
[Interface]

# IP Address of the VPN Server in the VPN Client Network
Address = 10.255.0.1/24

# Automatically save the configuration when a new client is added
SaveConfig = true

# UDP port number the VPN Server is listening to
ListenPort = 51820

# Private Key from the /etc/wireguard/privatekey file
PrivateKey = 8AqJCXhEjvR6F6yglZ96LULpeK31MmL2VuV3oBMSXXQ=

# Open the firewall port and enable masquerading after starting the VPN Service.
PostUp = firewall-cmd --zone=public --add-port 51820/udp && firewall-cmd --zone=public --add-masquerade

# Close the firewall port and disable masquerading after stopping the VPN Service.
PostDown = firewall-cmd --zone=public --remove-port 51820/udp && firewall-cmd --zone=public --remove-masquerade
To prevent users from accessing the private key or VPN configuration, set the permission to 600.
# chmod 600 /etc/wireguard/*
Start the Interface
Bring the interface up by running the following command:
# wg-quick up wg0
[#] ip link add wg0 type wireguard
[#] wg setconf wg0 /dev/fd/63
[#] ip -4 address add 10.255.0.1/24 dev wg0
[#] ip link set mtu 1420 up dev wg0
[#] firewall-cmd --zone=public --add-port 51820/udp && firewall-cmd --zone=public --add-masquerade
success
success
When everything was successful, set the service to persist after reboots.
# systemctl enable wg-quick@wg0
Make the VPN Server available to the Internet
To make the VPN Server available to the Internet, create a Port Forwarding (NAT) in VMware Cloud Director. As the WireGuard port is not part of the default set of applications, you have to use a custom application port profile.
- Open Cloud Director as Tenant
- Navigate to Networking > Edge Gateways and open the Gateway configuration
- Within Security > Application Port Profiles press NEW
- Create a profile WireGuard including the port UDP/51820
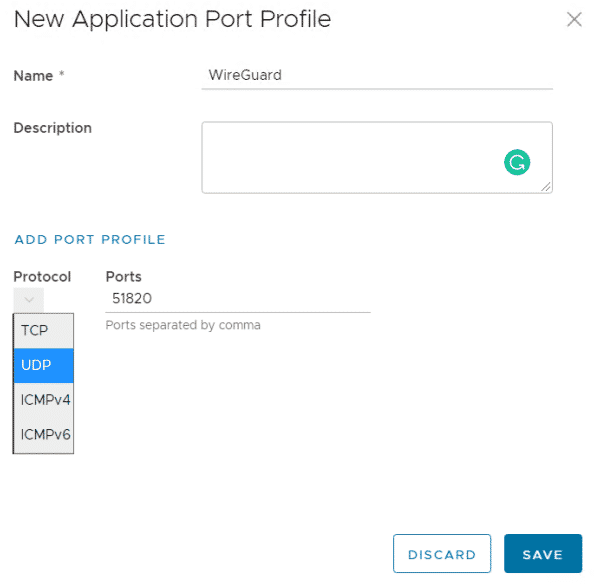
- Press SAVE
- In the Edge Gateway Configuration, open the NAT page
- Create a DNAT rule to forward a public IP to the WireGuard Server.
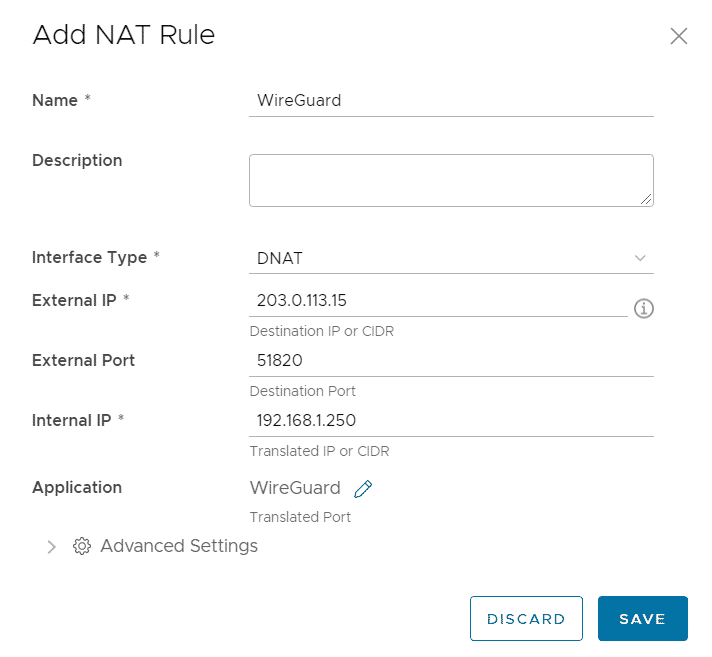
- Press SAVE
Add a WireGuard VPN Client
To add clients, the process is as follows:
- The Client generates private and public keys
- The Client sends its public key to the VPN Server maintainer
- The VPN Server maintainer adds the key to the VPN Server and assigns an IP address
- The VPN Server maintainer sends a configuration file to the Client
- The Client adds the configuration file to its WireGuard client
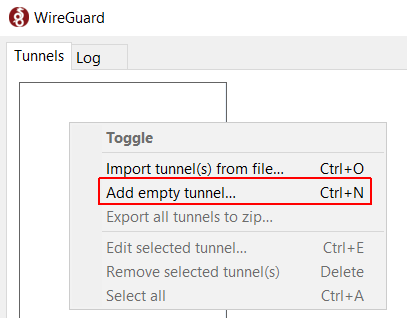
In this example, I'm using the Windows Client. You can get the Client from the official website.
- After installing the Client, right-click in the Tunnel Configuration and select Add empty tunnel...
- Give the tunnel a Name and copy the Public Key.
- Use the public key to add a peer in the WireGuard Server configuration. At this step, an IP address from the VPN Client Network is assigned to the Client.
# wg set wg0 peer vev5WHsYM/+HzbF8x6KtVC4Iy43TOegIgMwKC5scrDk= allowed-ips 10.255.0.10/32
- Edit the tunnel in the client and add the following configuration
[Interface]
PrivateKey = SN0JI0Tm8Wy/eGpJQboi7DMgM2X1F+7QCBQa4pPZnXs=
Address = 10.255.0.10/32

[Peer]
PublicKey = B2S2OVZpDbekItMzn5ylGdM2aCosYs9W905FlqXaNXM=
AllowedIPs = 192.168.1.0/24, 192.168.2.0/24
Endpoint = 203.0.113.15:51820
- Press Activate to start the tunnel
You should now have full access to all Org Networks connected to the Edge Gateway.
Troubleshooting
When your Virtual Machine has Secure Boot enabled, the WireGuard kernel module might fail to load, resulting in the following error message when trying to bring up an interface:
# ip link add dev wg0 type wireguard
Error: Unknown device type

# modprobe wireguard
modprobe: ERROR: could not insert 'wireguard': Required key not available
Workaround: Disable Secure Boot, or use an Image with Secure Boot disabled.