When you try to deploy custom images using the VM Service in vSphere with Tanzu, the following error is displayed:
Error from server (GuestOS not supported for osType other3xLinux64Guest on image photon-hw11-4.0-1526e30ba0 or VMImage is not compatible with v1alpha1 or is not a TKG Image): error when creating "vmsvc-photon.yaml": admission webhook "default.validating.virtualmachine.vmoperator.vmware.com" denied the request: GuestOS not supported for osType other3xLinux64Guest on image photon-hw11-4.0-1526e30ba0 or VMImage is not compatible with v1alpha1 or is not a TKG Image
Only images provided by VMware in their Marketplace are supported to be deployed with the VM Operator. The reason for this limitation is that the template needs to be prepared to be used with OVF options and cloud-init. As of today, the only available Image is CentOS 8.
If you want to use your own images, the only hard requirement is that the Virtual Machine has to boot with DHCP and to access the machine, SSH needs to be enabled. In this article, I'm explaining how to change the official PhotonOS Image to be used with VM Service.
- Download PhotonOS (PhotonOS 4.0 GA - OVA with virtual hardware v11)
- Extract photon-hw11-4.0-1526e30ba0.ova to get .ovf and .vmdk files. This can be done with 7-Zip.
- Open photon-ova.ovf with a text editor.
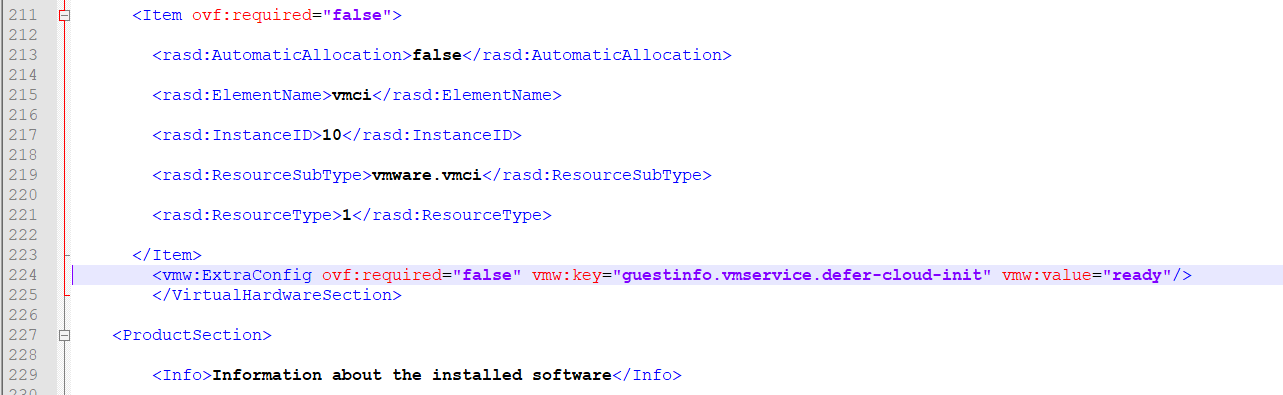
- Add the following line in the <VirtualHardwareSection></VirtualHardwareSection> section
<vmw:ExtraConfig ovf:required="false" vmw:key="guestinfo.vmservice.defer-cloud-init" vmw:value="ready"/>
- The config should look like this:
- Save the file
- Import the .ovf and .vmdk to the VM Service activated Content Library
- Verify that the image is supported using kubectl
# kubectl get virtualmachineimages.vmoperator.vmware.com -o wide
NAME                                                         VERSION                           OSTYPE                FORMAT   IMAGESUPPORTED   AGE
centos-stream-8-vmservice-v1alpha1-1619529007339                                               centos8_64Guest       ovf      true             4d9h
photon-hw11-3.0-0a85037c                                     3.0                               other3xLinux64Guest   ovf      false            4d11h
photon-hw11-4.0-1526e30ba0                                   4.0                               other3xLinux64Guest   ovf      false            4d11h
photon-hw11-4.0-vmservice                                    4.0                               other3xLinux64Guest   ovf      true             61m
photon-hw11-4.0-with-guestos                                 4.0                               other3xLinux64Guest   ovf      false            70m
- Use the example .yaml to deploy PhotonOS
vms-photon.yaml
apiVersion: vmoperator.vmware.com/v1alpha1
kind: VirtualMachine
metadata:
  name: photon
  namespace: dev
spec:
  imageName: photon-hw11-4.0-vmservice
  className: best-effort-xsmall
  powerState: poweredOn
  storageClass: storagegold
  networkInterfaces:
  - networkType: nsx-t
Deploy PhotonOS
# kubectl apply -f vmsvc-photon.yaml
virtualmachine.vmoperator.vmware.com/photon created
Get the IP Address
# kubectl get vm photon -o jsonpath='{.status.vmIp}'
10.244.0.82
Connect to the Virtual Machine using SSH. You should be able to login as root (Password: changeme)