This article explains how to set up Firewall Rules in NSX-T that allow users to only access specific domains. In many high-security environments, outgoing traffic is filtered using a firewall. When you want to access an external service, you usually create IP-based firewall rules. In some cases, you don't know which IP addresses hide behind a domain. This is where domain filters come in handy.
While this feature has been available in NSX-T for a while, it was limited to a predefined set of domains. With the Release of NSX-T 3.1, you can finally define your own FQDN lists.
In this example, I'm going to set up NSX-T Distributed Firewall to only allow access to www.virten.net and reject all other domains.
Goal
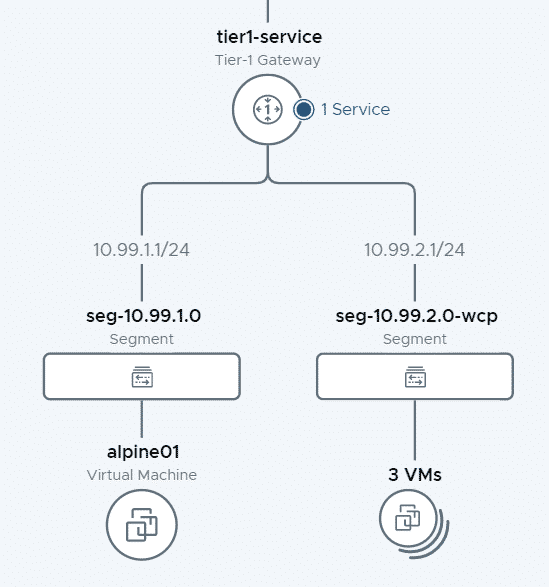
I want to deny all Virtual Machines (including alpine01) in the NSX-T segment seg-10.99.1.0 to access anything, except for browsing www.virten.net.
Step 1 - Create a Group
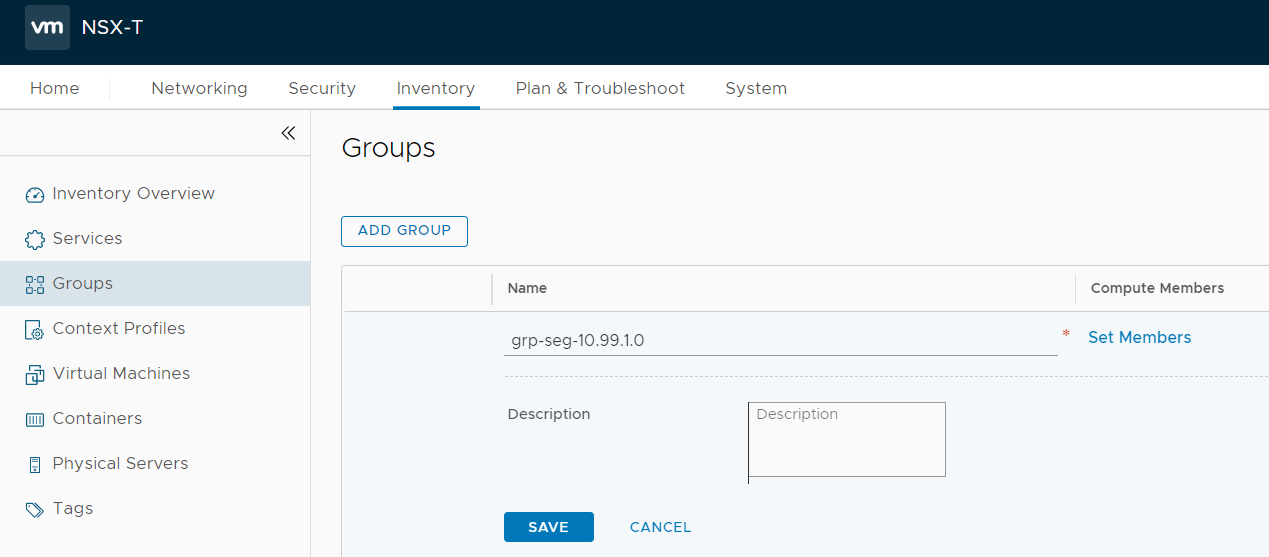
The group is used as a target to apply Distributed Firewall rules. I want the rule to apply to all systems connected to the seg-10.99.1.0 segments, I create a group with a Segment Member.
- In NSX-T, navigate to Inventory > Groups and press ADD GROUP
- Give the group a name and press Set Members
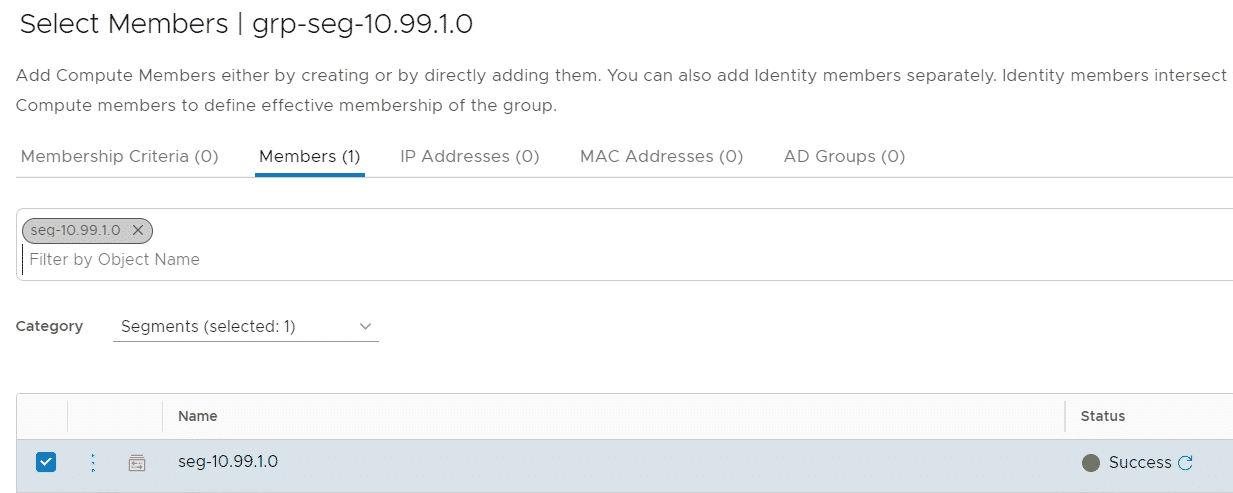
- Select the Members tab
- Set Catagory to Segments
- Select the seg-10.99.1.0 Segment and press APPLY
- Press SAVE to finish the group configuration
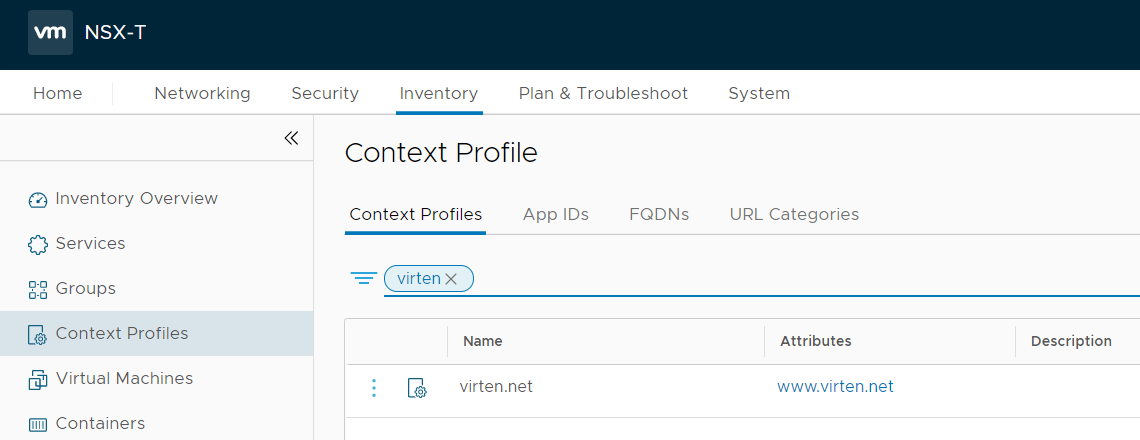
Step 2 - Create a Context Profile
The Context Profile is used used to further specify Firewall rules. In my use case, it is used to specify the URL filter.
- Navigate to Inventory > Context Profiles and press ADD CONTEXT PROFILE
- Give the profile a name and press Set
- Press ADD ATTRIBUTE and select Domain (FQDN) Name
- Press the 3 dots and select Add FQDN
- Add the domain www.virten.net and press SAVE
- Press ADD > APPLY and SAVE to finish the context profile configuration
Step 3 - Create a Distributed Firewall Rule
The last step is to create the actual firewall rule. When creating the firewall policy, make sure to also allow DNS, and set the DNS rule to the DNS Context Profile, or else the filter will not work.
- Navigate to Security > Distributed Firewall
- Press ADD POLICY and give the policy a name
- Select the policy and press ADD RULE
- Create a rule to allow DNS, using the DNS context profile applied to the Group created in Step 1
- Create a second rule to allow HTTPS using the virten.net context profile applied to the Group created in Step 1
- Create a Cleanup rule at the end to Reject all other traffic.
- The firewall policy should look like this:

- Press PUBLISH to activate the policy.
Verify that you can access www.virten.net, while all other traffic is blocked:

Check the Distributed Firewall Log (which is located on the ESXi host running the alpine01 VM) at /var/log/dfwpktlogs.log
2021-05-12T19:21:37.053Z 0c7787a5 INET L7 Rule pending PASS 17409 OUT 60 UDP 10.99.1.10/58403->8.8.8.8/53
2021-05-12T19:21:37.063Z 0c7787a5 INET match PASS 17409 OUT 48 UDP 10.99.1.10/58403->8.8.8.8/53 APP_DNS
2021-05-12T19:21:37.092Z 0c7787a5 INET match PASS 17411 OUT 60 TCP 10.99.1.10/43870->178.77.77.190/443 S www.virten.net

2021-05-12T19:21:43.347Z 0c7787a5 INET L7 Rule pending PASS 17409 OUT 60 UDP 10.99.1.10/48989->8.8.8.8/53
2021-05-12T19:21:43.358Z 0c7787a5 INET match PASS 17409 OUT 48 UDP 10.99.1.10/48989->8.8.8.8/53 APP_DNS
2021-05-12T19:21:43.385Z 0c7787a5 INET match REJECT 17410 OUT 60 TCP 10.99.1.10/57760->142.250.181.196/443 S