When you are using NSX-T as network backend for VMware Cloud Director, you can't use the Native Load Balancer included in NSX-T. Since Cloud Director 10.2, the NSX Advanced Loadbalancer (ALB), previously known as AVI Vantage Platform, has been integrated to allow customers to create Self-Service Load Balancers.
This article explains all steps required to integrate NSX ALB into VMware Cloud Director.
Prerequisites
The basic installation and configuration of vCenter Server, NSX-T and Cloud Director is not the scope of this article. I'm assuming that you already have an NSX-T backed Cloud director that is able to host tenants. Please make sure to understand the following prerequisites prior to starting with the NSX Advanced Load Balancer (ALB) integration.
- vCenter, ESX, Cloud Director and NSX-T installed and configured.
- NSX-T: Tier-0 Gateway with any kind of external connection.
- Cloud Director: Network Pool, Tier-0 Gateway (External Network) and Provider VDC ready to host tenants.
- A Cloud Director Organization with an Edge Gateway, a couple of allocated IP Addresses and a "Routed Org Network".
- Two Webservers Virtual Machines in the "Routed Org Network" to be used in the load balancer pool.
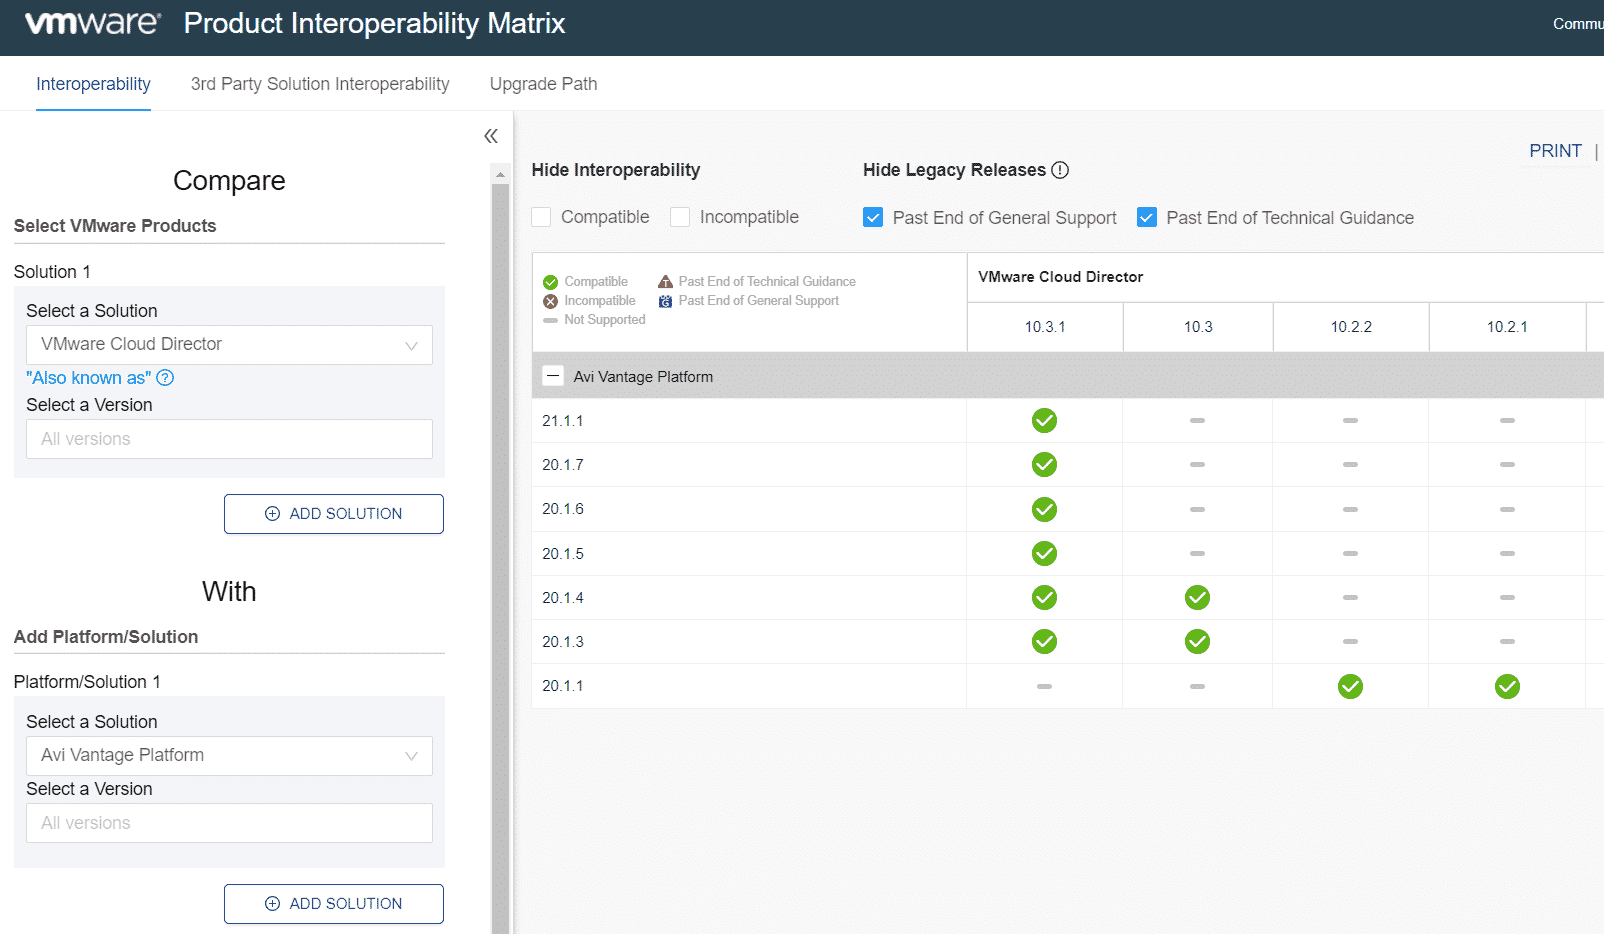
- Check the Interoperability of VMware Cloud Director and the version of ALB you are planning to use. Go to VMware Interop Matrix and Compare VMware Cloud Director with Avi Vantage Platform to find supported Versions. For this article, I'm using Cloud Director 10.3.1, NSX-T 3.1.3.1 and ALB 21.1.1.
ALB Glossary
When you are working with the NSX Advanced Loadbalancer, you should make yourself familiar with its components. For VCD integration, the following new terms are used:
- AVI Vantage Controller or NSX-ALB Controller - Management System, similar to NSX-T Manager, to manage the NSX Advanced Load Balancer.
- NSX-T Cloud - Defines how NSX-ALB communicates with NSX-T and vCenter to deploy Load Balancing Services. (Basically, the "Transport Zone, configured in NSX-T)
- Service Engine (SE) - Virtual Machine that performs the actual Load Balancing.
- Service Engine Group (SEG) - Defines availability and capacity parameters for the Service Engines. With VCD, you can use dedicated and shared Service Engine Groups.
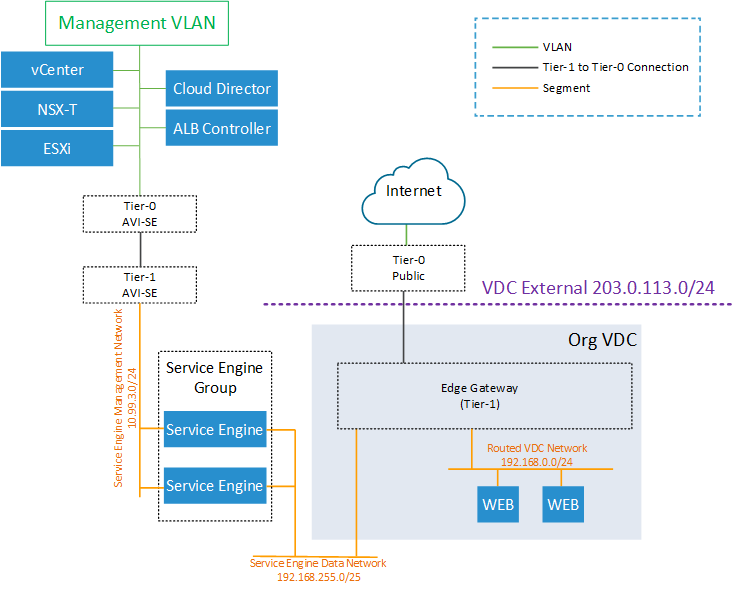
- SE Management Network - Management Network where Service Engines are placed to communicate with the NSX-ALB Controller.
- SE Data Network - Private network between Service Engine and Tier-1 Gateway to perform the actual Load Balancing.
- Virtual Services - The frontend part of the Load Balancer.
- Pools - The backend part of the Load Balancer.
Additional Information
- The ALB is fully integrated into VCD and only backend communication is required. You don't have to make the controller accessible for customers like with other VCD Addons (Tenant App, vCloud Availability, Container Storage Extension, Cohesity, etc.)
- You can't add the NSX-T Manager with its IP Address in VCD and with the hostname in AVI. Verify if you have used an IP address or FQDN when connecting VCD to NSX-T. For ALB integration, it is important to use the same address. VCD > Resources > Infrastructure Resources > NSX-T Manager. See KB83889 for further information.
- Service Engine Sizing is not covered in this article. For production use, refer to the official ALB Service Engine Sizing Documentation
- My Cloud Director uses RFC5735 reserved 203.0.113.0/24 (TEST-NET-3) as the public IP pool to differentiate between public and private addresses. It's a special address space which only routed in my lab.
- I using a single NSX Overlay Transport Zone (Default: nsx-overlay-transportzone) in NSX-T, VCD and ALB.
Step 1 - NSX Advanced Loadbalanver Deployment and Basic Configuration
The Advanced Loadbalancer is not part of a standard NSX-T Installation. While NSX-T has a native Load Balancer functionality in Tier-1 Gateways, those are very limited and can't be used with Cloud Director. You have to download and install an additional product, the "AVI Vantage Controller". The Controller then uses NSX-T as the backend. It is not integrated into the NSX-T UI.
Currently, the product is still hosted at AVI's software portal. In VMware Customer Connect (Direct Link: Download NSX Advanced Loadbalancer), you are forwarded and automatically logged into the AVI portal, where you can find the Download within Software > Vantage. Choose the desired version (21.1.1 in this article) and download the VMware Controller OVA.
Deploying the AVI Vantage Controller .ova is very simple. You just have to provide network information (IP address, Subnet Mask and Gateway). The system should be placed in a management network, adjacent to vCenter, NSX-T Manager and VCD. During deployment, you can also provide an SSH key that is automatically added to the system for login with SSH. I've deployed the controller using Powershell OVF Helper (See: OVF Template for VMware NSX Advanced Load Balancer).
If you are in a lab environment with limited resources, you can resize the Controller to 4vCPU and 12 GB RAM without problems.
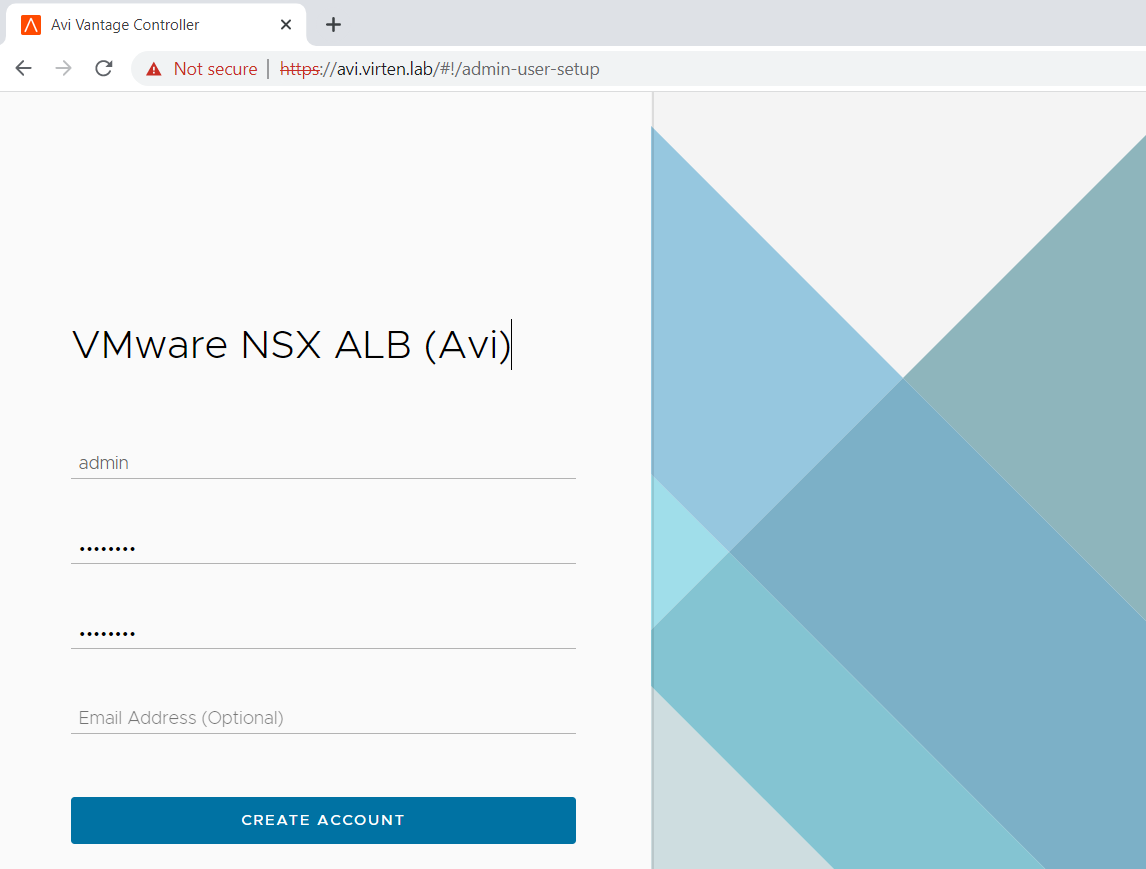
When the deployment is finished, open the NSX ALB UI with a browser. The first step forces you to set a password for the admin user.
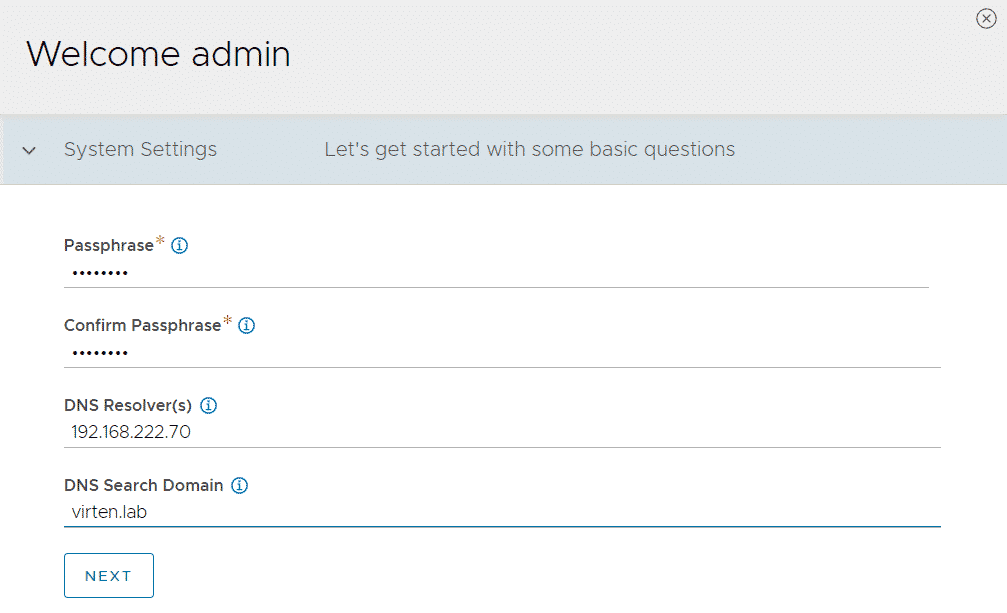
After setting the admin password you have to provide a Passphrase (Used to encrypt sensitive information in backups) and a DNS server.
As this is a demo setup, I don't need it to send Emails, so I set Email/SMTP to None.
The last step in the initial configuration is to set up Tenant IP Route and Service Engine sharing. This step might be confusing when you are implementing ALB with VCD. ALB has its own multitenancy model which has nothing to do with tenants in Cloud Director. From the ALB perspective, you only configure the default "admin" tenant, which serves the NSX-T Cloud and VCD. Set the Tenant Setting to:
- IP Route Domain: Per tenant IP route domain
- Service Engines Context: Service Engines are managed within the tenant context, not shared across tenants.
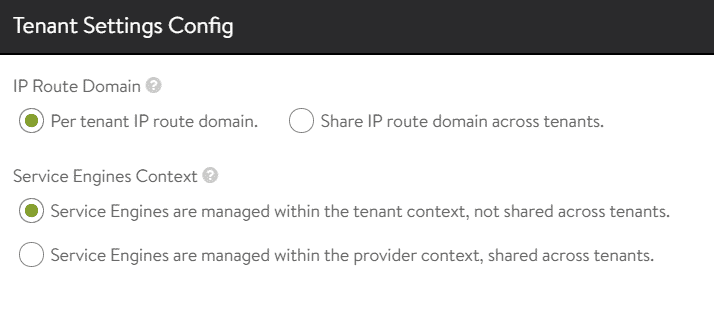
Note: You can change Tenant Settings later within NSX-ALB > Administration > Settings > Tenancy Mode.
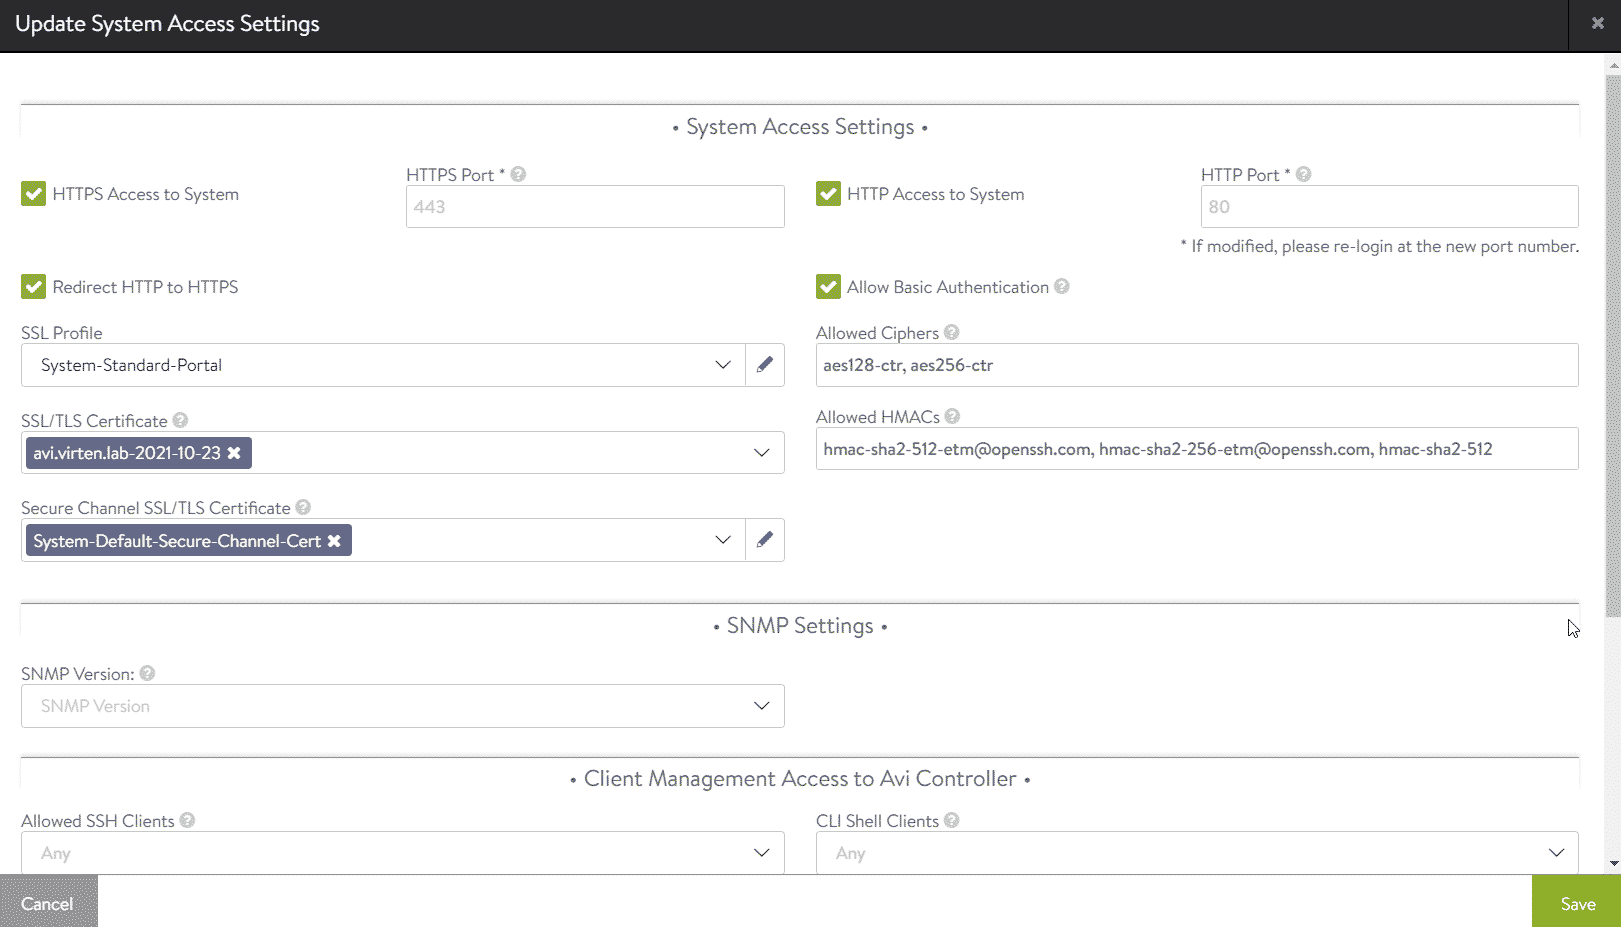
After finishing the wizard, you should see the NSX-ALB UI. The first step here should be to replace the default SSL certificate. You can use a self-signed certificate. This step is mandatory and can not be skipped. If you try to connect VCD to ALB using the default certificate, the connection will fail. In NSX-ALB, navigate to Administration > Settings > Access Settings and press the pen in the upper right corner to edit access settings.
- Enable Allow Basic Authentication
- In the SSL/TLS Certificate field, remove System-Default-Portal-Cert and System-Default-Portal-Cert-EC256
- Click the SSL/TLS Certificate Drop-Down menu and press Create Certificate
- Enter a Name for the Certificate (This is only a display name)
- Set the Common name to the FQDN of the System
- Enter Email, Org, OU, Location, State and Country (You can use dummy values, but do not leave them blank!)
- Add two Subject Alternative Names and, one for the IP Address and the second for the FQDN of the system.
- Press Save
This is what the configuration should look like:
After saving the configuration, reload the browser to use the new certificate. I recommend trusting the self-signed certificate to remove browser SSL warnings.
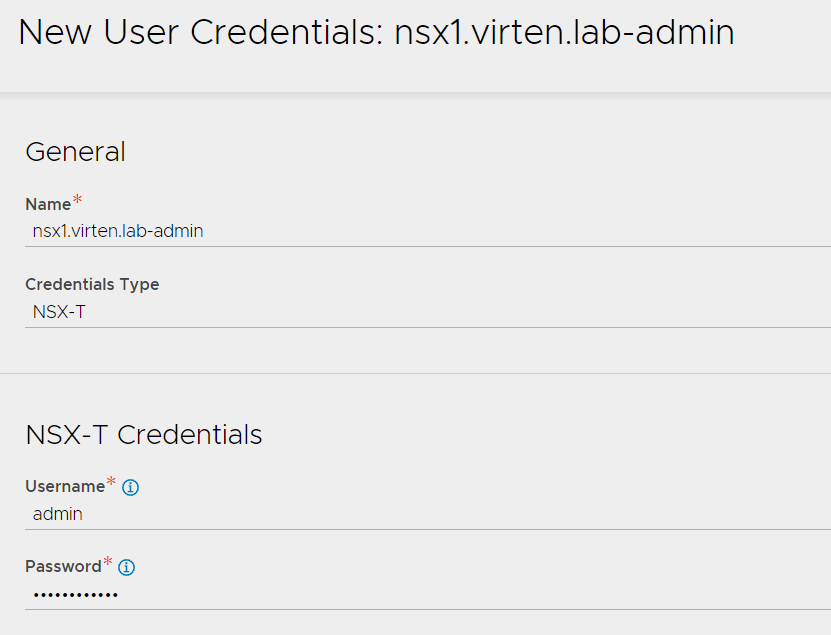
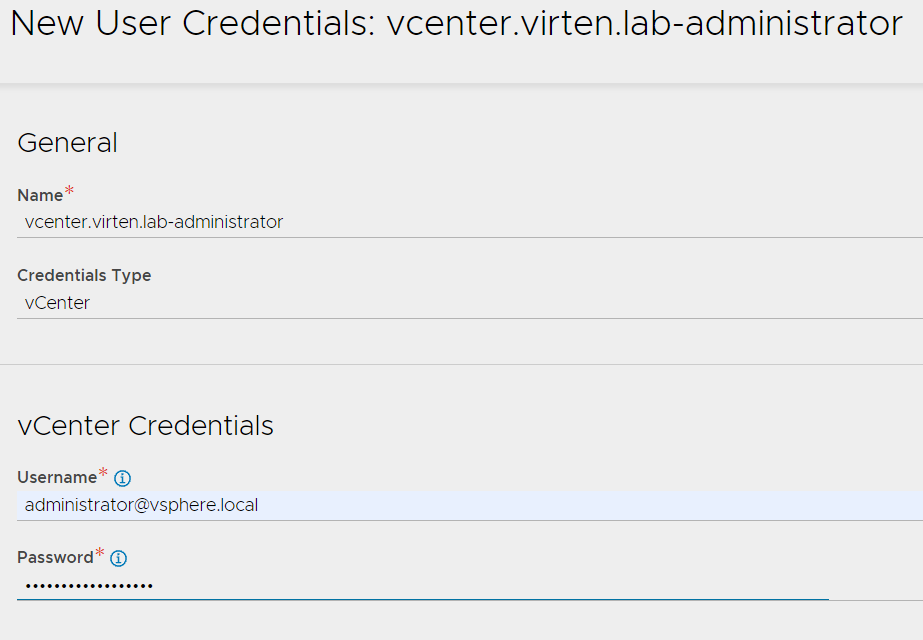
To connect to NSX-T and vCenter later, you have to preconfigure credentials. In NSX-ALB, navigate to Administration > User Credentials > User Credentials and Create two Credentials:
- NSX-T Admin
- vCenter Admin
Step 2 - Prepare vCenter Server Content Library
The actual load-balancing in NSX ALB happens in Service Engines, which are simple Virtual Machines. The AVI Controller automatically deploys Service Engines, based on Service Engine Group (SEG) settings, on-demand. To enable the controller to upload and clone images, you have to provide a content library.
Open vSphere Client, navigate to Content Libraries and press CREATE. Create a Library with the following settings:
- Name: alb
- Local content library
- Enable Publishing: disabled
- Apply Security Policy: disabled
- Datastore for storing Images
That's it from the vSphere Client. You don't have to upload templates, the is done automatically by the AVI Controller.
Step 3 - Prepare NSX-T SE Management Network
Service Engine Virtual Machines have to be deployed in an NSX-T based network. I highly recommend using a DHCP-enabled network to not have to mess with IP address management in ALB. Service Engines can be either deployed into a VLAN or an NSX-T Segment. The following two diagrams are showing the deployment options.
NSX ALB Service Engine Management Network in NSX-T Segment
This is my preferred option. You create a separate OOB Management Tier-0, Tier-1 and Segment, which is connected to your Management Infrastructure. The Segment has DHCP enabled.
NSX ALB Service Engine Management Network in VLAN
You can also use your existing DHCP-enabled management VLAN for Service Engines. The VLAN needs to be added as NSX-T Segment in the VLAN Transport Zone.
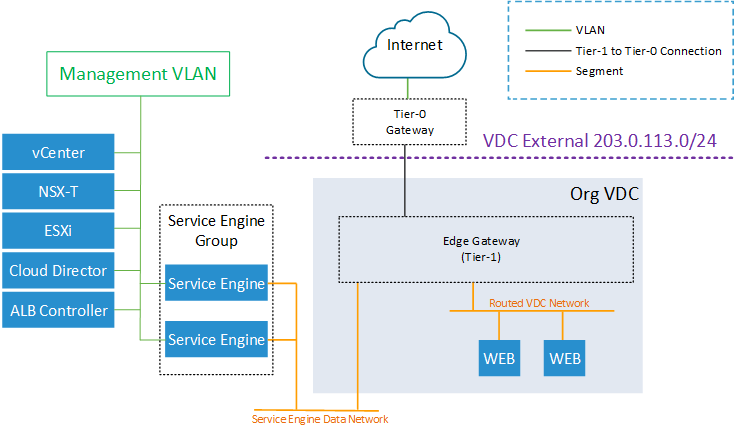
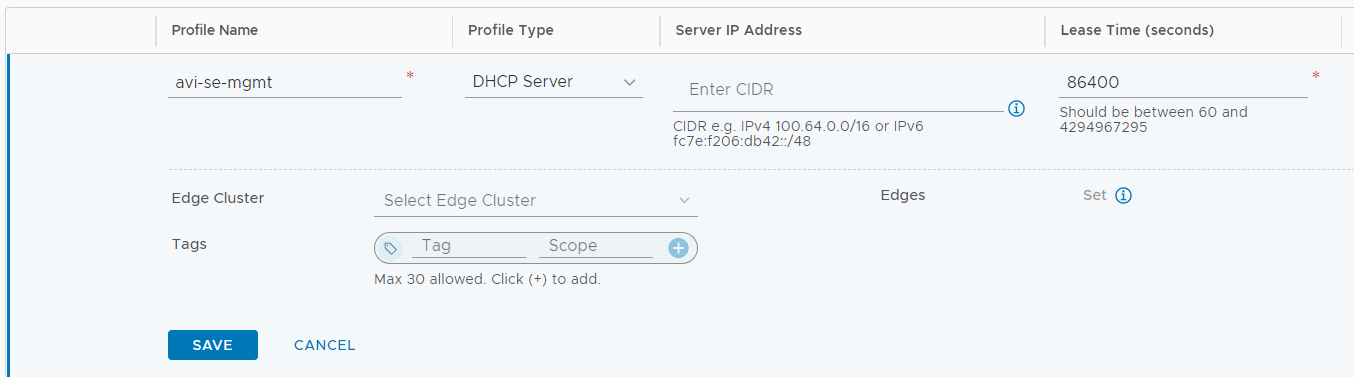
The VLAN deployment method should be self-explaining (You just add an existing VLAN Segment in NSX-T) and not covered in this article. I'm using the recommended dedicated Tier-1 / Segment method. Open NSX-T Manager and navigate to Networking > IP Management > DHCP, press ADD DHCP Profile and enter a Name for the Profile. You don't have to configure anything else here. The Server IP address will default to 100.96.0.1/30, which is fine. The DHCP pool itself is configured later in the Tier-1 Gateway.
In NSX-T, navigate to Networking > Connectivity > Tier-0 Gateways, create a Tier-0 Gateway and connect it to your Management VLAN. This configuration step is platform-specific. In my environment, the Tier-0 has an external interface in the Management VLAN and the AVI SE Network (10.99.3.0/24) has a static route.
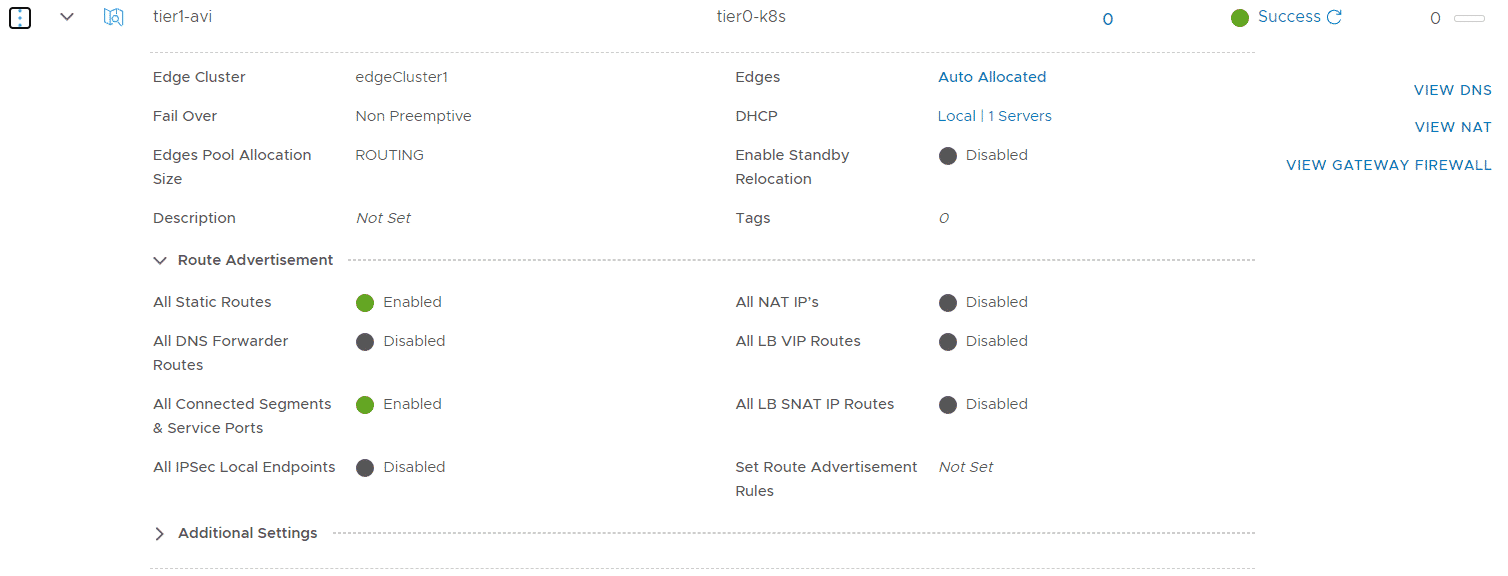
Navigate to Networking > Connectivity > Tier-1 Gateways, create a Tier-1 Gateway and connect it to the new Tier-0. Enable Route Advertisement for All Static Routes and All Connected Segments & Segment Ports. Press Set DHCP Configuration, set the Type to DHCP Server and Select the previously created DHCP Server Profile.
Navigate to Networking > Connectivity > Segments and create the AVI SE Management Segment. Connect it to the previously connected Tier-1 and make sure that is created in the correct nsx-overlay-transport zone. Press SET DHCP Config, enable DHCP, set a DHCP Range and provide a DNS Server.

That's it for the NSX-T Manager. Everything else is configured in NSX-ALB or VCD.
Step 4 - Create NSX-T Cloud in NSX-ALB
Now it's time to marry NSX-ALB with NSX-T and the vCenter. This bond is called "NSX-T Cloud" and configured from the NSX-ALB Controller.
Open NSX-ALB and navigate to Infrastructure > Clouds. Press CREATE > NSX-T Cloud.
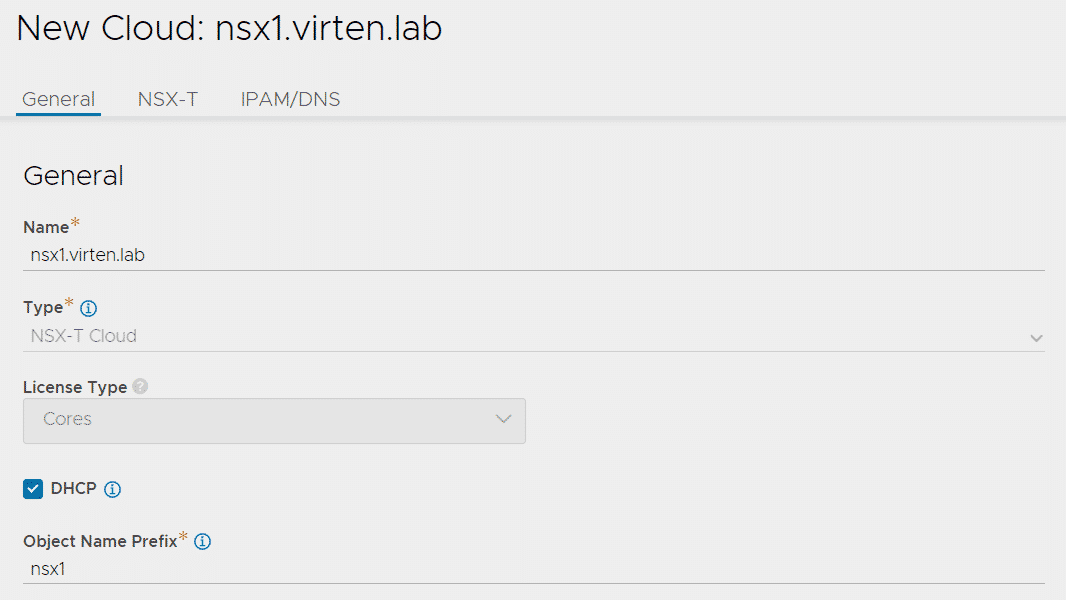
General Tab
- Name: Display name for the Cloud. Choose whatever you want. I'm using the NSX-T Manager FQDN, which is fine unless you want to create a second NSX-T Cloud.
- Type: NSX-T Cloud
- License Type: Cores
- DHCP: Enabled - DHCP is used for Service Engines. If you can't use DHCP, you have to set up IPAM/DNS (Not covered in this article).
- Object Name Prefix: nsx1 - Used as Prefix for objects created by NSX-ALB.
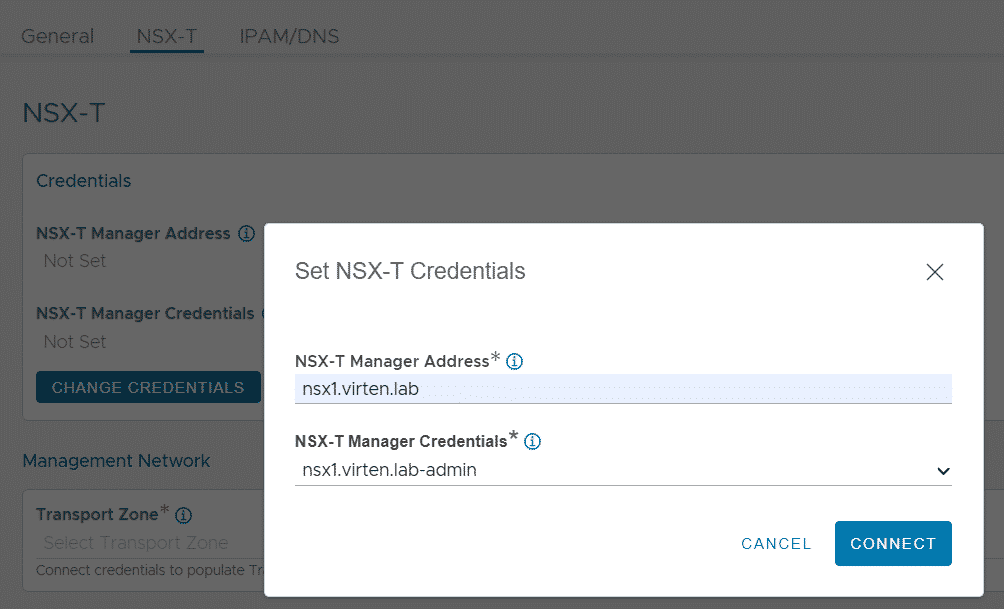
NSX-T Tab
- NSX-T Manager Address: FQDN or IP Address (Must use the same address as VCD is connected to NSX-T!)
- NSX-T Manager Credentials: NSX-T-admin credentials created in Step 1.
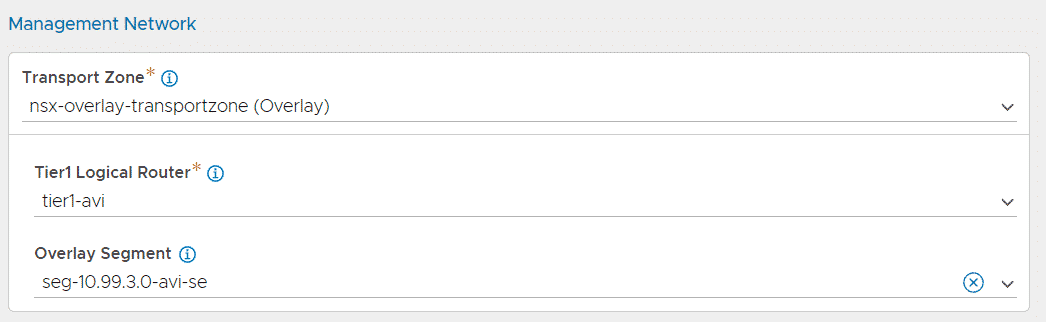
- Management Network - Transport Zone: nsx-overlay-transport-zone (Default Overlay Zone)
- Management Network - Tier1 Logical Router: The Management Tier-1 Router created in Step 3.
- Management Network - Overlay Segment: The DHCP-enabled SE Management Segment, created in Step 3.
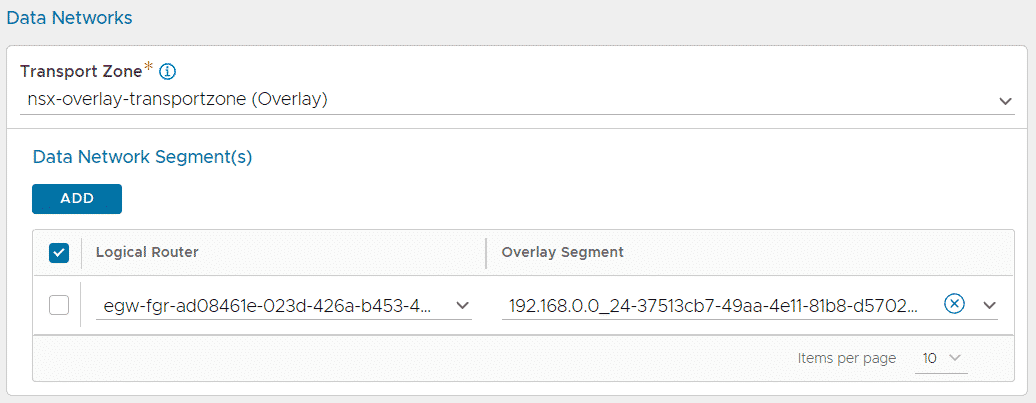
- Data Network - Transport Zone: nsx-overlay-transport-zone (Must be the transport zone that has been added as "network-pool" in VCD)
- Data Network Segment(s): This configuration step is kind of confusing and has a chicken-and-egg problem. Here you have to configure a Logical Router (Tier-1 Gateway) and an Overlay Segment. The Logical Router is the VCD Tenants Edge Gateway and the Overlay Segment is supposed to be the SE Data Segment which is managed by NSX-ALB. However, you have to set up at least one Router and Segment to create the NSX-T Cloud, or the SAVE button stays greyed out. This is why it is mandatory to have at least one customer onboarded to VCD prior to start with the NSX-ALB configuration. I've selected my Tenants EGW and the network where the web servers are located at. The segment is automatically corrected to the SE Data Segment when you enable the LB Service in VCD.
[Update 2021-11-17] Turns out that it is easier to just create a dummy Tier-1 and dummy Segment just for the purpose of initial NSX-T Cloud Configuration. Makes the first Tenant deployment easier. You can delete it later.
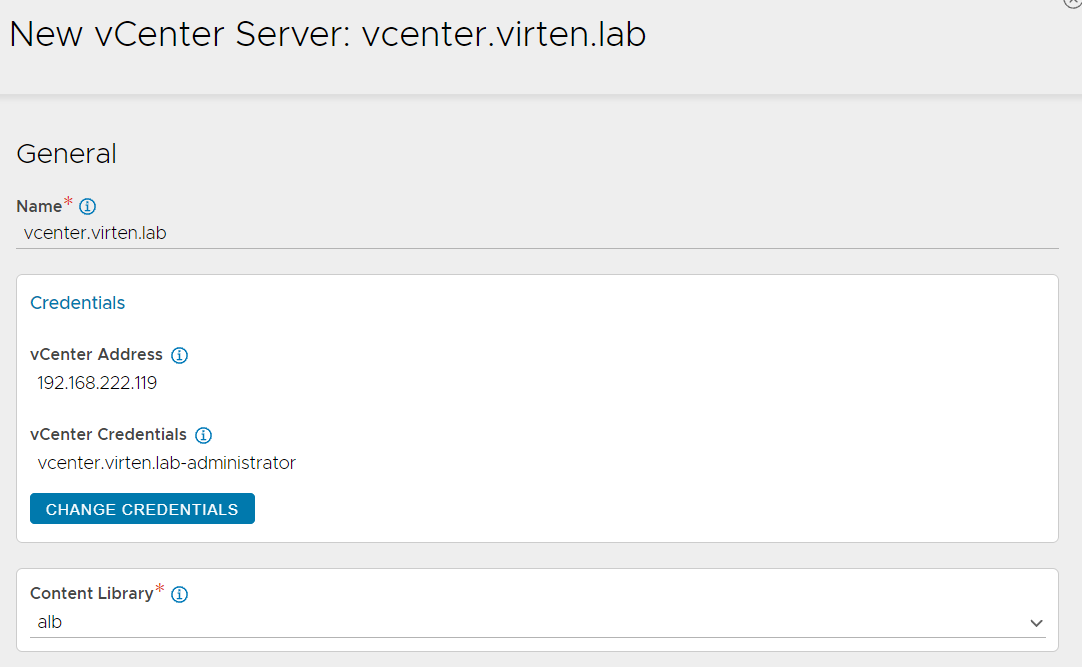
- vCenter Servers: The vCenter Server that is added in NSX-T Manager as Compute Manager. NSX-ALB should automatically fill the vCenter Address (It uses the IP address instead of FQDN which is fine at this point). Add the vCenter Credentials added in Step 1 and the Content Library created in Step 2.
- IPAM/DNS - IPAM Profile: empty (Used when you don't have a DHCP - Not covered in this article)
- IPAM/DNS - DNS Profile: empty (Used when you don't have a DHCP - Not covered in this article)
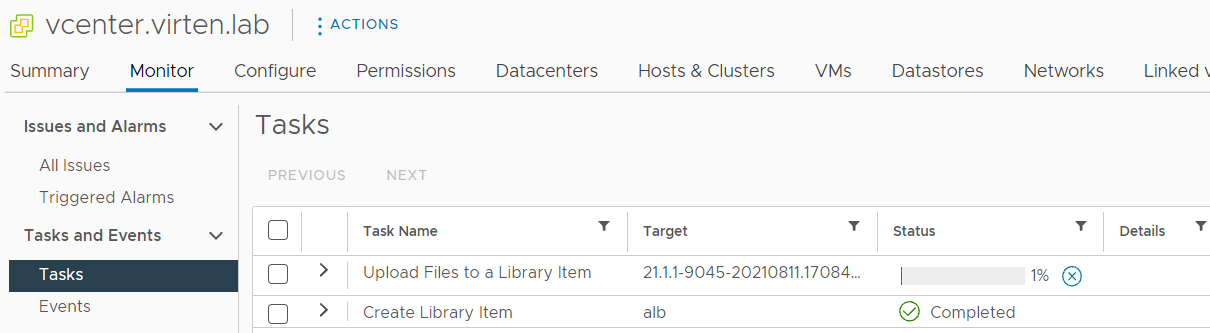
Press SAVE. The NSX-T Cloud is not added to NSX-ALB. Wait until the status is green. If you head over to the vCenter Server, you should see that it uploads templates to the alb Library.
Step 5 - Create Service Engine Group in NSX-ALB
The Service Engine Group (SEG) defines availability and capacity parameters for the Service Engine deployment. You can create and use multiple SEGs in VCD. Each group can be either dedicated for a single tenant, or shared across multiple tenants. When shared SEGs are used, the Service Engine uses VRFs to separate tenants. If a SEG is shared or dedicated is decided later when importing the SEG into Cloud Director.
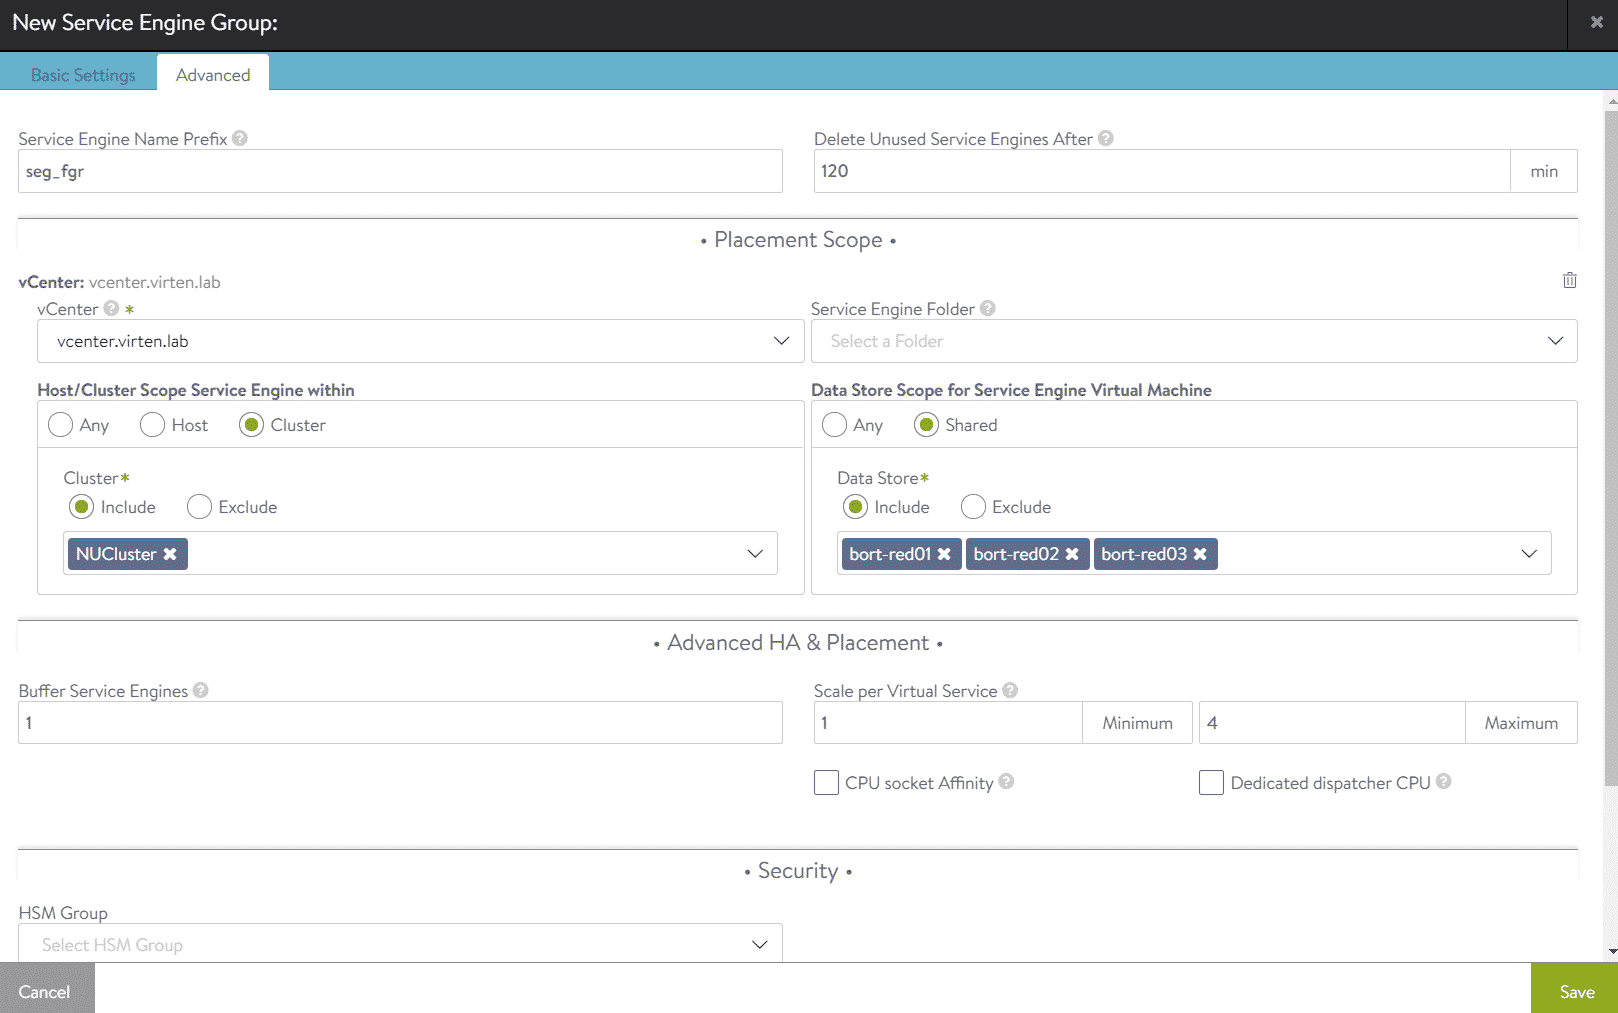
Open NSX-ALB and navigate to Infrastructure > Cloud Resources > Service Engine Groups. Select the previously created NSX-T Cloud at the top of the page. Do not create the SEG in the Default Cloud!

Press CREATE and configure the SEG:
- Service Engine Group Name: seg-tenant-fgr - I'm planning to import this SEG as dedicated for the fgr tenant.
- High Availability Mode: N+M (buffer) - The N+M configuration places each Virtual Service on a single Service Engine with a Cold Standby. With the Active/Active setup, each Virtual Service is placed on multiple SEs for redundancy. In a production environment, based on availability requirements you should consider choosing A/A.
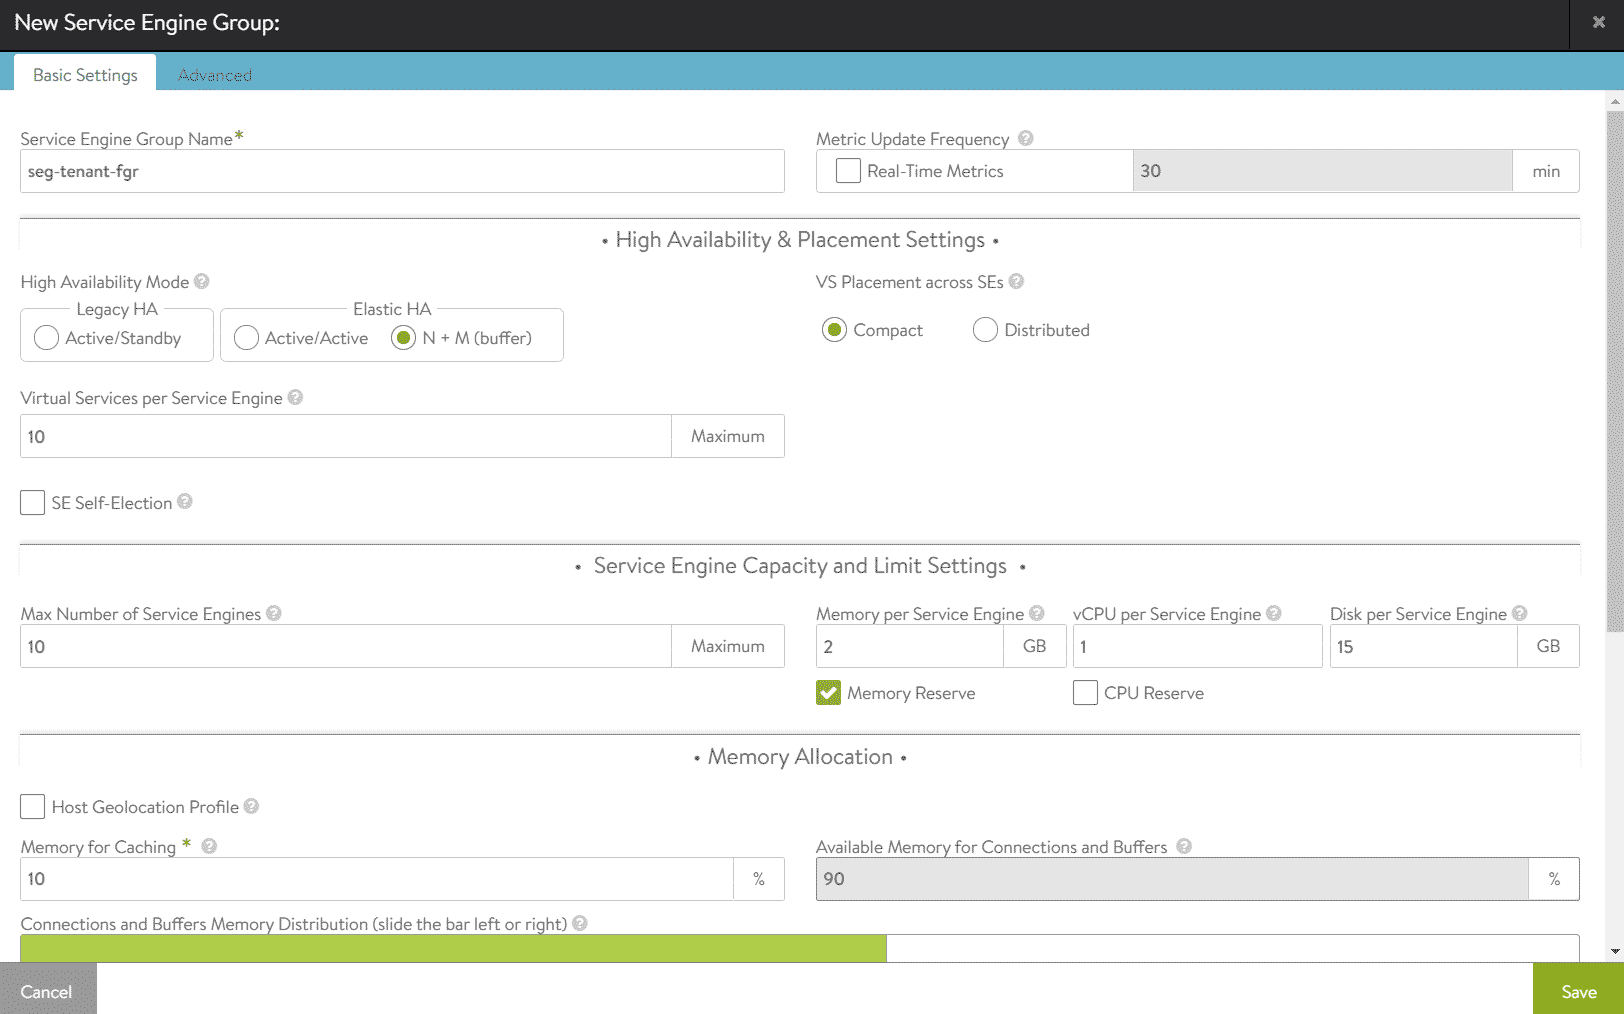
- In the Advanced Tab, you can configure SE Placement options. This allows you to choose the Cluster and Datastore where Service Engines are deployed to.
Press Save to create the Service Engine Group. Please note that Service Engines are not deployed yet. They are created on-demand when the first Virtual Service is defined.
Step 6 - Add ALB Controller and Service Engine Group to Cloud Director (VCD Admin Part)
The rest of the configuration is done using VMware Cloud Director. In VCD you have to add the NSX-ALB Controller, import the NSX-T Cloud and Service Engine Groups and assign SEGs to Tenants. These steps must be done as System Administrator.
Open VMware Cloud Director and navigate to Resources > Infrastructure Resources > NSX-ALB > Controllers and press ADD
- Name: Display Name (Does not need to be the FQDN)
- URL: URL of the AVI Controller
- Username: AVI Username
- Password: AVI Password
- Enterprise License: enabled (Make sure to have an NSX ALB License added in NSX-ALB)
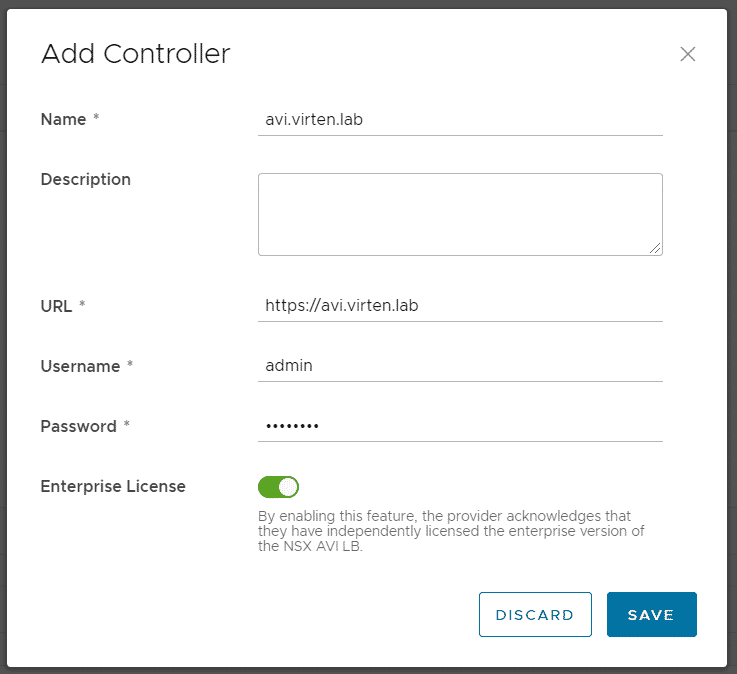
Press SAVE and TRUST the certificate. If it fails to add the controller, it is likely that problem is related to the certificate mixed usage of FQDN and IP-Addresses (See KB83889). When the controller has been added, navigate to Resources > Infrastructure Resources > NSX-ALB > NSX-T Cloud and press ADD to Import the Cloud. At this point, it is required to have the NSX Transport Zone already added as Network Pool in VCD.

Now navigate to Resources > Infrastructure Resources > NSX-ALB > Service Engine Groups and press ADD.
- NSX-T Cloud: nsx1.virten.lab (Added in the previous Step)
- Reservation Model: Dedicated (You can choose whether the Service Engine Group is dedicated for a tenant, or shared across multiple tenants)
- Name: seg-tenant-fgr (Can differ from the name in NSX-ALB. This is the name that the tenant sees the SEG in its EGW configuration)
- Available Service Engine Groups: seg-tenant-fgr
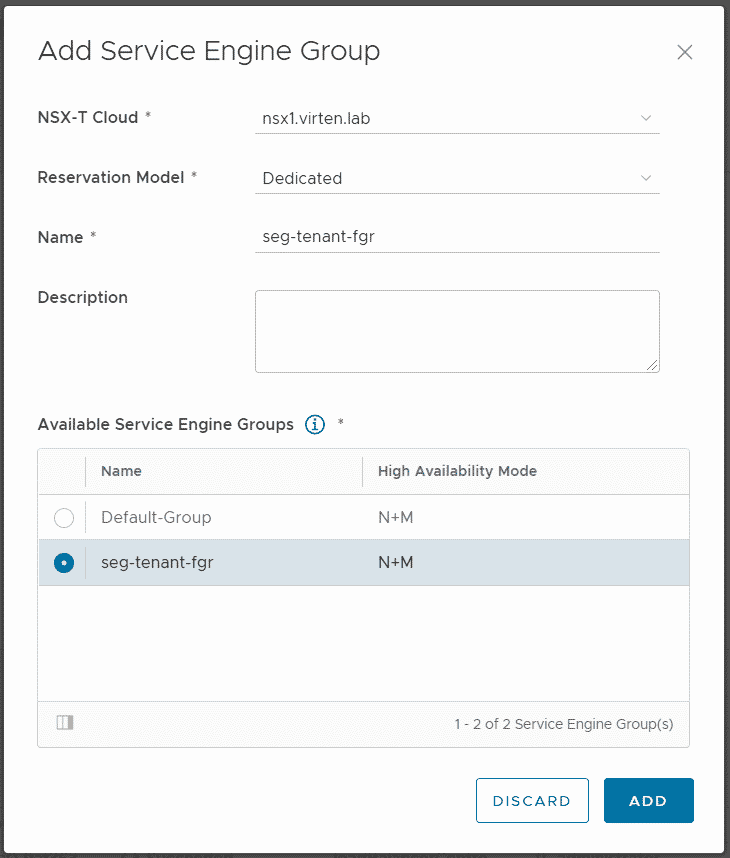
Press ADD to finish the configuration. Note: Service Engines are still not created!
The last step as System Administrator is to enable the Load Balancer for the tenant. The loadbalancer is never enabled by default. You have to explicitly enable it and assign a Service Engine Group for each tenant EGW. Navigate to Resources > Cloud Resources > Edge Gateways and click on the tenant's EGW Name to enter the configuration. From there, navigate to Load Balancer > General Settings, press EDIT and enable the Load Balancer. If you enable Use Default,192.168.255.0/25 is used as the default service network.
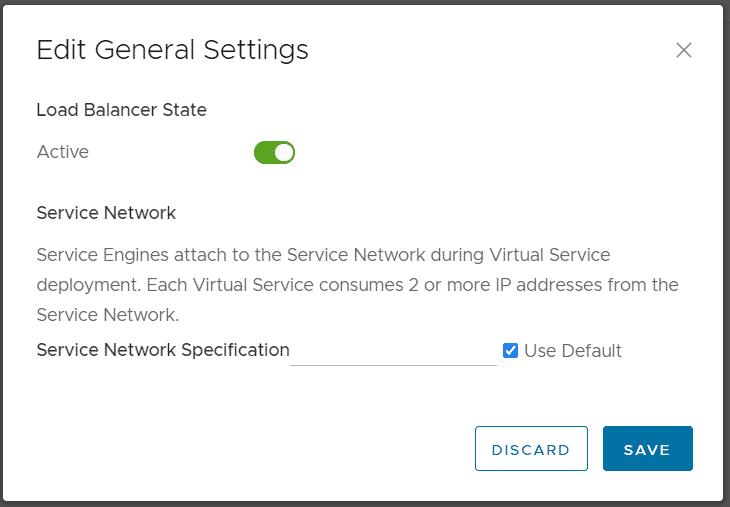
Note: If you get the "Edge Gateway [NAME] already registered on Load Balancer Cloud [CLOUD]. Please contact System Administrator." Error, just try to enable it again. It should work with the 2nd try. I suspect that this error is related to the issue that you have to add at least one logical router when creating the NSX-T Cloud in NSX-ALB.
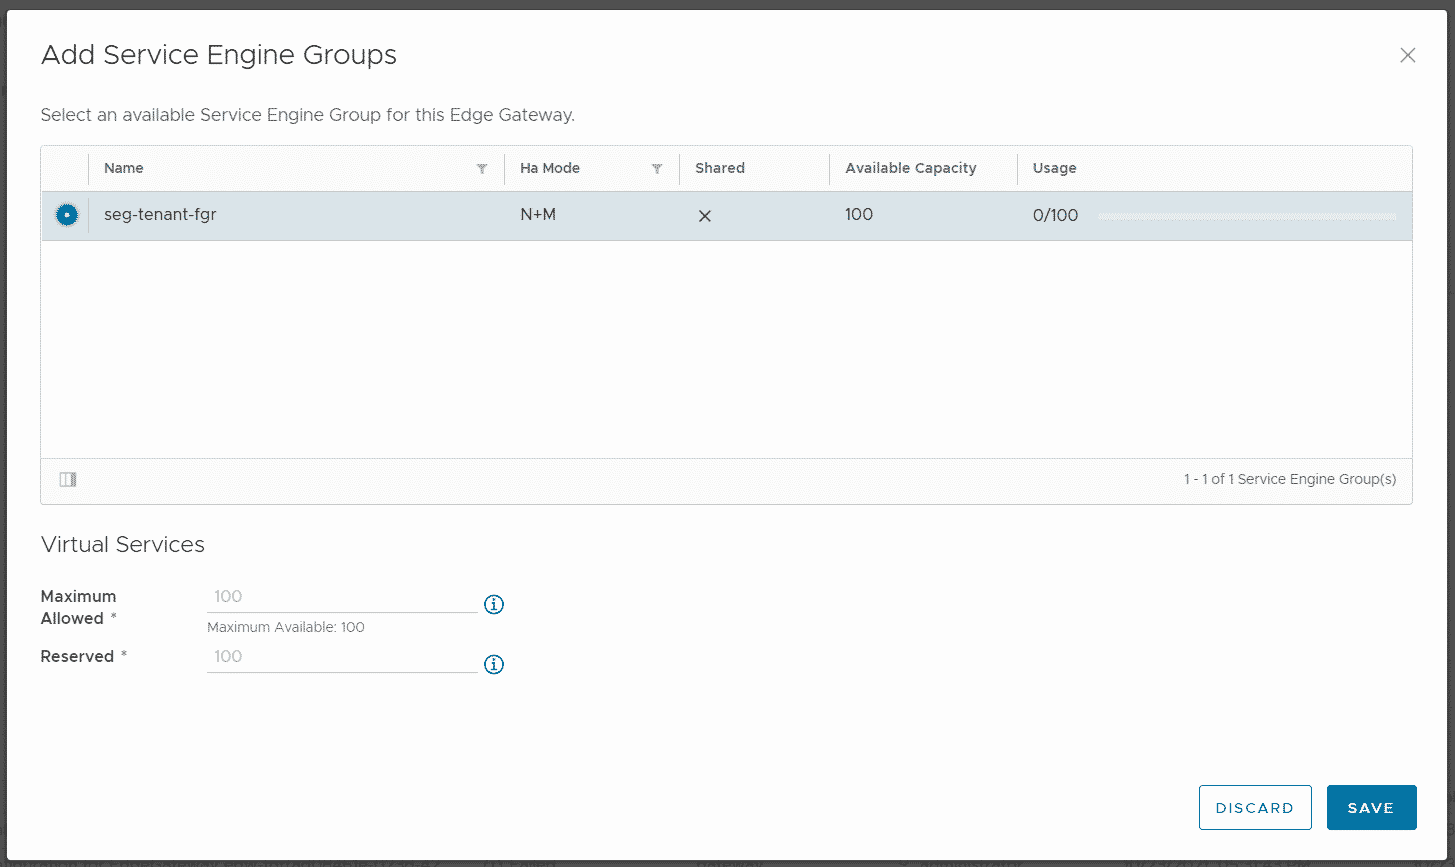
The final step as System Administrator is to assign a Service Engine Group to the Edge Gateway. Still in the Edge Gateway configuration, navigate to Load Balancer > Service Engine Groups, press ADD and assign the dedicated Service Engine Group.
That's it as System Administrator. The Tenant can now create Pools and Virtual Services in Self-Service.
Step 6 - Create Load Balancer Pool and Virtual Service (VCD Tenant)
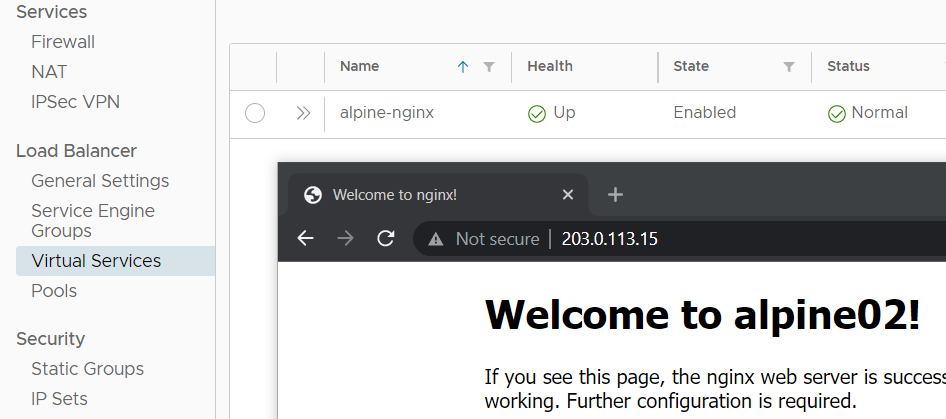
Now it's time to create a Virtual Service. As mentioned earlier, I've deployed two Virtual Machines running an nginx Webserver which are used as Pool for the Virtual Service. Log in to the VCD as Organization Administrator and Navigate to Networking > Edge Gateway > Load Balancer > Pools
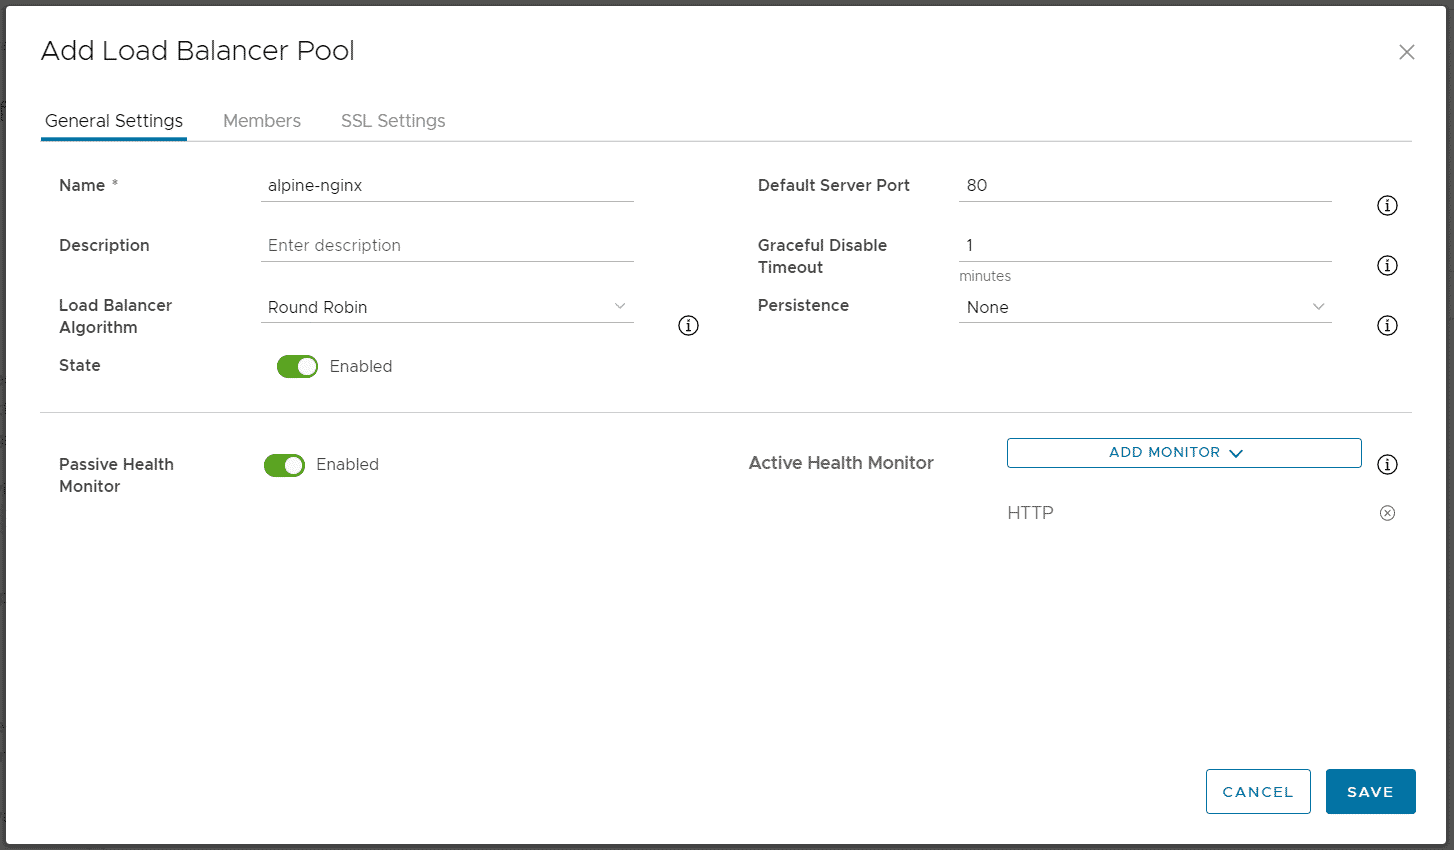
Press ADD to Create a Load Balancer Pool and configure the Pool:
- General Settings Tab
- Name: alpine-nginx
- Default Server Port: 80
- Load Balancer Algorithmn: Round Robin
- Persistence: None
- Active Health Monitor: HTTP (This will send periodic HTTP HEAD request to each server in the Pool to check the availability)
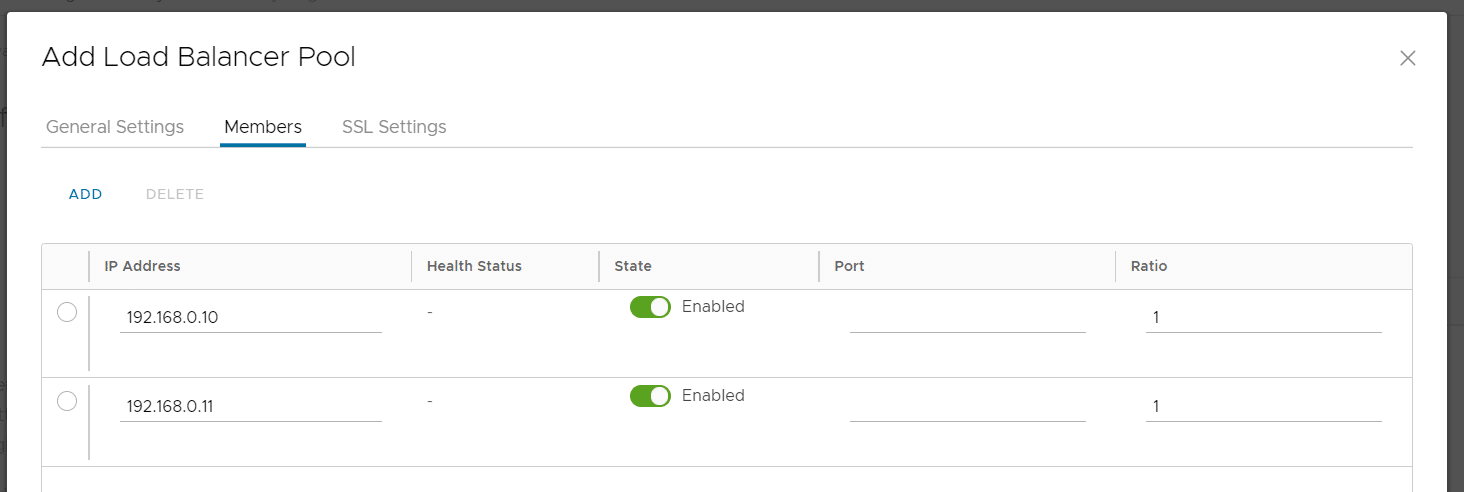
- In the Members Tab, add two entries and enter the IP Addresses from the Virtual Machines running the Webserver.
- Press SAVE to create the pool
Navigate to Networking > Edge Gateway > Load Balancer > Virtual Services and press ADD.
- Name: alpine-nginx
- Service-Engine-Group: seg-tenant-fgr
- Load Balancer Pool: alpine-nginx
- Virtual IP: 203.0.113.15 (Available Address from the pool, assigned to the tenant's edge gateway)
- Service Type: HTTP
- Port: 80
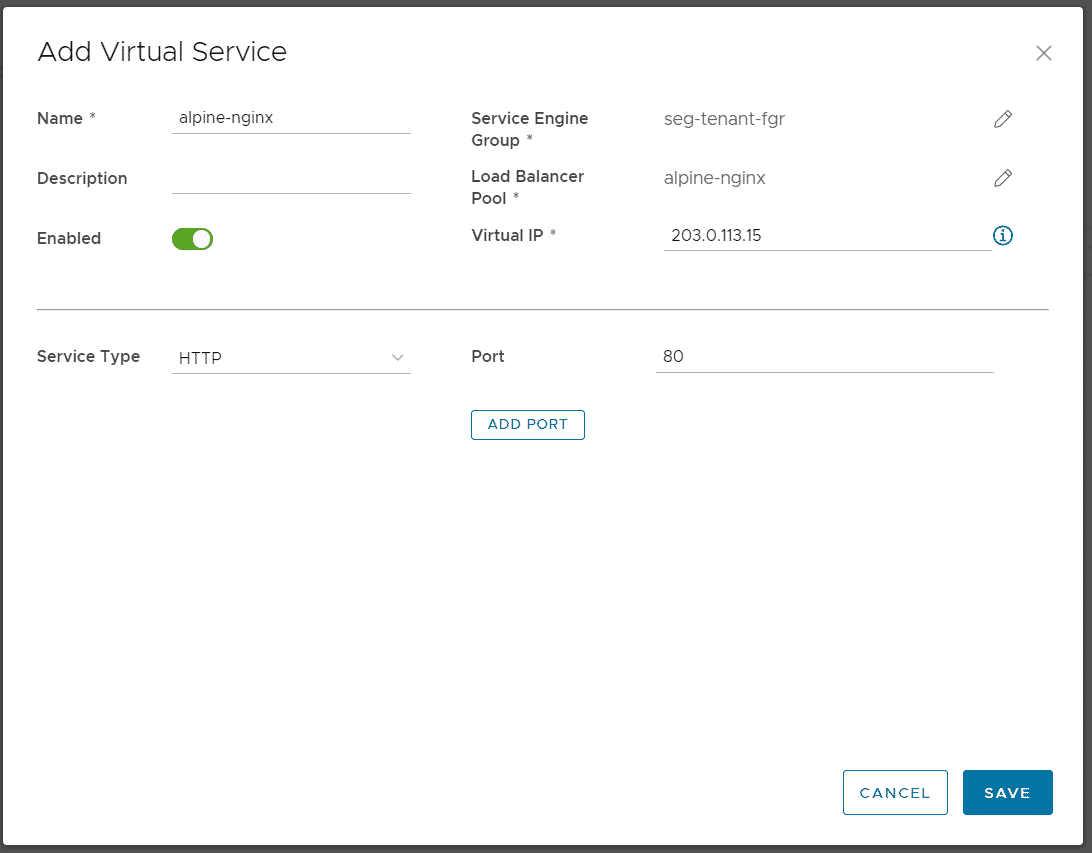
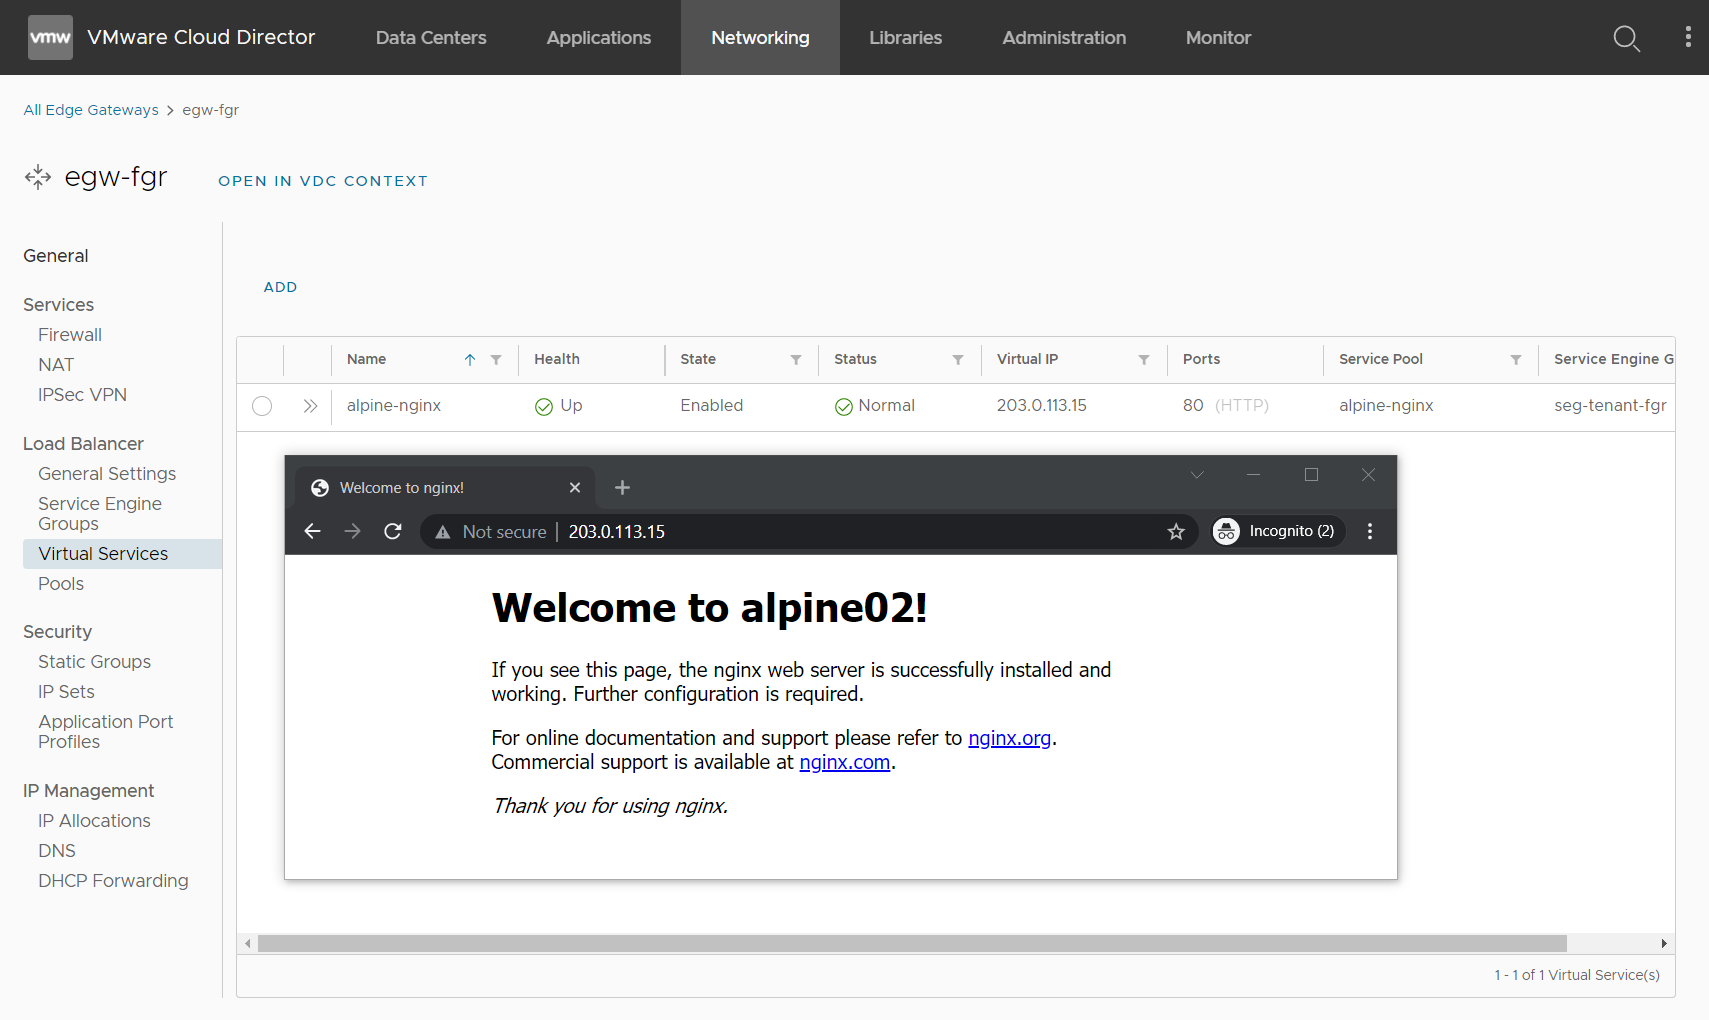
Press SAVE to create the Virtual Service. When this is the first Virtual Service, this might take some time because the Service Engine Virtual Machines need to be deployed. After a couple of minutes, you should be able to access the Virtual Service.
You have a duplicate T1 screenshot under the sentence:
Press SET DHCP Config, enable DHCP, set a DHCP Range and provide a DNS Server.
I guess that it was supposed to be a segment screenshot?
Thank you. Yes, it should have shown the segment configuration. I removed the wrong screenshot and will create a new one.
Is it really valid not to create SEG in the default? "Make sure that the SEGs are created in the default ‘admin’ tenant in ALB. Non-admin tenants are currently unsupported." I am a little confused.