With the release of Cloud Director 10.3 and Container Service Extension 3.1 (CSE), you have an additional option to deploy Kubernetes Clusters: "Tanzu Kubernetes Grid Multi-Cloud" aka. TKGm. With TKGm you now have 4 options to offer Kubernetes as a Service for your customers.
- TKGm (Multi-Cloud)
- TKGs (vSphere with Tanzu)
- Native
- TKG-I (Enterprise PKS)
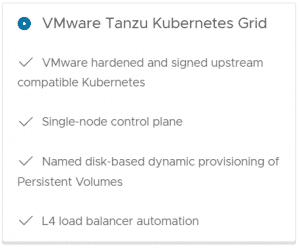
Yes, there is a reason why TKGm and TKGs are in bold letters. If you are starting today, forget about "Native" and "TKG-I". "TKGm" works similar to "Native" but is far superior. TKG-I (TKG Integrated Edition, formerly known as VMware Enterprise PKS) is deprecated as of CSE 3.1 and will be removed in future releases.
This article explains how to integrate CSE 3.1 in VMware Cloud Director 10.3.
Introduction
Container Service Extension (CSE) is a VMware Cloud Director extension that allows tenants to create and work with Kubernetes clusters.
This guide explains how to prepare your Cloud Director to support TKGm Clusters. If you want to use the vSphere 7.0 integrated Tanzu Kubernetes, see this guide. The CSE Server is only required for Native and TKGm Clusters. TKGs Clusters (vSphere with Tanzu) can be managed with the VCD itself.
TKGm Clusters are deployed into the customer's Organization networks, similar to "Native" Clusters. You do not need vSphere with Tanzu to deploy TKGm.
If you've previously worked with CSE, there is good news. Since CSE 3.1 with VCD 10.3, you no longer have to maintain a RabbitMQ (AMQP) Server. CSE 3.1 uses MQTT, which runs directly on Cloud Director cells.
CSE is Python-based and can be installed on many Linux-based Operating Systems. It is very strict on python versions and requires version 3.7.3 or greater (3.7.x) but not 3.8! VMware Photon OS 3.0 Revision 3 uses Python 3.7 as default, so I'm using it for my CSE Server.
Check the Compatibility Matrix for CSE 3.1. During this article, I'm using the following versions:
- Cloud Director 10.3.1
- Container Service Extension 3.1.1
- NSX-T 3.1.3.1
- NSX-ALB 21.1.1
- vCenter 7.0 U3
Step 1 - Install and Configure Photon OS 3.0
As mentioned earlier, Photon OS 3.0 works great with CSE. Currently, CSE is not available as Appliance, so you have to download and install it yourself.
Photon OS Download Page > Photon OS 3.0 Rev 3 > OVA-hw11
Make sure to have the following OBA: photon-hw11-3.0-a383732.ova
Deploy it and configure a static IP address and FQDN (# hostnamectl set-hostname cse.virten.lab). It is not required to expose CSE to the Internet, so it should be placed on an internal management network, close to vCenter and Cloud Director. CSE talks directly to VCD and uses the MQTT to listen for orders.
If you want to automate the deployment, you can use cloud-init and PowerShell. I've deployed mine using this article, but installing it manually is also fine.
At the end of this Step, you should be able to log in on the Photon OS VM as root.
Step 2 - Prepare a CSE Seed Tenant in Cloud Director
CSE requires a Tenant in Cloud Director to install, store and share Templates. Go to VCD and create:
- Organization for CSE
- Organization VDC for CSE
- Edge Gateway
- Routed Network with Internet Access
- IP Pools and DNS configured on the Routed Network
I've deployed everything with Terraform. See terraform-examples/vcd-cse_tenant
Step 3 - Install and Configure CSE 3.1
Update all Photon Packages to the latest version.
tdnf update --assumeyes
Install required Packages.
tdnf install git python3-pip python3-devel build-essential --assumeyes
Create a user that will be used to run CSE. For obvious security reasons, you should not run CSE as root.
groupadd cse
mkdir /opt
useradd cse -g cse -m -d /opt/cse
chmod 755 /opt
Change the user context to cse.
su - cse
Create and activate a virtual Python Environment.
python3 -m venv /opt/cse/python
source /opt/cse/python/bin/activate
Install CSE using PIP. This will install all required dependencies including vcd-cli.
Note: The current stable version of CSE is available in the PIP repository. The second command allows you to install CSE directly from GIT. This might be useful for future releases that are not yet available. See vmware/container-service-extension/tags for a list of available versions.
pip3 install container-service-extension==3.1.1
#pip3 install git+https://github.com/vmware/container-service-extension.git@3.1.1
Verify that cse has been installed correctly.
(python) cse [ ~ ]$ cse version
CSE, Container Service Extension for VMware vCloud Director, version 3.1.1
Add the CSE extension to vcd-cli.
mkdir /opt/cse/.vcd-cli
cat > /opt/cse/.vcd-cli/profiles.yaml << EOF
extensions:
- container_service_extension.client.cse
EOF
Verify that the vcd-cli extension works.
(python) cse [ ~ ]$ vcd cse version
CSE, Container Service Extension for VMware vCloud Director, version 3.1.1
Create the CSE Role in Cloud Director. Use your VCD hostname instead of vcloud.virten.lab. The -s option can be used when VCD used untrusted certificates. Enter VCD System Administrator credentials after you run the command.
cse create-service-role vcloud.virten.lab -s
Create a CSE Service User. When using vcd-cli commands, you have to log in and the session will timeout after some time. You might have to log in again through the guide to use vcd-cli commands. The command returns an error when you are no longer logged in. The -i option is required if you are using untrusted certificates.
vcd login vcloud.virten.lab system administrator -i
vcd user create --enabled cse VMware1! "CSE Service Role"
CSE can use environment variables to store the config path and password. Add those to .bash_profil to automatically set them when you log in. This will automatically enable the Python Virtual Environment.
Note: the "CSE_TKG_M_ENABLED=True" variable is no longer required in CSE 3.1
cat >> /opt/cse/.bash_profile << EOF
export CSE_CONFIG=/opt/cse/config/config.yaml
export CSE_CONFIG_PASSWORD=VMware1!
source /opt/cse/python/bin/activate
EOF
Source the file to activate changes in the current session.
source /opt/cse/.bash_profile
Get a configuration example and write it to a file.
mkdir /opt/cse/config
cse sample > /opt/cse/config/config-decrypted.yaml
Edit config-decrypted.yaml to match your environment. The "enable_tkg_m: true" that was used in previous versions is no longer required. This is what my file looks like:
mqtt:
  verify_ssl: false

vcd:
  host: vcloud.virten.lab
  log: true
  password: PASSWORD
  port: 443
  username: cse
  verify: false

vcs:
- name: vcenter.virten.lab
  password: PASSWORD
  username: administrator@vsphere.local
  verify: false

service:
  enforce_authorization: false
  legacy_mode: false
  log_wire: false
  no_vc_communication_mode: false
  processors: 15
  telemetry:
    enable: true

broker:
  catalog: cse
  ip_allocation_mode: pool
  network: cse-builder
  org: cse
  remote_template_cookbook_url: https://raw.githubusercontent.com/vmware/container-service-extension-templates/master/template_v2.yaml
  storage_profile: 'StorageGold'
  vdc: cse
Encrypt the configuration. The CSE_CONFIG_PASSWORD environment variable is used.
cse encrypt /opt/cse/config/config-decrypted.yaml --output /opt/cse/config/config.yaml
chmod 600 /opt/cse/config/config.yaml
Verify the configuration
(python) cse [ ~ ]$ cse check
Required Python version: >= 3.7.3
Installed Python version: 3.7.5 (default, Oct 25 2021, 23:57:02)
[GCC 7.3.0]
Decrypting '/opt/cse/config/config.yaml'
Validating config file '/opt/cse/config/config.yaml'
InsecureRequestWarning: Unverified HTTPS request is being made. Adding certificate verification is strongly advised.
Connected to vCloud Director (vcloud.virten.lab:443)
Connected to vCenter Server 'vcenter.virten.lab' as 'administrator@vsphere.local' (vcenter.virten.lab)
Config file '/opt/cse/config/config.yaml' is valid
Add your SSH public key to the user. This will allow you to directly login, and you can copy them to TKG images for troubleshooting reasons.
mkdir -p ~/.ssh
cat >> ~/.ssh/authorized_keys << EOF
ssh-rsa AAAAB3NzaC[...] fgr
EOF
With this configuration, CSE is able to provide "Native" Images. Now you have to import TKGm Images, which need to be downloaded from the VMware website. To do so, you have to go to vmware.com > Resources > Product Downloads > Tanzu Kubernetes Grid. Please make sure to download the correct images. According to the documentation, only "Ubuntu 20.04 based" TKG Images are supported.
Direct Link: VMware Tanzu Kubernetes Grid 1.4.0 Download
You should have one (or more) of the following images:
- ubuntu-2004-kube-v1.21.2+vmware.1-tkg.1-7832907791984498322.ova
- ubuntu-2004-kube-v1.19.12+vmware.1-tkg.1-15841320193950299489.ova
- ubuntu-2004-kube-v1.20.8+vmware.1-tkg.1-17589475007677388652.ova
Copy the .ova files to the CSE Server and import them using the cse template import command:
cse template import -F ~/ubuntu-2004-kube-v1.21.2+vmware.1-tkg.1-7832907791984498322.ova
cse template import -F ~/ubuntu-2004-kube-v1.19.12+vmware.1-tkg.1-15841320193950299489.ova
cse template import -F ~/ubuntu-2004-kube-v1.20.8+vmware.1-tkg.1-17589475007677388652.ova
Now you can start the installation. This command will take about 10 to 30 minutes as it needs to download images, configure Kubernetes and put them into the Cloud Director catalog.
cse install -k ~/.ssh/authorized_keys
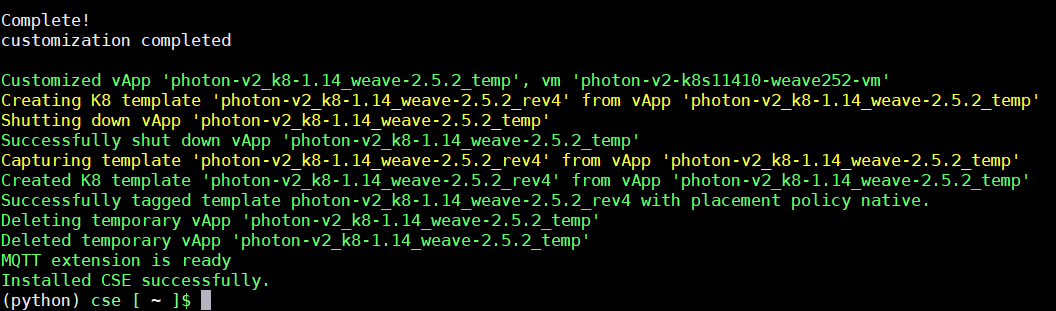
When the installation is finished, start the CSE server in interactive mode to see if it can start successfully. The output should look like this:
(python) cse [ ~ ]$ cse run
Required Python version: >= 3.7.3
Installed Python version: 3.7.5 (default, Oct 25 2021, 23:57:02)
[GCC 7.3.0]
CSE version: 3.1.1
Decrypting '/opt/cse/config/config.yaml'
Validating config file '/opt/cse/config/config.yaml'
InsecureRequestWarning: Unverified HTTPS request is being made. Adding certificate verification is strongly advised.
Connected to vCloud Director (vcloud.virten.lab:443)
Connected to vCenter Server 'vcenter.virten.lab' as 'administrator@vsphere.local' (vcenter.virten.lab)
Config file '/opt/cse/config/config.yaml' is valid
Using RDE version: 2.0.0
Successfully loaded defined entity schema urn:vcloud:type:cse:nativeCluster:2.0.0 to global context
Loading k8s template definition from catalog
Found K8 template 'photon-v2_k8-1.14_weave-2.5.2' at revision 4 in catalog 'cse'
Found K8 template 'ubuntu-16.04_k8-1.18_weave-2.6.5' at revision 2 in catalog 'cse'
Found K8 template 'ubuntu-16.04_k8-1.19_weave-2.6.5' at revision 2 in catalog 'cse'
Found K8 template 'ubuntu-16.04_k8-1.20_weave-2.6.5' at revision 2 in catalog 'cse'
Found K8 template 'ubuntu-16.04_k8-1.21_weave-2.8.1' at revision 1 in catalog 'cse'
Loading TKGm template definition from catalog
Found TKGm template ubuntu-2004-kube-v1.20.8+vmware.1-tkg.1-17589475007677388652.
Loading kubernetes runtime placement policies.
Template rules are not supported by CSE for vCD api version 35.0 or above. Skipping template rule processing.
Validating CSE installation according to config file
MQTT extension and API filters found
Found catalog 'cse'
CSE installation is valid
Started thread 'MessageConsumer' (140098913969920)
Started thread 'ConsumerWatchdog' (140098905577216)
Container Service Extension for vCloud Director
Server running using config file: /opt/cse/config/config.yaml
Log files: /opt/cse/.cse-logs/cse-server-info.log, /opt/cse/.cse-logs/cse-server-debug.log
waiting for requests (ctrl+c to close)
Press CTRL+C to stop the server. Now we will make it run as a service. This requires you to write a startup script and a systemd unit file. You can use the official examples of cse.sh and cse.service. Here are the files that I use.
cse.sh
cat > /opt/cse/cse.sh << EOF
#!/usr/bin/env bash
CSE_VENV_PATH=/opt/cse
source $CSE_VENV_PATH/python/bin/activate
export CSE_CONFIG_PASSWORD='VMware1!'
export CSE_CONFIG=$CSE_VENV_PATH/config/config.yaml
cse run
EOF
Make the file executable
chmod +x /opt/cse/cse.sh
The Unit file needs to be created as root.
cse.service
cat > /etc/systemd/system/cse.service << EOF
[Unit]
Description=Container Service Extension for VMware vCloud Director
Wants=network-online.target
After=network-online.target

[Service]
ExecStart=/opt/cse/cse.sh
User=cse
WorkingDirectory=/opt/cse
Type=simple
Restart=always

[Install]
WantedBy=default.target
EOF
Enable and Start the service
root@cse [ ~ ]# systemctl enable cse.service
root@cse [ ~ ]# systemctl start cse.service
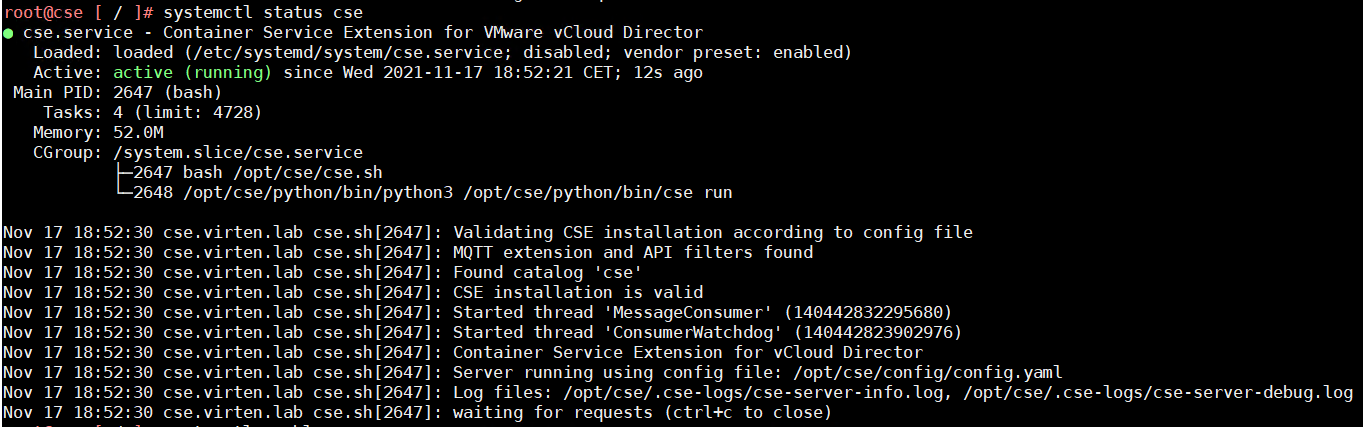
Verify that the service is running.
root@cse [ ~ ]# systemctl status cse.service
That's it for the CSE Server. You can keep the SSH session open to check log files for debugging:
- /opt/cse/.cse-logs/cse-server-cli.log
- /opt/cse/.cse-logs/cse-server-info.log
- /opt/cse/.cse-logs/cse-server-debug.log <- Your holy grail for troubleshooting CSE issues
Step 4 - Cloud Director Configuration to enable Tenants for TKGm
Publish the Container UI Plugin to Tenants
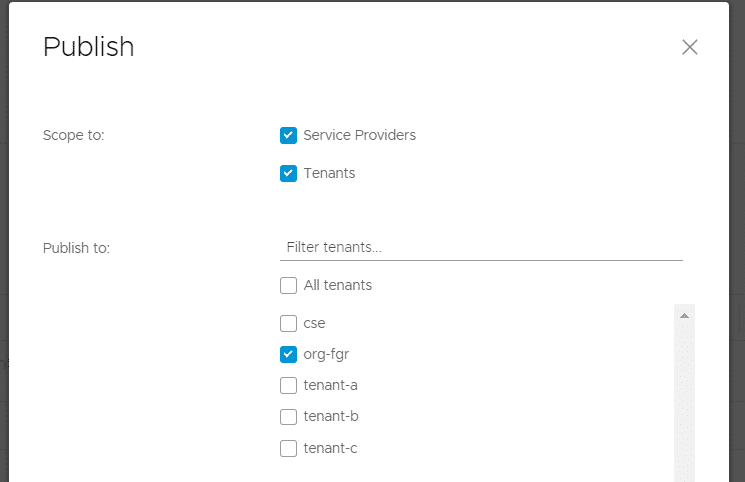
Login to Cloud Director as the System Administrator navigate to More > Customize Portal, select Container UI Plugin and press PUBLISH. You can either enable all tenants or select which tenants you want to enable for CSE.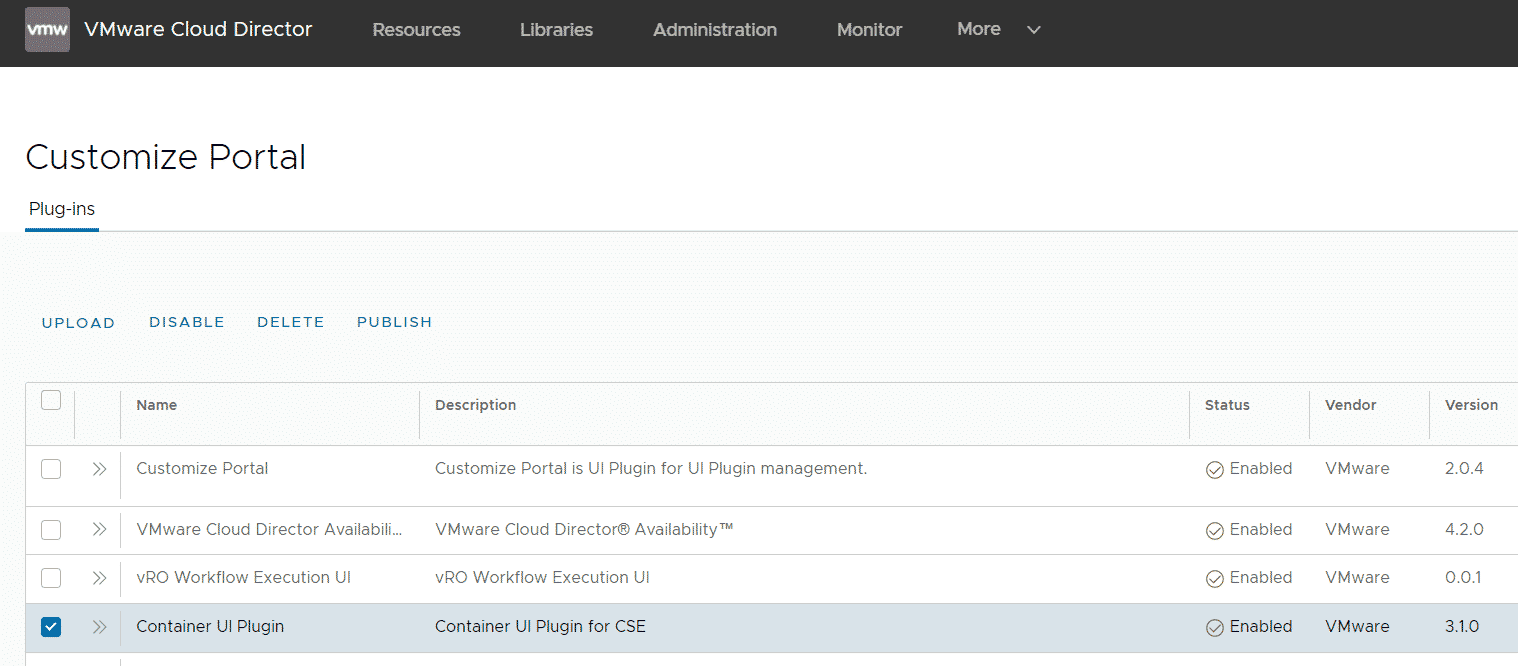
I've only selected a single tenant.
Now, when you log in as the tenant, you should see the plugin within the More tab.
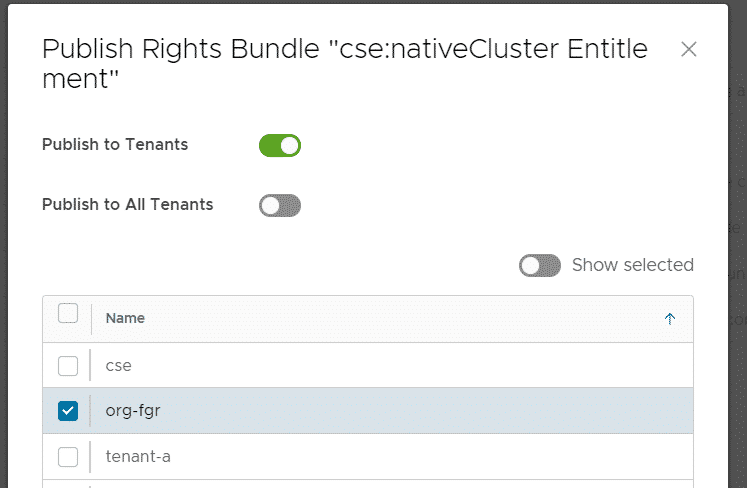
Edit and Publish the cse:nativeCluster Entitlement
To allow tenants to create TKGm clusters, you have to publish the "cse:nativeCluster Entitlement" Rights Bundle. With the bundle itself, they can only deploy TKGm clusters, not "Native" Clusters, which is fine for me. To enable Native Clusters you additionally have to explicitly enable the oVDC using the vcd-cli tool. I don't do it here but you can see how it works here.
Prior to publishing the bundle, you have to add a few rights. This is new in CSE 3.1 and documented here. Navigate to Administration > Tenant Access Control > Rights Bundles, select cse:nativeCluster Entitlement and press EDIT.
Make sure that the following rights are enabled:
- LIBRARIES > Catalog > View > View Shared Catalogs from Other Organizations
- ACCESS CONTROL > User > Manage > Manage user's own API token
- NETWORKING > Gateway > View > View Gateway
- NETWORKING > Gateway Services > View > NAT View Only
- NETWORKING > Gateway Services > Manage > NAT Configure
- NETWORKING > Gateway Services > View > Load Balancer View Only
- NETWORKING > Gateway Services > Manage > Load Balancer Configure
- COMPUTE > Organization VDC > Manage > Create a Shared Disk
Press SAVE. Then mark the Rights Bundle again, click PUBLISH and publish the bundle to all or selective tenants.
With the rights bundle, tenants are able to create their own role that allows them to create TKGm clusters. This is quite uncomfortable, so I edit the Global Organization Administrator to include the right. Navigate to Administration > Tenant Access Control > Global Roles, select the Organization Administrator and press EDIT. Scroll down to OTHER, activate View and Manage and press SAVE.
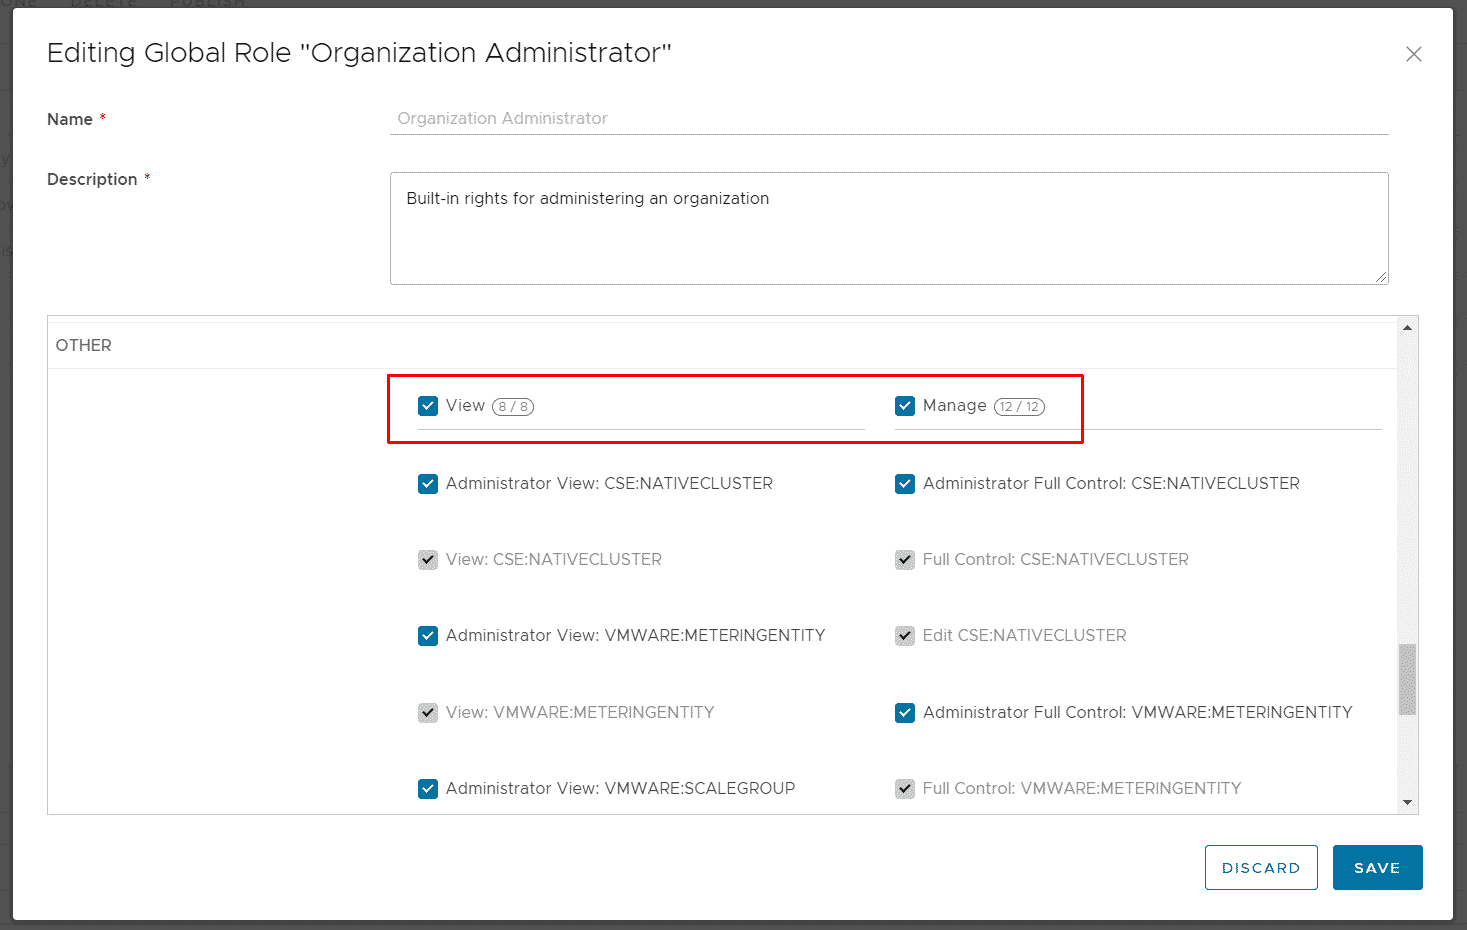
Note: Only the CSE:NATIVECLUSTER rights are actually required for TKGm. I think having all rights active in the Role and further specifying permissions using Rights Bundles is more convenient.
Thats' it! Your tenants can now start and deploy TKGm!
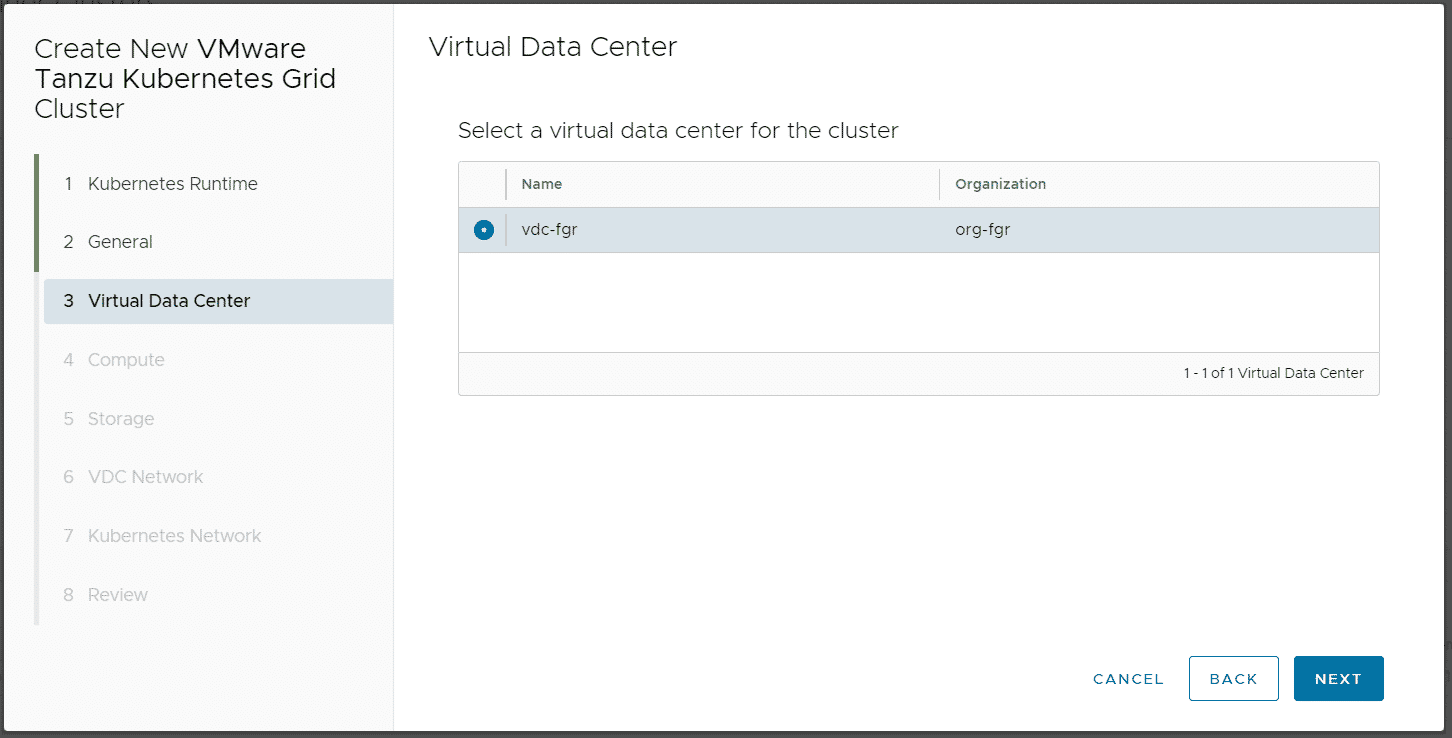
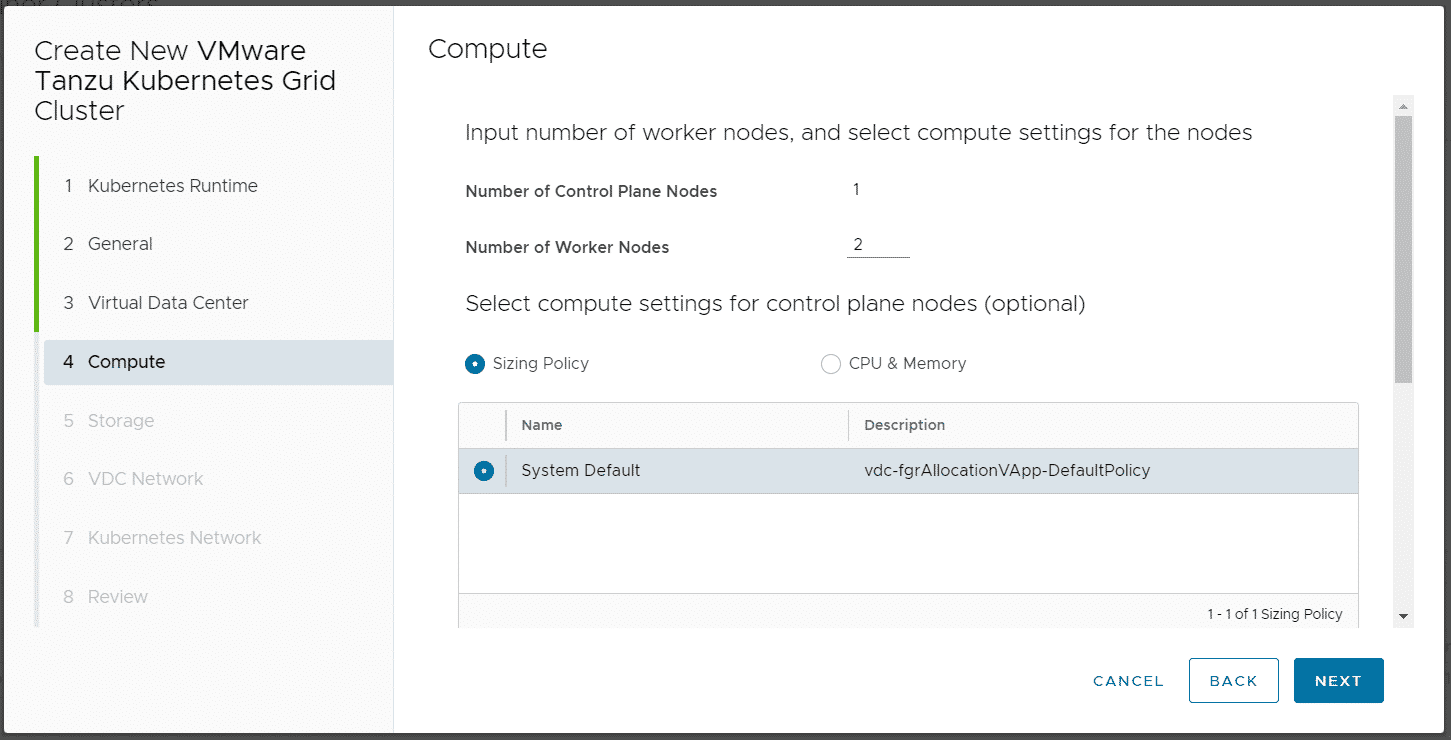
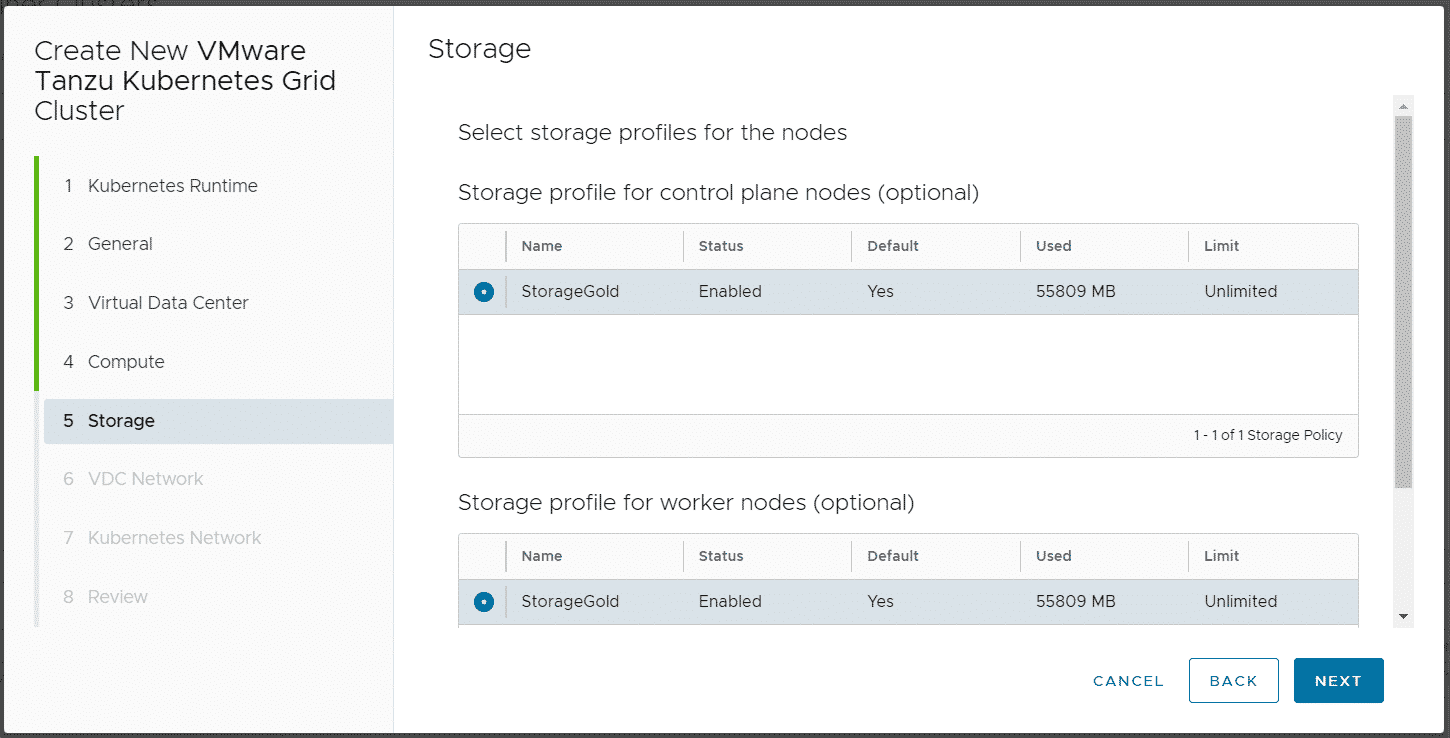
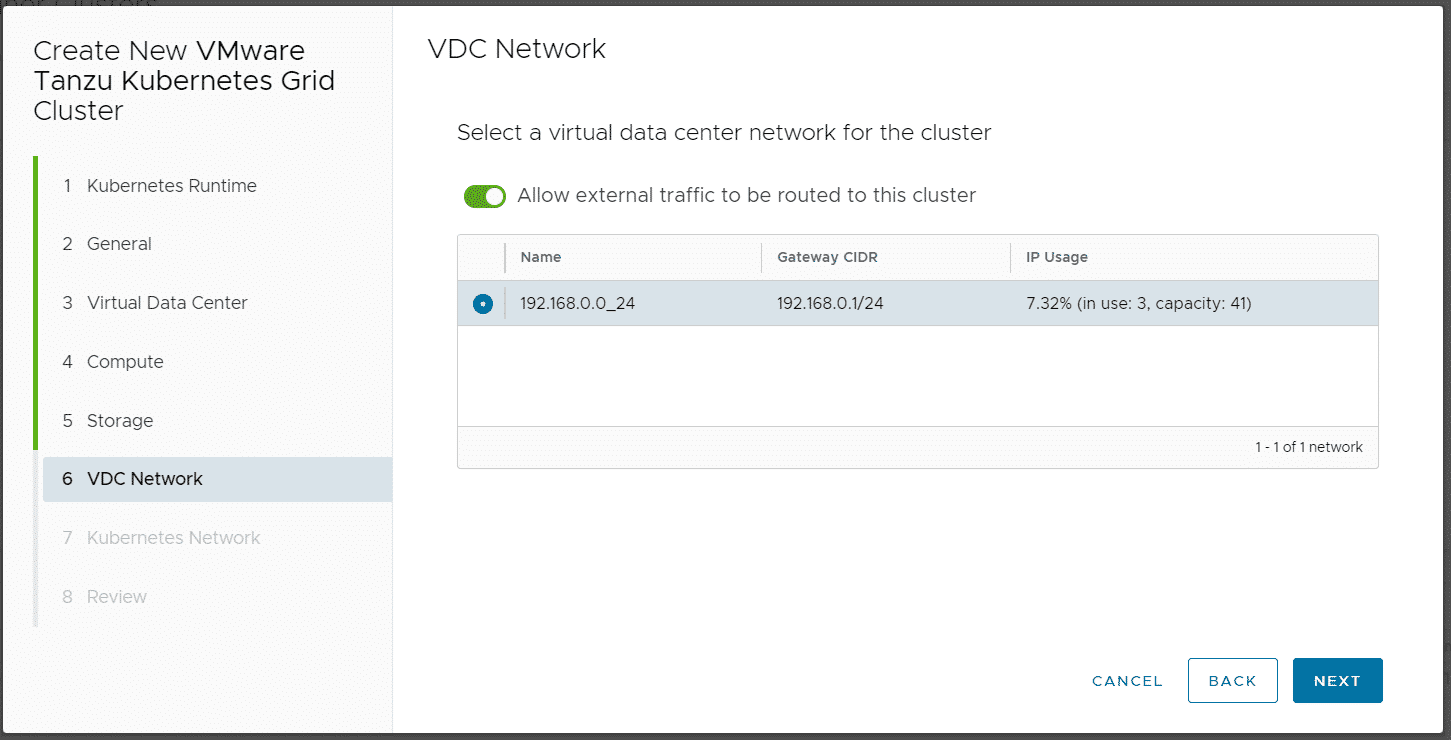
Step 5 - Deploy a TKGm Kubernetes Cluster as Tenant
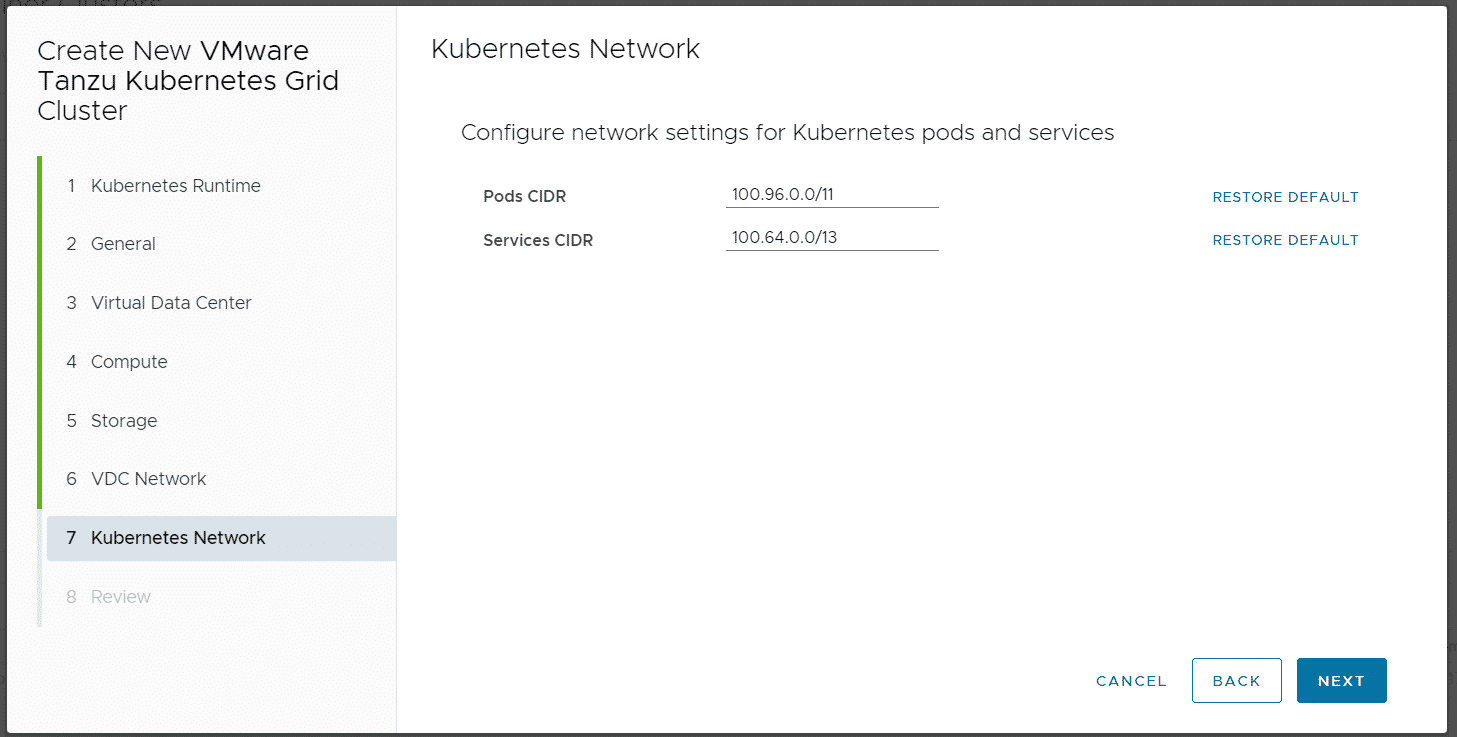
Login as a Tenant and navigate to More > Kubernetes Container Clusters, press NEW and follow the Wizard.

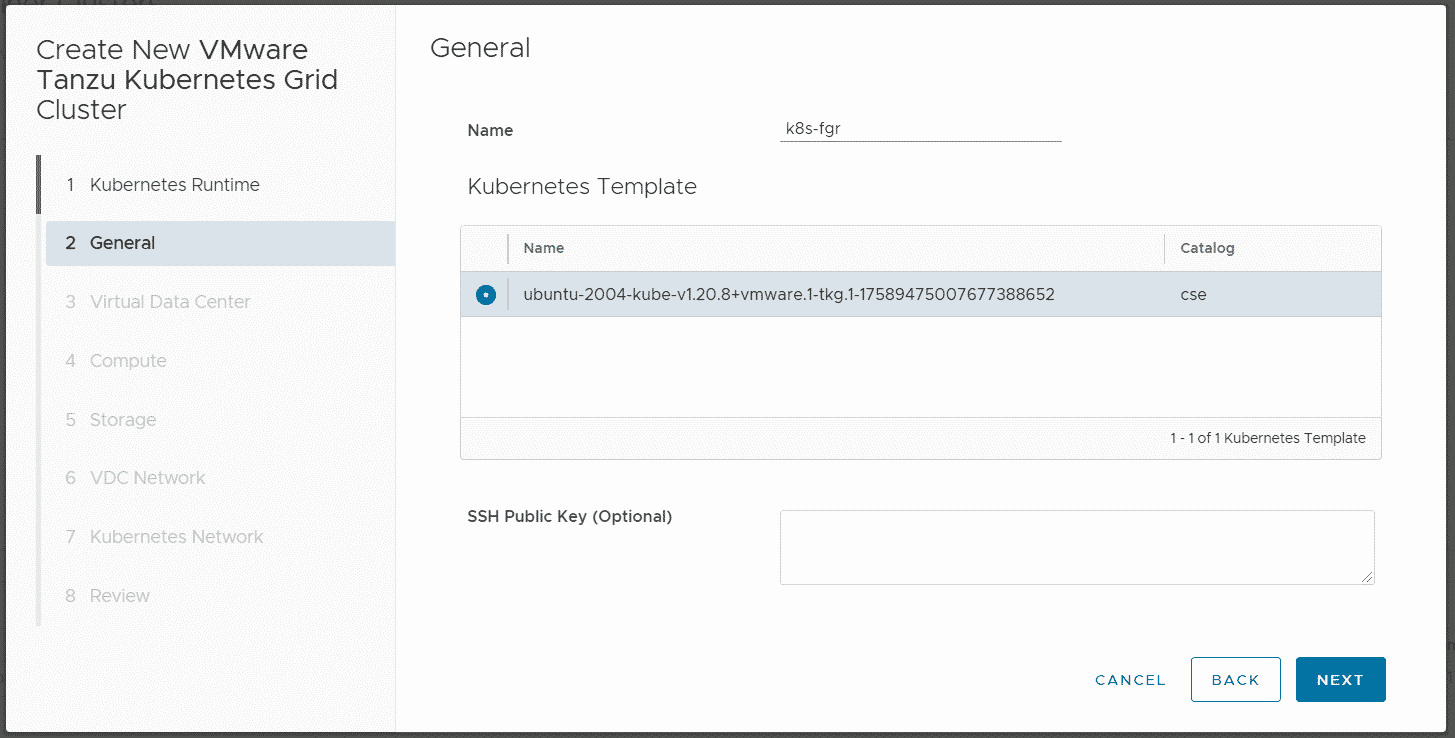
Note: Do NOT disable "Allow external traffic to be routed to this cluster", this feature is required by TKGm!
When the cluster has been deployed you can download the kubeconfig.
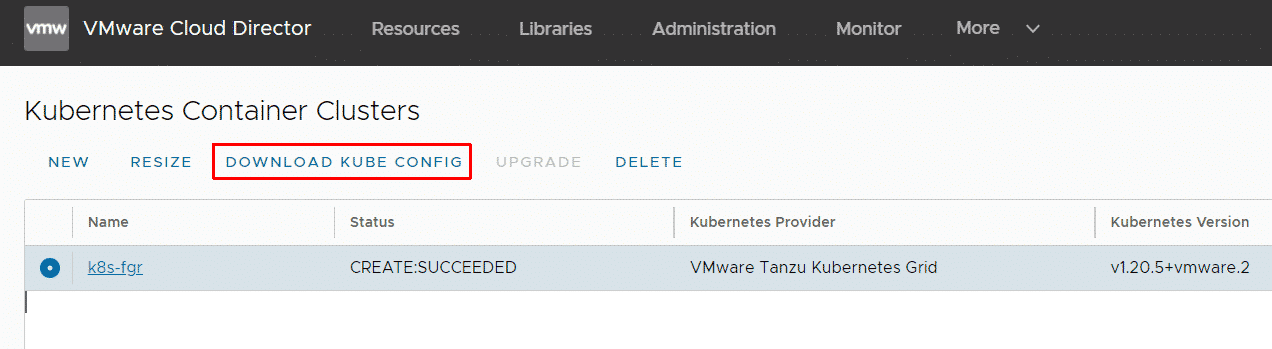
With this configuration, you can login using kubectl. Please be aware that with the default configuration, the Kubernetes apiserver is exposed to the internet. You might want to create Edge Gateway Firewall rules to limit the access.
# export KUBECONFIG=k8s-fgr

# kubectl get nodes
NAME        STATUS   ROLES                  AGE    VERSION
mstr-sqpd   Ready    control-plane,master   161m   v1.20.5+vmware.2
node-knp3   Ready                           156m   v1.20.5+vmware.2
node-zrce   Ready                           157m   v1.20.5+vmware.2

# kubectl get pods -A
NAMESPACE     NAME                                   READY   STATUS    RESTARTS   AGE
kube-system   antrea-agent-47j2t                     2/2     Running   0          94m
kube-system   antrea-agent-d7dms                     2/2     Running   0          91m
kube-system   antrea-agent-hslbg                     2/2     Running   0          89m
kube-system   antrea-controller-5cd95c574d-5z2np     1/1     Running   0          94m
kube-system   coredns-6598d898cd-9z55d               1/1     Running   0          94m
kube-system   coredns-6598d898cd-gf5qc               1/1     Running   0          94m
kube-system   csi-vcd-controllerplugin-0             3/3     Running   0          94m
kube-system   csi-vcd-nodeplugin-fwfz2               2/2     Running   0          90m
kube-system   csi-vcd-nodeplugin-xjz9l               2/2     Running   0          89m
kube-system   etcd-mstr-tfgn                         1/1     Running   0          94m
kube-system   kube-apiserver-mstr-tfgn               1/1     Running   0          94m
kube-system   kube-controller-manager-mstr-tfgn      1/1     Running   0          94m
kube-system   kube-proxy-8hbvz                       1/1     Running   0          89m
kube-system   kube-proxy-lsqxv                       1/1     Running   0          94m
kube-system   kube-proxy-r4twn                       1/1     Running   0          91m
kube-system   kube-scheduler-mstr-tfgn               1/1     Running   0          94m
kube-system   vmware-cloud-director-ccm-5489b6788c   1/1     Running   0          94m
All Pods should be up and running. If not, there might be an Issue with TKG to VCD communication. In beta releases, you had to manually configure VCD credentials at this point. This is no longer required in the final product. You automatically have a token in the vcloud-basic-auth secret:
# kubectl get secret -n kube-system vcloud-basic-auth -o yaml
apiVersion: v1
kind: Secret
data:
  password: ""
  refreshToken: NlVtRVNpVjFkNVhxNDBMS2JNcDBZa0xRbU4zMnpIdXg=
  username: ""
hello,
Thank you for such a great step by step article. I followed this article for configuration of CSE with tkgm in my lab. I tried to create a tkgm cluster. Master vm comes online and then it is deleted. I tried from UI and CLI. In cli i receive below message. Have you encountered such problem
(python) cse [ ~ ]$ vcd cse cluster apply tkgmcl01.yaml
/opt/cse/python/lib/python3.7/site-packages/dataclasses_json/core.py:171: RuntimeWarning: `NoneType` object value of non-optional type description detected when decoding DefEntityType.
warnings.warn(f"`NoneType` object {warning}.", RuntimeWarning)
Hey,
Great write up it helped me fine tune getting CSE setup for TKGm only without vCenter.
Few useful points for anyone else doing a similar setup
If using `no_vc_communication_mode: true`
Native templates are not supported so when you run `cse install` it will fail saying unsupported, use `cse install -t` to skip template creation as you already imported them.
Hopefully a remote_template_cookbook_url for TKGm will be provided in a future release so that upgrades work.
Hi, great blog, thank you very much.
Do you know why the option "Allow external traffic to be routed to this cluster" is always required, i havent found anything about it in the documentation??
https://vmware.github.io/container-service-extension/cse3_1/CLUSTER_MANAGEMENT.html section Creating clusters with VMware Tanzu Kubernetes Grid
For TKGm it is required