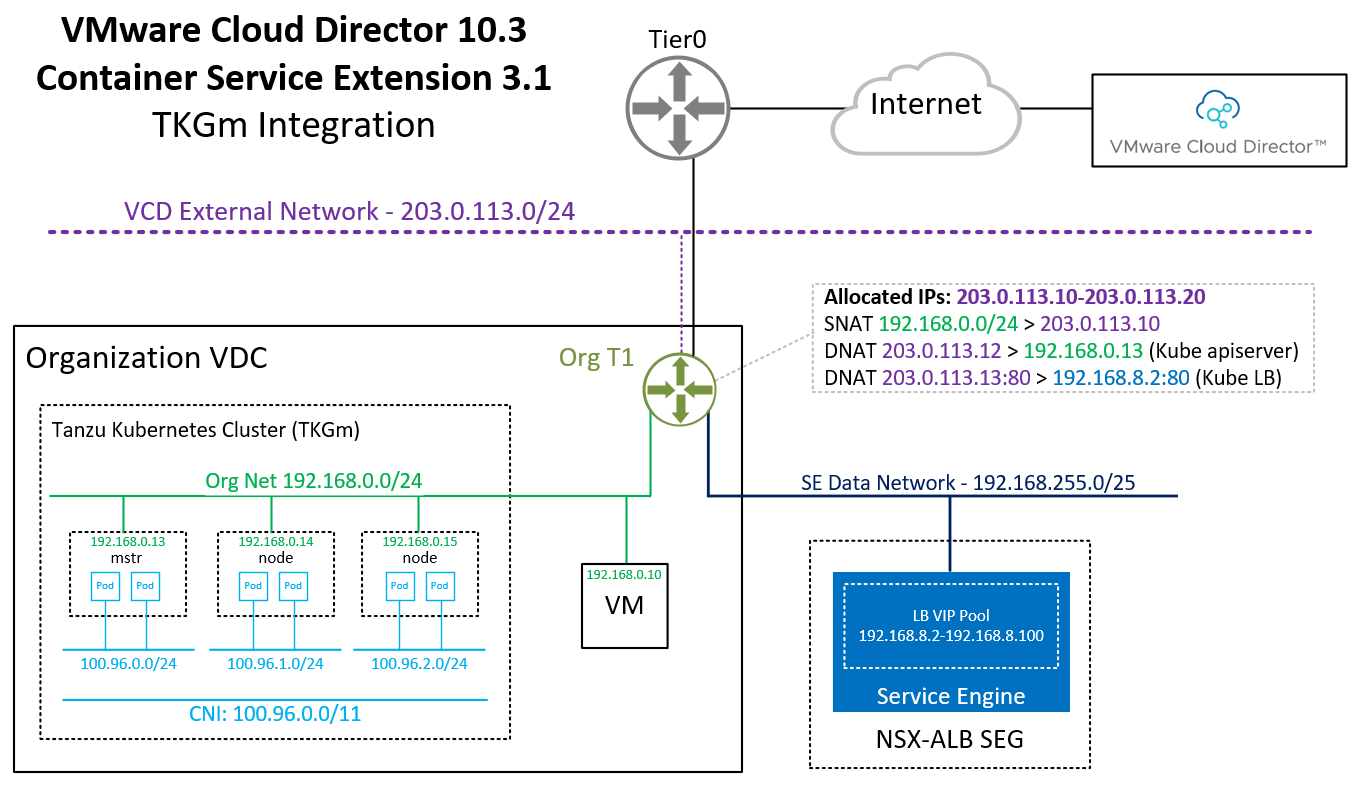
In the previous article, I've explained how to deploy Container Service Extension 3.1 with TKGm Support in VMware Cloud Director 10.3. In this article, I'm taking a look at how the Tanzu Kubernetes Grid Cluster is integrated into the Organization VDC and how the Tenant can access and work with the Kubernetes Cluster.
Prerequisites
This guide is from the Tenant's perspective and all actions can be done by the Tenant itself in the VMware Cloud Director Self Service Portal. However, it is required that the Service Provider has enabled "Tanzu Kubernetes Grid" support, which requires:
- VMware Cloud Director 10.3.1
- VMware NSX-ALB Integrated in VCD
- VMware CSE 3.1 with TKGm Support
To deploy TKGm Clusters, the Tenant needs:
- An Organization VDC
- NSX-T backed Edge Gateway
- TKGm Entitlement Rights Bundle
- Routed Org Network (Self Service)
- SNAT for the Routed Org Network to access Cloud Director
Deploy TKGm Kubernetes Cluster
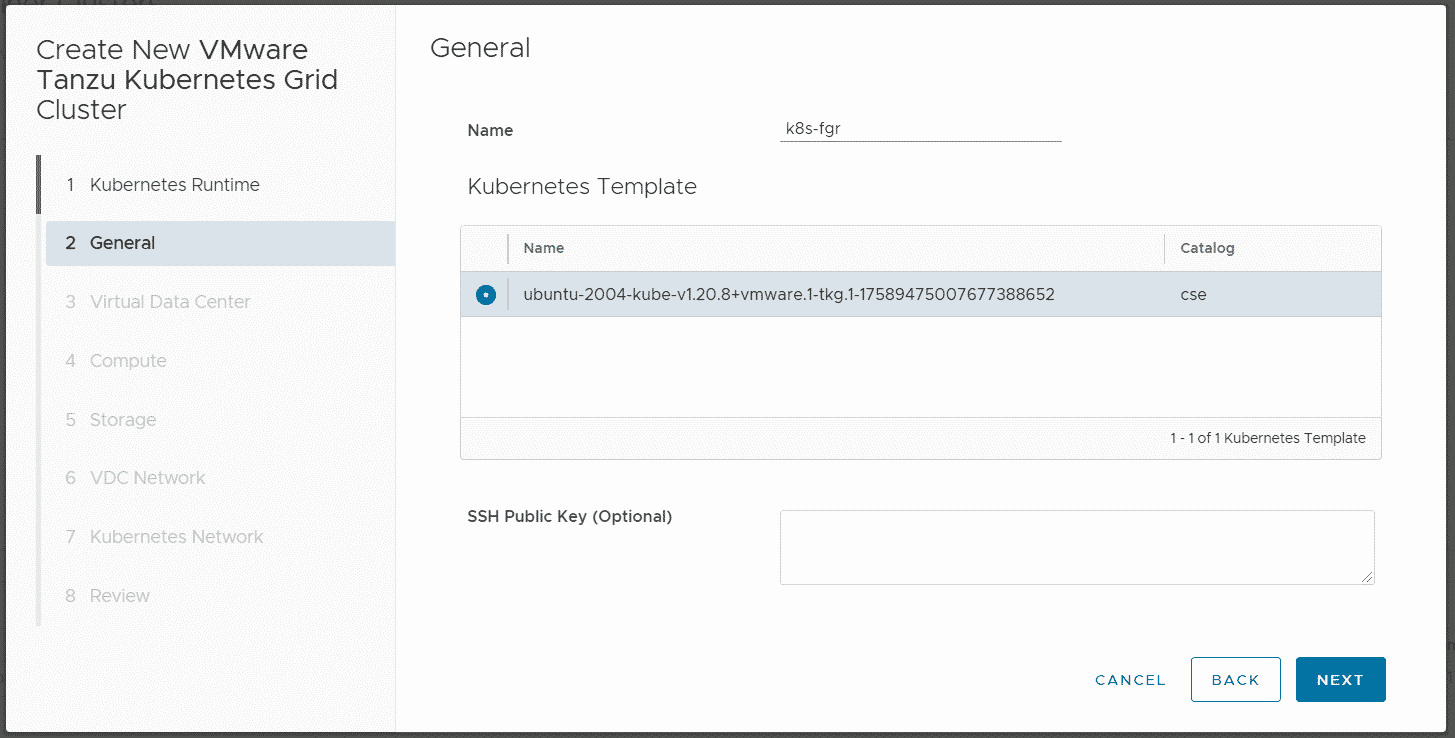
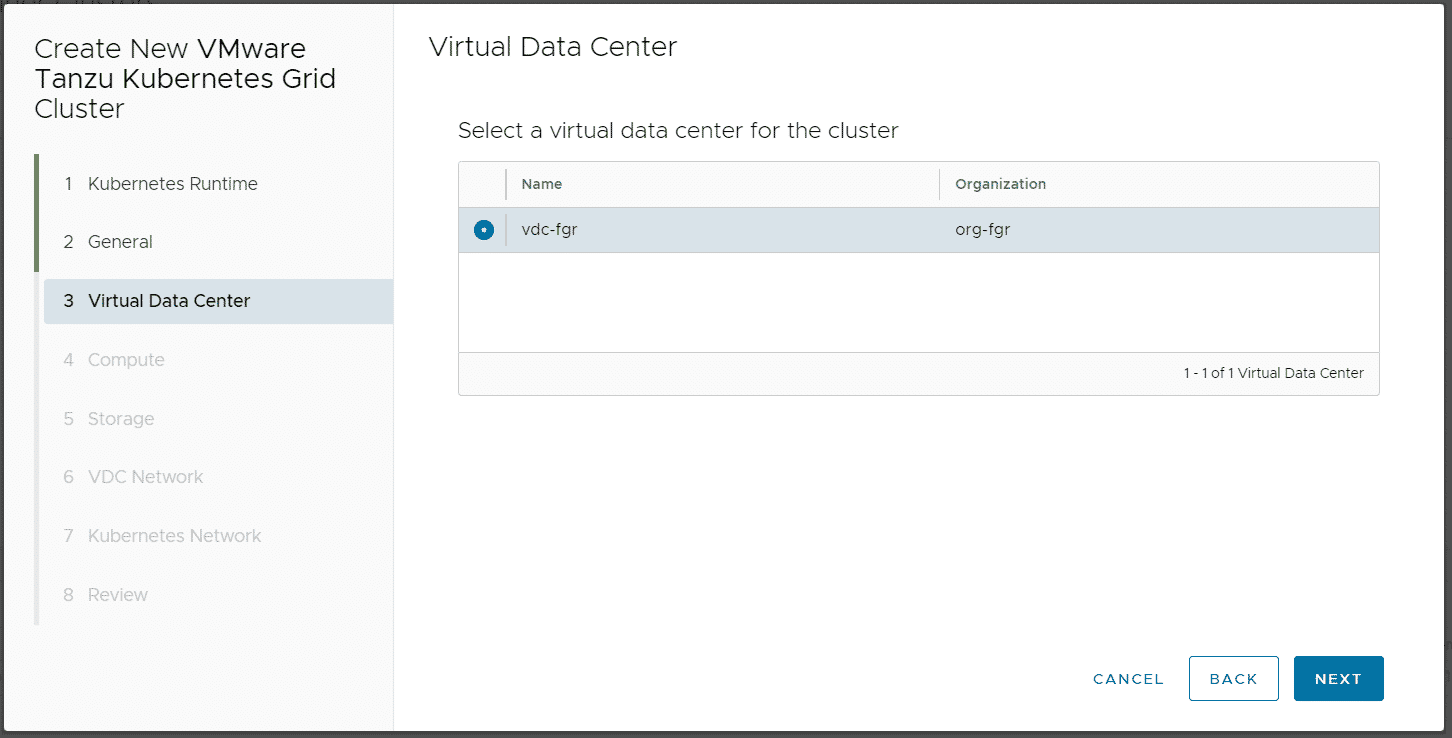
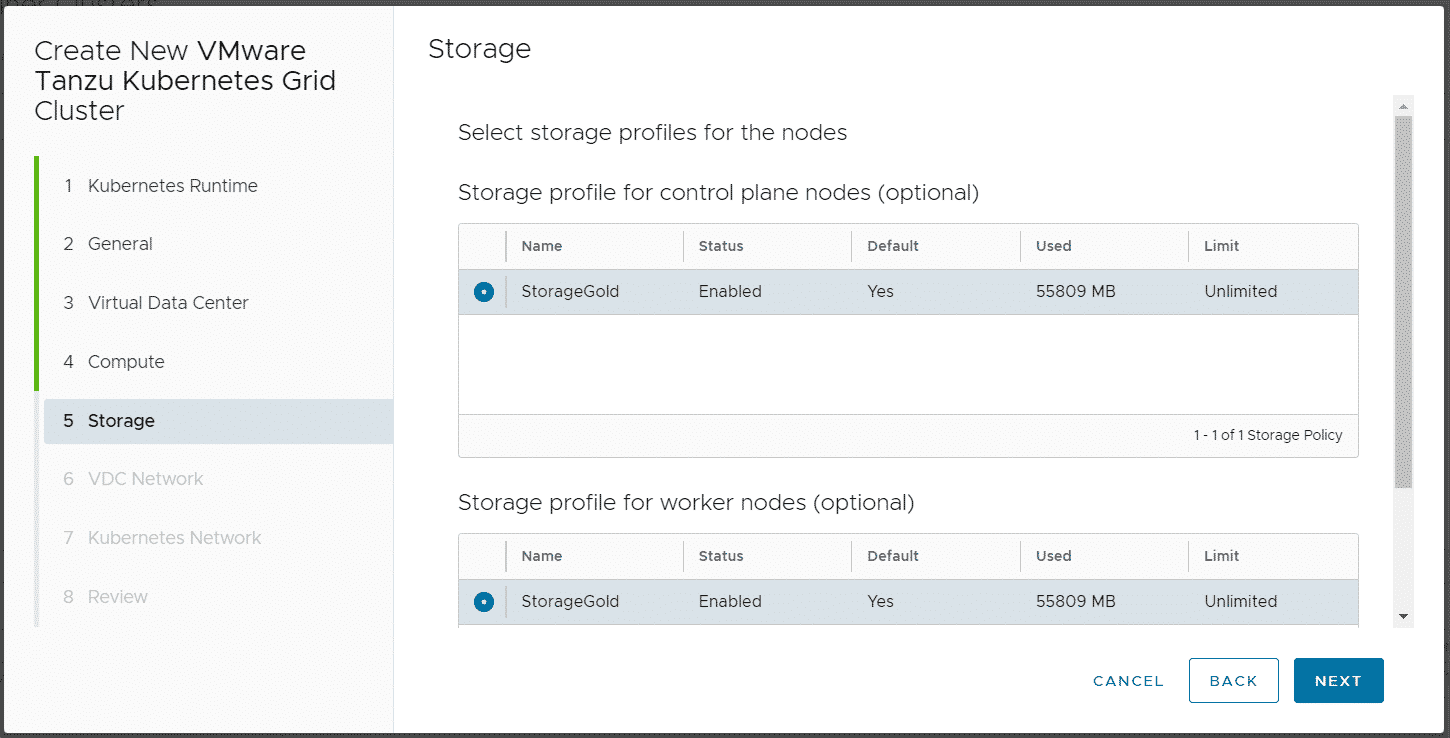
The TKG Cluster is deployed by the Tenant. Login to VDC and navigate to More > Kubernetes Container Clusters, press NEW and follow the Wizard.

You can add an SSH Key in Step 2. This allows you to log in to Kubernetes Nodes as root.
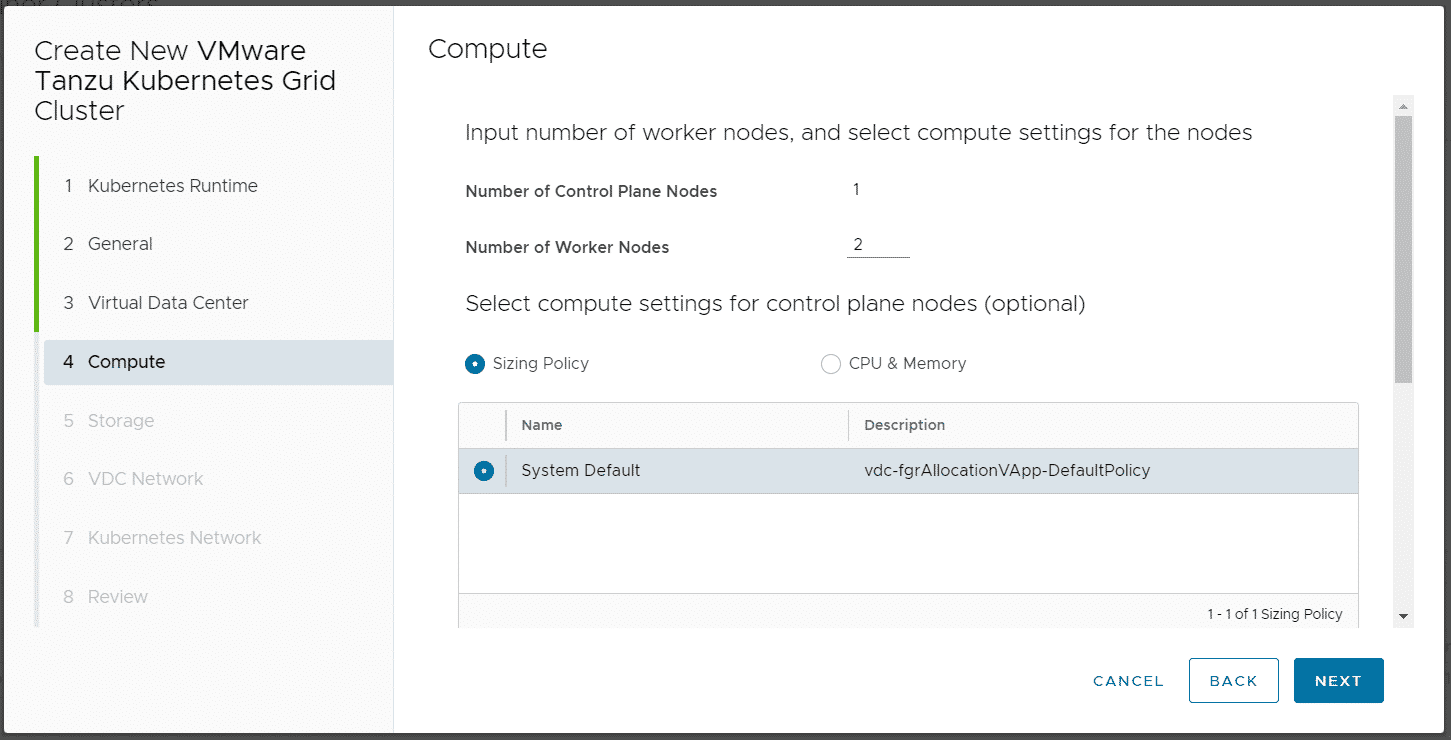
Currently, only Single Control Plane Clusters are supported.
Do NOT disable Allow external traffic to be routed to this cluster! This feature is required by TKGm. Please be aware that the master node is fully exposed to the external network (Internet).
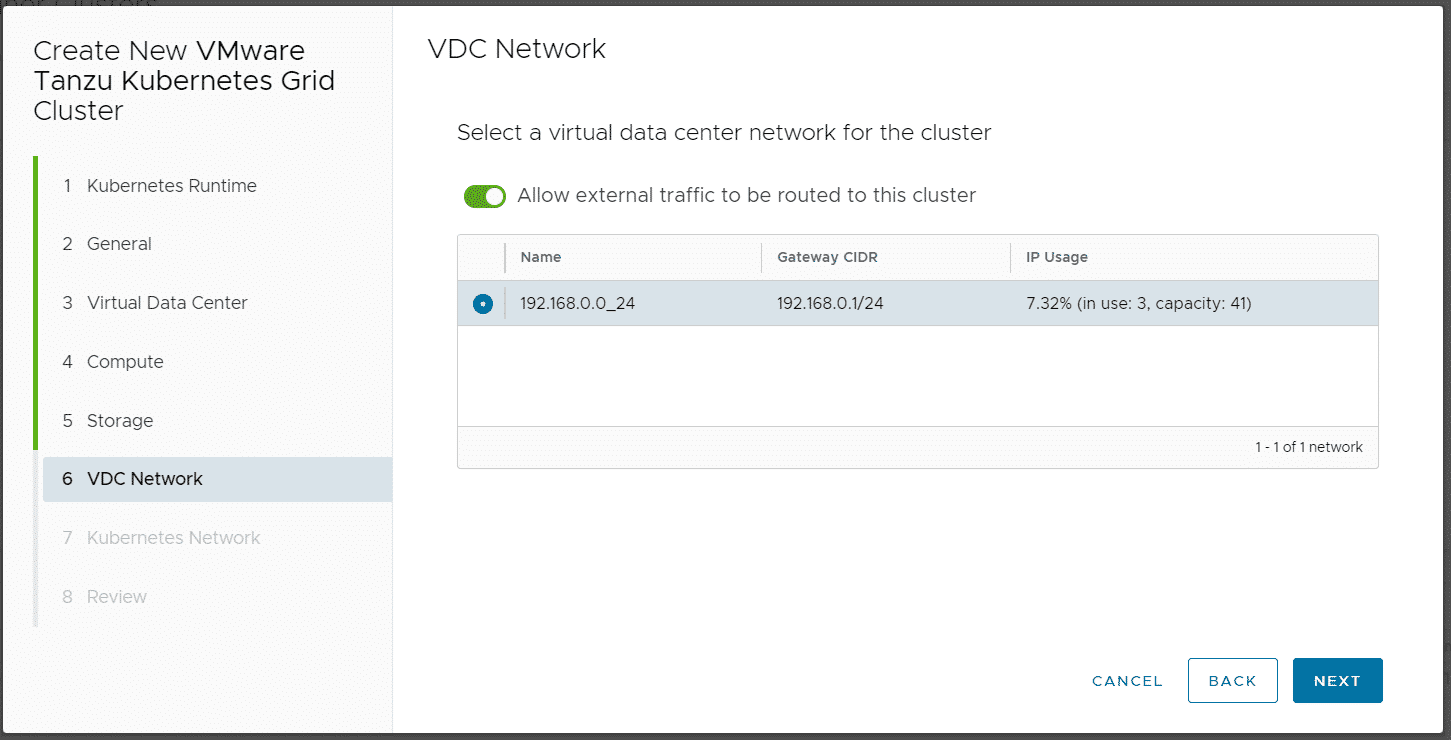
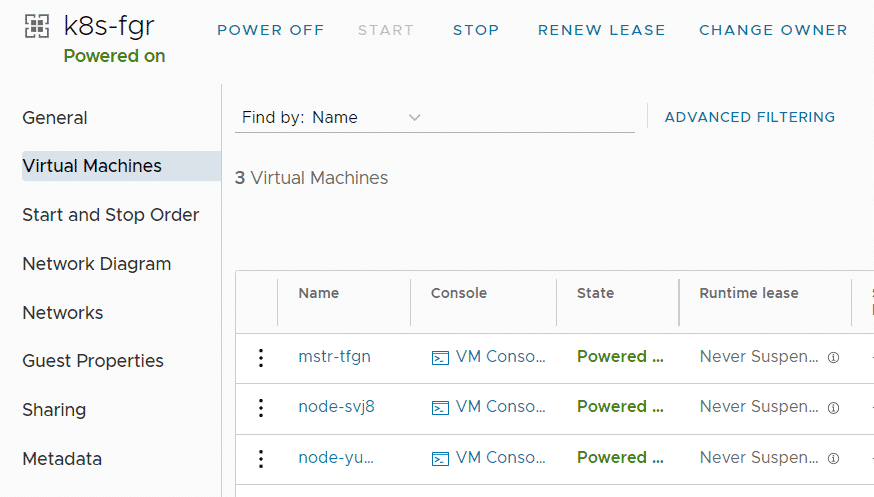
When you finish the Wizard, Cloud Director and CSE are deploying and configuring Kubernetes Master and Worker VMs as VAPP. It also creates a DNAT using a free IP address from the Edges IP Address Pool to fully expose the master node:
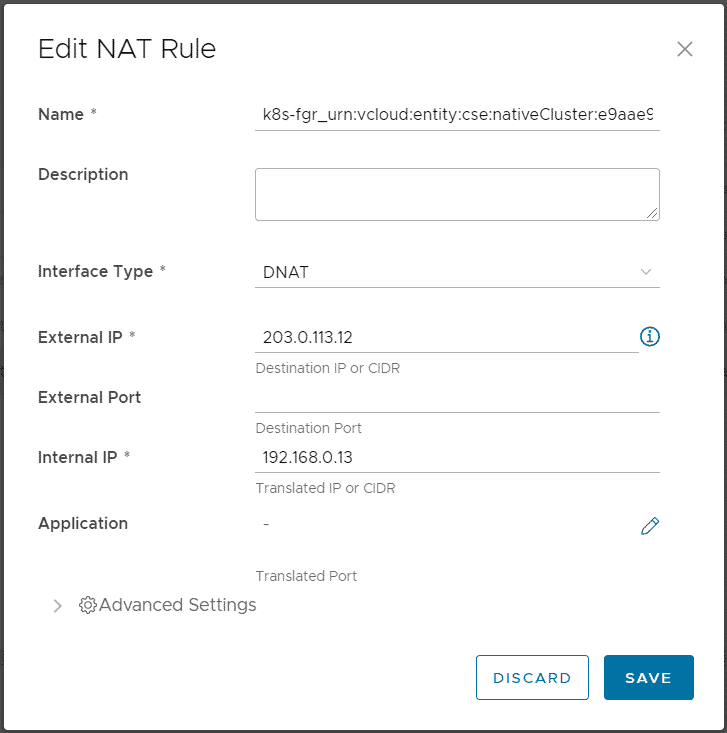
Please keep in mind that with this NAT configuration, every service Type NodePode you deploy in Kubernetes is available on the Internet.
Get Kubeconfig and Acces the Kubernetes Cluster with kubectl
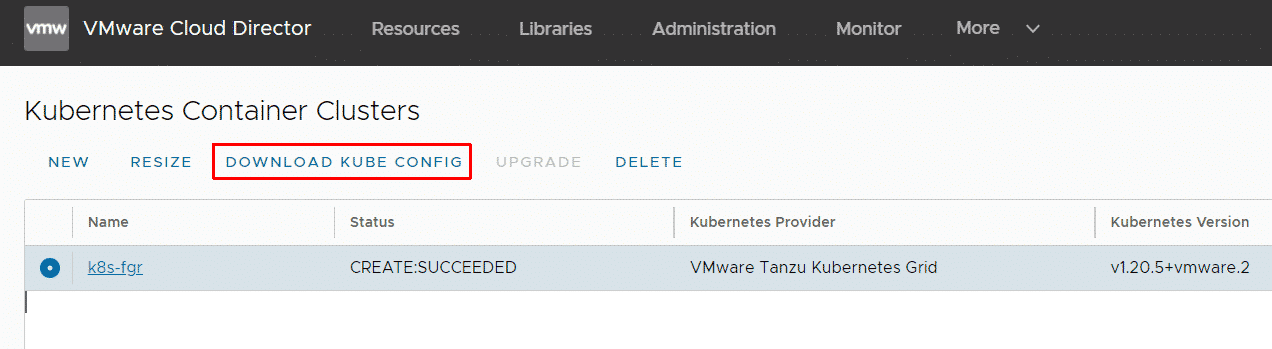
When the cluster has been deployed you can download the kubeconfig from the UI:
You can also get the kubeconfig using API with the following API call:
GET https://[URL]/api/cse/3.0/cluster/[Cluster ID]/config
I made a small bash script that automatically pulls the configuration. You can get the script here.
# wget https://raw.githubusercontent.com/fgrehl/virten-scripts/master/bash/vcd_get_kubeconfig.sh
# chmod +x vcd_get_kubeconfig.sh
# ./vcd_get_kubeconfig.sh -u admin@org-fgr -p 'VMware1!' -v vcloud.virten.lab -c k8s-fgr > ~/k8s/k8s-fgr
# export KUBECONFIG=~/k8s/k8s-fgr
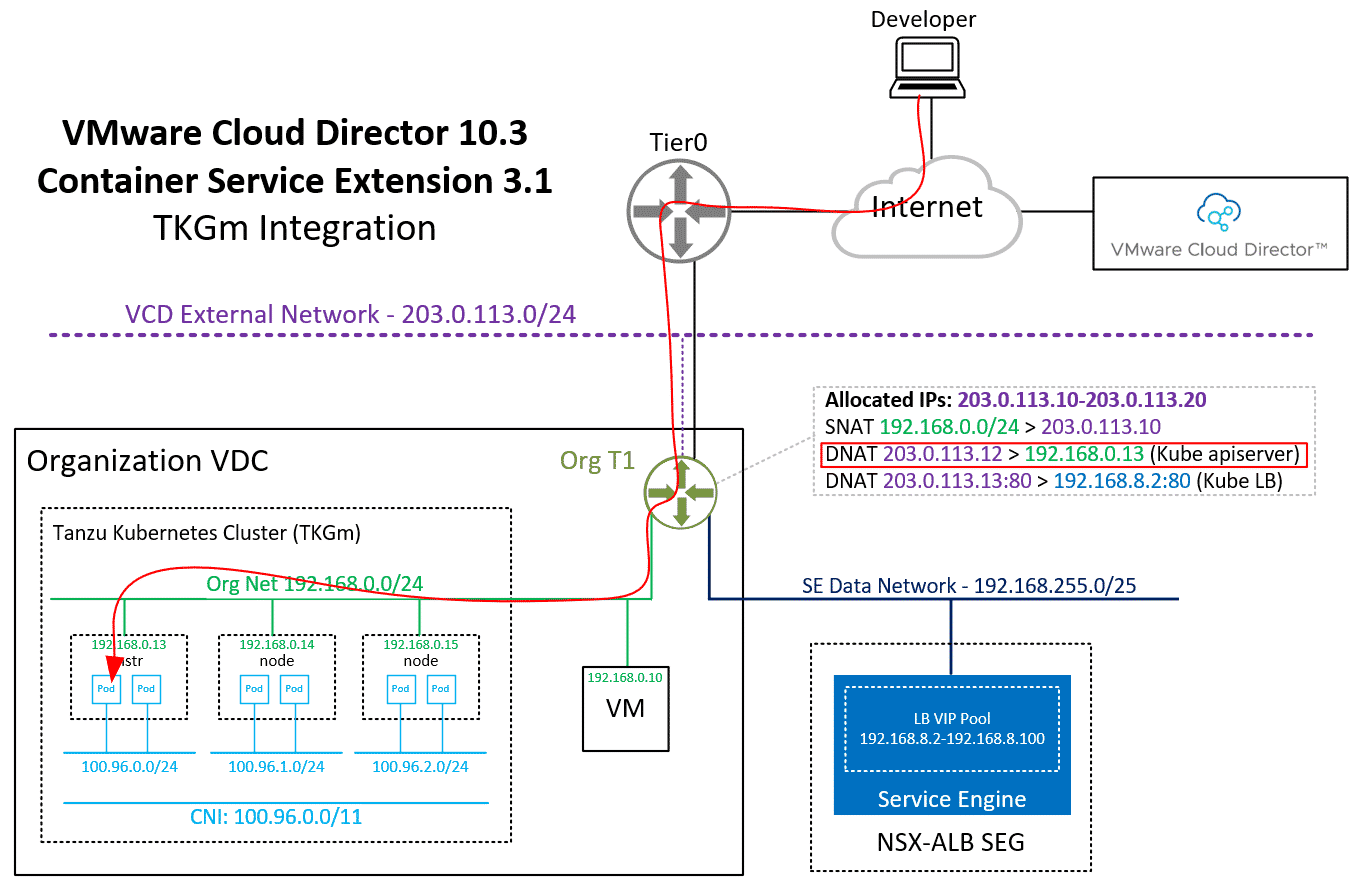
As mentioned earlier, the Kubernetes apiserver is exposed to the Internet and the public NAT address is automatically added to the downloaded kubeconfig. You should now be able to access the Cluster with kubectl.
# kubectl get nodes
NAME        STATUS   ROLES                 AGE   VERSION
mstr-sqpd   Ready    control-plane,master  45h   v1.20.5+vmware.2
node-knp3   Ready                          45h   v1.20.5+vmware.2
node-zrce   Ready                          45h   v1.20.5+vmware.2
The first thing to check is if all pods are up and running. All pods should be in Running state!
# kubectl get pods -A
NAMESPACE     NAME                                   READY   STATUS    RESTARTS   AGE
kube-system   antrea-agent-47j2t                     2/2     Running   0          94m
kube-system   antrea-agent-d7dms                     2/2     Running   0          91m
kube-system   antrea-agent-hslbg                     2/2     Running   0          89m
kube-system   antrea-controller-5cd95c574d-5z2np     1/1     Running   0          94m
kube-system   coredns-6598d898cd-9z55d               1/1     Running   0          94m
kube-system   coredns-6598d898cd-gf5qc               1/1     Running   0          94m
kube-system   csi-vcd-controllerplugin-0             3/3     Running   0          94m
kube-system   csi-vcd-nodeplugin-fwfz2               2/2     Running   0          90m
kube-system   csi-vcd-nodeplugin-xjz9l               2/2     Running   0          89m
kube-system   etcd-mstr-tfgn                         1/1     Running   0          94m
kube-system   kube-apiserver-mstr-tfgn               1/1     Running   0          94m
kube-system   kube-controller-manager-mstr-tfgn      1/1     Running   0          94m
kube-system   kube-proxy-8hbvz                       1/1     Running   0          89m
kube-system   kube-proxy-lsqxv                       1/1     Running   0          94m
kube-system   kube-proxy-r4twn                       1/1     Running   0          91m
kube-system   kube-scheduler-mstr-tfgn               1/1     Running   0          94m
kube-system   vmware-cloud-director-ccm-5489b6788c   1/1     Running   0          94m
The vmware-cloud-director-ccm pod is responsible for Cloud Director communication. If antrea-controller, coredns or csi-vcd-controllerplugin-0 are stuck in pending state, you probably have a communication problem with the Cloud Director. At this point, no workload pods can be started because without the Cloud Provivder Integration, all nodes are tainted:
# kubectl get events
LAST SEEN    TYPE     REASON           OBJECT                          MESSAGE
20s          Warning  FailedScheduling pod/webserver-559b886555-p4sjc  0/3 nodes are available: 1 node(s) had taint {node-role.kubernetes.io/master: }, that the pod didn't tolerate, 2 node(s) had taint {node.cloudprovider.kubernetes.io/uninitialized: true}, that the pod didn't tolerate.
If that's the case, you can run a shell on the ccm pod to verify VCD communication:
# kubectl exec -it vmware-cloud-director-ccm-5489b6788c-fc86k -n kube-system -- sh
Or get Logs from the pod:
# kubectl logs vmware-cloud-director-ccm-5489b6788c-fc86k -n kube-system
Deploy and expose the first Container
As an example, I'm going to deploy an nginx webserver and expose it to the internet using the ALB integration. This is a very simple task in Kubernetes:
# kubectl create deployment webserver --image nginx
# kubectl expose deployment webserver --port=80 --type=LoadBalancer
It should download the nginx image, launch a pod and create a service of type LoadBalancer:
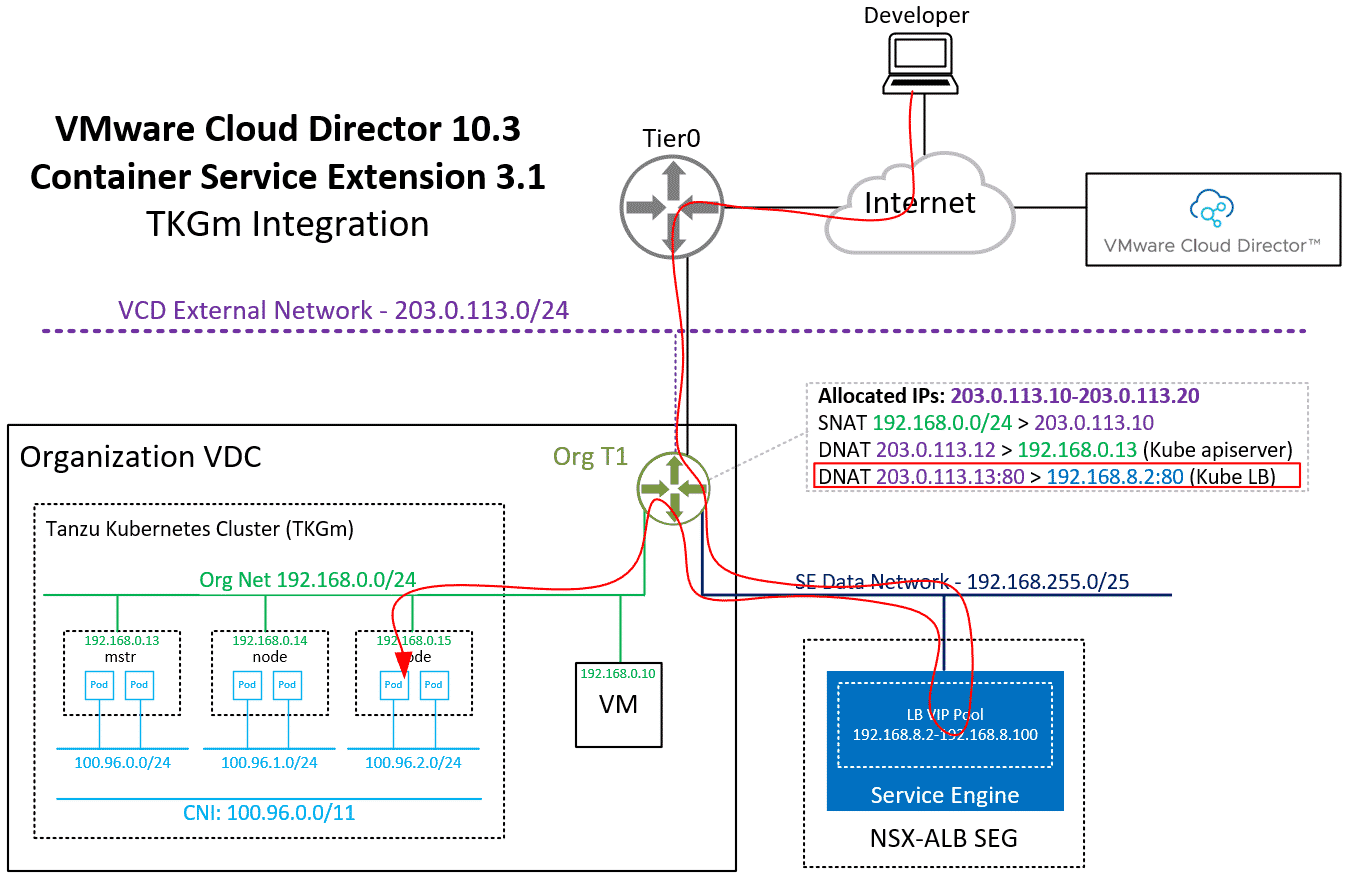
# kubectl get deployments
NAME         READY   UP-TO-DATE   AVAILABLE   AGE
webserver    1/1     1            1           47m

# kubectl get service
NAME         TYPE           CLUSTER-IP       EXTERNAL-IP    PORT(S)        AGE
kubernetes   ClusterIP      100.64.0.1       <none>         443/TCP        2d1h
webserver    LoadBalancer   100.67.6.30      203.0.113.13   80:32515/TCP   47m
From the output, you can learn that it has automatically assigned the address 203.0.113.13 from the tenant's IP pool. This address is not directly configured in the ALB loadbalancer. Every service type LoadBalancer you deploy uses an address from 192.168.8.2-192.168.8.100 to configure the NSX-ALB Loadbalancer and then creates a NAT to forward a public address to the load balancer.
For more information, about the VCD Cloud provider which also includes the NSX-ALB integration, refer to cloud-provider-for-cloud-director.
Deploy Internal Services
Currently, every service you deploy is automatically exposed to the Internet. You do not have an option to influence which IP Address is assigned when you deploy a LoadBalancer. If you want to make service available internally to your Org Network only, you have to deploy it as NodePort:
# kubectl expose deployment webserver --port=80 --type=NodePort
Check the Service to learn the exposed port:
# kubectl get service
NAME         TYPE           CLUSTER-IP       EXTERNAL-IP    PORT(S)        AGE
webserver2   NodePort       100.71.223.221   <none>         80:30871/TCP   9h
The webserver can now be accessed on all Kubernetes Nodes on port 30871. If you want, you can configure an internal loadbalancer using the VCD UI. Just create a pool with all nodes as Node members. You can quickly get a list of all address with the following command:
kubectl get nodes -o jsonpath='{ $.items[*].status.addresses[?(@.type=="InternalIP")].address }'
192.168.0.13
192.168.0.15
192.168.0.14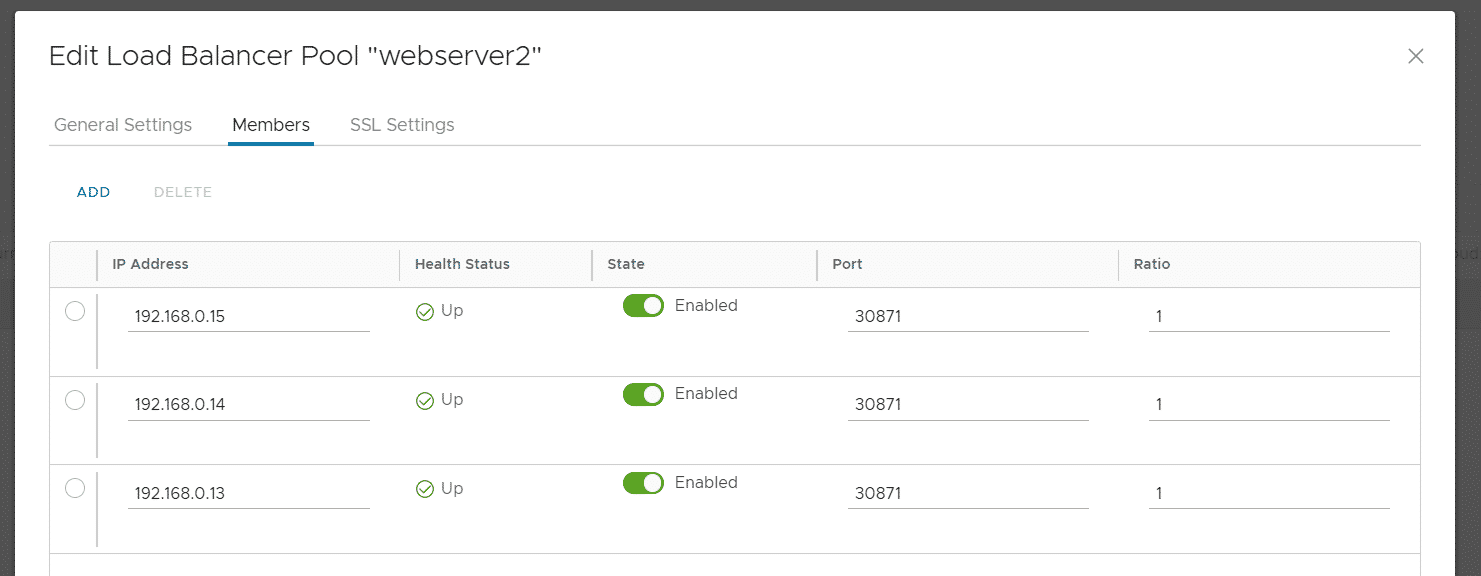
Persistent Storage with Name Disks
Persistent Disks in TKGm are using the Named Disks feature in Cloud Director. The CSI driver documentation is available here. Communication with Cloud Director is already prepared by the Cloud Provider, so you just have to define a Storage Class. A storage class can be defined with the following YAML file. Please change storageProfile to fit your environment or just use "*" to use the default class.
sc_gold.yaml
apiVersion: v1
kind: StorageClass
apiVersion: storage.k8s.io/v1
metadata:
  annotations:
    storageclass.kubernetes.io/is-default-class: "false"
  name: gold
provisioner: named-disk.csi.cloud-director.vmware.com
reclaimPolicy: Delete
parameters:
  storageProfile: "StorageGold"
  filesystem: "ext4"
Then apply the yaml:
# kubectl apply -f sc.yaml
storageclass.storage.k8s.io/gold created
Now create and apply a PVC and Debugger Pod that mounts the PVC to /data
pvc.yaml
---
apiVersion: v1
kind: PersistentVolumeClaim
metadata:
  name: testpvc
spec:
  accessModes:
    - ReadWriteOnce
  resources:
    requests:
      storage: 1Gi
  storageClassName: "gold"
---
kind: Pod
apiVersion: v1
metadata:
  name: debugger
spec:
  volumes:
    - name: testpvc
      persistentVolumeClaim:
       claimName: testpvc
  containers:
    - name: debugger
      image: busybox
      command: ['sleep', '3600']
      volumeMounts:
        - mountPath: "/data"
          name: testpvc
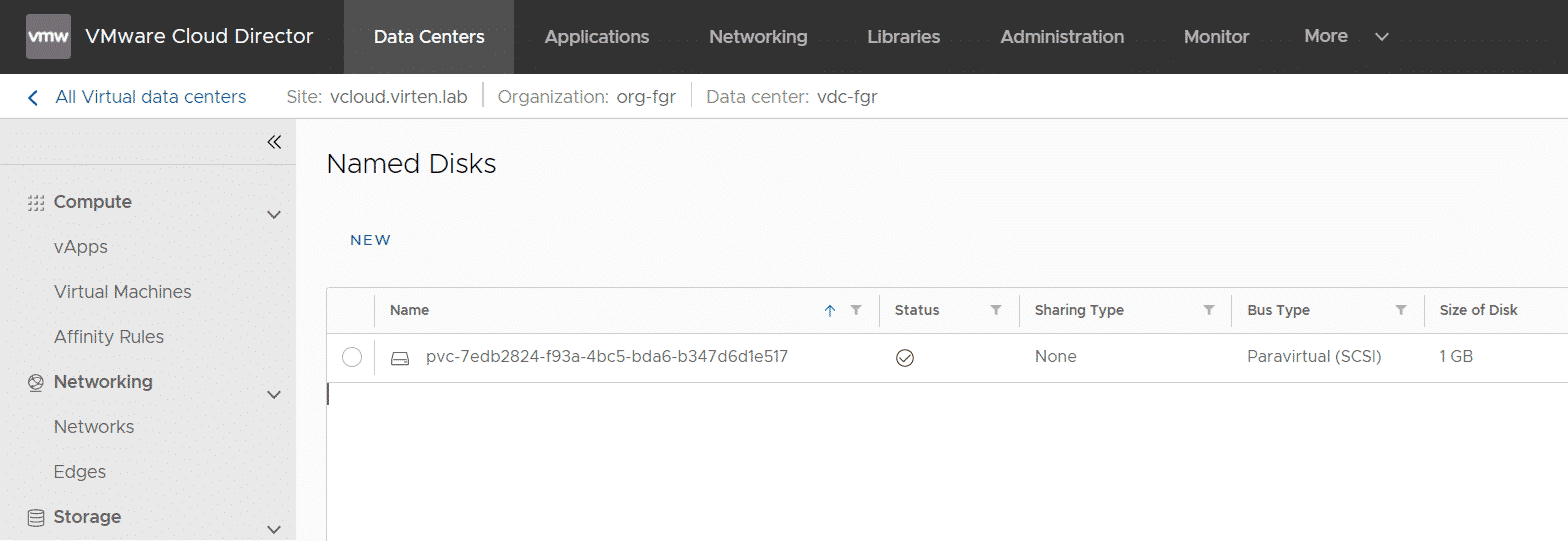
You can find the PVC in Cloud Director > Data Centers > Datacenter > Storage > Named Disks
Run a shell in the pod to verify that the PVC has been mounted successfully:
# kubectl exec -it debugger -- sh
/ # df -h /data
Filesystem  Size    Used  Available  Use%  Mounted on
/dev/sdb    975.9M  2.5M  906.2M     0%    /data
/ # touch /data/hello
/ # ls -l /data
total 16
-rw-r--r--  1 root root     0 Nov 21 20:56 hello
drwx------  2 root root 16384 Nov 21 20:51 lost+found
Hi,
i'm having the following problem:
```
# kubectl get events
LAST SEEN TYPE REASON OBJECT MESSAGE
20s Warning FailedScheduling pod/webserver-559b886555-p4sjc 0/3 nodes are available: 1 node(s) had taint {node-role.kubernetes.io/master: }, that the pod didn't tolerate, 2 node(s) had taint {node.cloudprovider.kubernetes.io/uninitialized: true}, that the pod didn't tolerate.
```
I look for evidence in the pod logs (vmware-cloud-director-ccm-XXXX) and i had received this content:
```
I0117 13:02:33.635772 1 cloud.go:92] Error initializing client from secrets: [unable to get swagger client from secrets: [unable to get bearer token from serets: [failed to set authorization header: [error finding LoginUrl: could not find valid version for login: could not retrieve supported versions: error fetching versions: [ParseErr]: error parsing error body for non-200 request: XML syntax error on line 6: element closed by (&{Status:400 Bad Request StatusCode:400 Proto:HTTP/1.1 ProtoMajor:1 ProtoMinor:1 Header:map[Content-Length:[167] Content-Type:[text/html] Date:[Mon, 17 Jan 2022 13:02:33 GMT] Server:[NSX LB]] Body:0xc00048f300 ContentLength:167 TransferEncoding:[] Close:true Uncompressed:false Trailer:map[] Request:0xc000676000 TLS:0xc0003051e0})]]]]
```
Are you have any tips to indicate me?