This article explains how to create a bootable ESXi Installer USB Flash Drive with Linux, Windows, and Macs. Installing ESXi with a USB flash drive is a convenient method for physical servers that do not have remote management.
ESXi Image Download
- VMware vSphere Hypervisor (ESXi) 8.0.0 [Release Notes] [Download]
- VMware vSphere Hypervisor (ESXi) 7.0U3g [Release Notes] [Download]
- VMware vSphere Hypervisor (ESXi) 7.0U2a [Release Notes] [Download]
- VMware vSphere Hypervisor (ESXi) 7.0U1c [Release Notes] [Download]
- VMware vSphere Hypervisor (ESXi) 7.0b [Release Notes] [Download]
- VMware vSphere Hypervisor (ESXi) 6.7U3b [Release Notes] [Download]
- VMware vSphere Hypervisor (ESXi) 6.5U3a [Release Notes] [Download]
Create a bootable ESXi Installer USB Flash Drive with Linux
- Download ESXi Image: ESXi 8.0 (or any other version)
- Install syslinux using your Linux packet manager.
# yum install syslinux
# apt install syslinux
- Identify the usb flash drives device path (sdb in this example).
An easy method to identify the device is by running dmesg shortly after plugging in the drive. Have a look for square brackets []. Alternatively, run lsblk --fs and search for iso9660 filesystems.# dmesg scsi host0: usb-storage 1-2:1.0 scsi 0:0:0:0: Direct-Access Kingston DataTraveler 2.0 Stick sd 0:0:0:0: Attached scsi generic sg0 type 0 sd 0:0:0:0: [sdb] 62652416 512-byte logical blocks: (32 GB) sd 0:0:0:0: [sdb] Attached SCSI removable disk
- Create a partition with fdisk. This will bring up the interactive tool.
# fdisk /dev/sdb
- Press d to delete existing partitions
- Press n for new partition, followed by p for primary
- Press ENTER 3 times to use default settings
- press t to toggle the file system type
- press c to set the file system type to FAT32
- press a to make the partition active
- press w to write changes to disk
- Format the drive
# /sbin/mkfs.vfat -F 32 -n ESX /dev/sdb1
- Copy the boot loader and Master Boot Record
# /usr/bin/syslinux /dev/sdb1
# cat /usr/share/syslinux/mbr.bin > /dev/sdb
- Create a mount point for the flash drive and mount it
# mkdir /usbdisk
# mount /dev/sdb1 /usbdisk
- Create a mount point for the ESXi ISO and mount it
# mkdir /esxi
# mount -o loop VMware-VMvisor-Installer-x.x.x-XXXXXX.x86_64.iso /esxi
- Copy the contents of the ISO image to the USB flash drive
# cp -r /esxi/* /usbdisk
- In the /usbdisk/syslinux.cfg file, edit the APPEND -c boot.cfg line to APPEND -c boot.cfg -p 1
# sed -i 's/APPEND -c boot.cfg/APPEND -c boot.cfg -p 1/g' /usbdisk/syslinux.cfg
- Unmount the flash drive and ESXi ISO
# umount /usbdisk
# umount /esxi
- You can now remove the flash drive and use it to install ESXi.
Create a bootable ESXi Installer USB Flash Drive with Windows
- Download ESXi Image: ESXi 8.0 (or any other version)
- Download Rufus
- Connect the USB flash drive to your computer
- Open Rufus
- Select your flash drive as Device
- Press SELECT and open the ESXi Installer ISO
- Press START and wait until the process is finished.
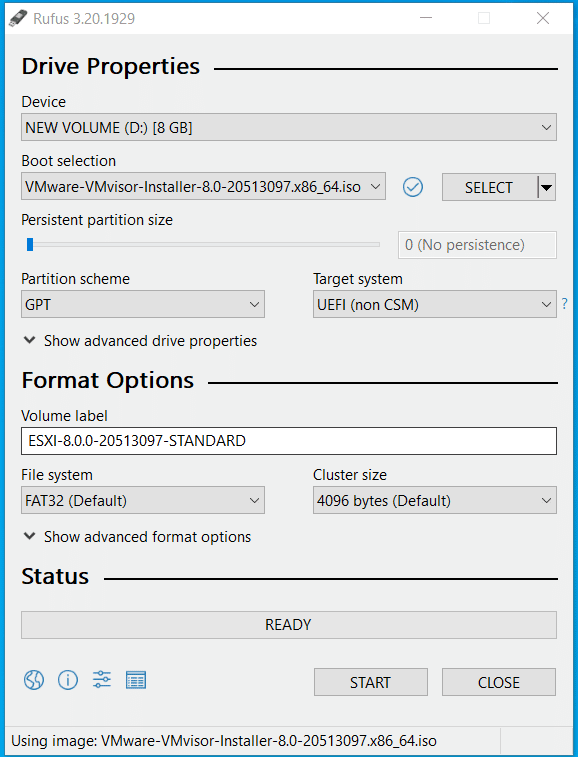
- You can now remove the flash drive and use it to install ESXi.
Create a bootable ESXi Installer USB Flash Drive with Mac
- Download ESXi Image: ESXi 8.0 (or any other version)
- Identify the usb flash drive. You should find an external, physical disk with the size of your flash drive (disk2 in this example).
# diskutil list
- Create a partition map and format the drive with FAT32.
# diskutil eraseDisk MS-DOS "ESX" MBR disk2
- Unmount the flash drive
# diskutil unmountDisk /dev/disk2
- Mark the first partition as active using fdisk. This will bring up the interactive tool.
fdisk: 1> f 1
fdisk: 1> write
fdisk: 1> quit
- Mount the ESXi Installer ISO and copy the contents from the ISO to the USB flash drive.
- On the flash drive, locate the ISOLINUX.CFG file and rename it to SYSLINUX.CFG.
- In the syslinux.cfg file, edit the APPEND -c boot.cfg line to APPEND -c boot.cfg -p 1
- You can now remove the flash drive and use it to install ESXi.
For linux in step 17 the file to edit is isolinux.cfg instead of syslinux.cfg
For MAC OS; Step #5, you need to execute the following command to get into the fdisk interactive tool (disk2 in this example):
$sudo fdisk -e /dev/disk2
fdisk: 1> f 1
fdisk: 1> write
fdisk: 1> quit
One thing to make sure you do is the SYSLINUX.CFG is case-sensitive. I was doing SYSLINUX.cfg and it would not work.
Another addition, under macos the commands for activation of the usb is:
sudo fdisk -d /dev/your_disk