When you try to install ESXi 7.0 or 8.0 on a system with a 12th Gen Intel CPU, the installation fails with a purple diagnostics screen:
HW feature incompatibility detected; cannot start
Fatal CPU mismatch on feature "Hyperthreads per core"
Fatal CPU mismatch on feature "Cores per package"
Fatal CPU mismatch on feature "Cores per die"
When you try to power on Virtual Machines on 13th Gen Intel CPUs, ESXi crashes with the following PSOD:
GP Exception 13 in world
This problem is caused by the new architecture of Intel CPUs which are equipped with different types of cores - Performance-cores and Efficient-cores. With vSphere 7.0 Update 2, the kernel parameter cpuUniformityHardCheckPanic has been implemented to address the issue. This article explains the manual and automated methods to properly implement the kernel option.
This article is valid for:
- ESXi 8.0 and later
- ESXi 7.0 Update 2 and later
Manual Method
The parameter needs to be set prior to installation and the first boot of ESXi.
- When ESXi installation starts, press SHIFT+O to edit boot options.
- Append cpuUniformityHardCheckPanic=FALSE

- Press ENTER
- Install ESXi
- When the installation is finished and promts for a reboot, do not reboot the system yet.
- Press ALT+F1
- Login as root without a password
- Edit /vmfs/volumes/BOOTBANK1/boot.cfg and append the kernel option cpuUniformityHardCheckPanic=FALSE to the existing kernelopt entry, just as in Step 2.
- Press ALT+F2 to get back to the installer and reboot the system.
- To make the kernel option permanent, run the following command on your ESXi host:
# esxcli system settings kernel set -s cpuUniformityHardCheckPanic -v FALSE
- For 13th Gen Intel CPUs (Raptor Lake), you also have to enable kernel option ignoreMsrFaults to prevent PSOD during VM startups. (Credit to William Lam for providing a solution for the PSOD Issue)
# esxcli system settings kernel set -s ignoreMsrFaults -v TRUE
This setting allows ESXi to work with different P-Cores and E-Cores, present in 12th Gen Intel CPUs.
Automated Kickstart Method
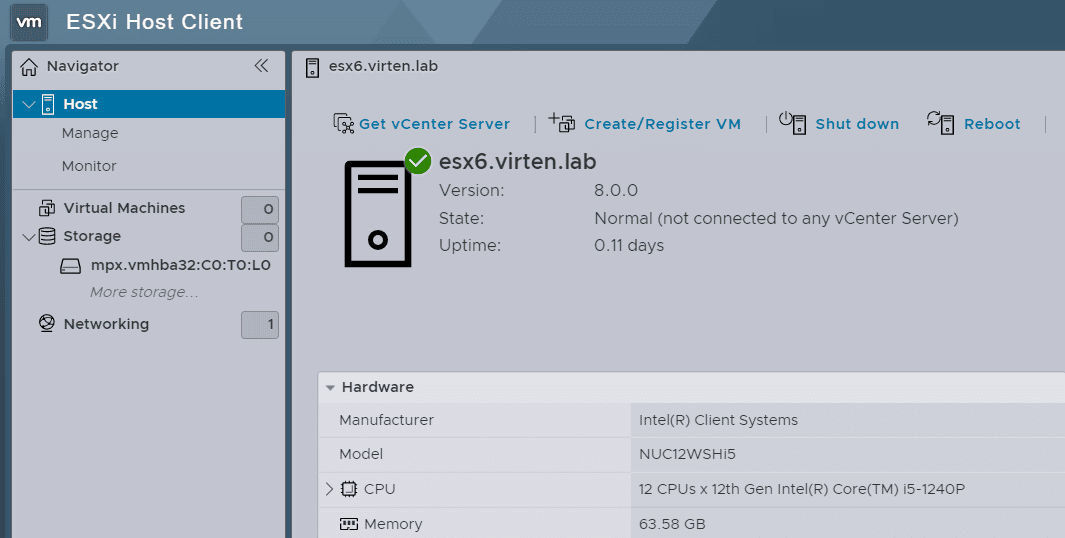
If you prefer an automated approach, you can also use a scripted kickstart installation to fix the issue for you. In this example, I'm installing ESXi 8.0 using a USB flash drive on an Intel 12th Gen Pro NUC.
- Create a bootable USB flash drive using the ESXi ISO (See this article for instructions).
- On the flash drive, open the /efi/boot/boot.cfg file with an editor and add the following options to the kernelopt= line: ks=usb:/KS.CFG cpuUniformityHardCheckPanic=FALSE
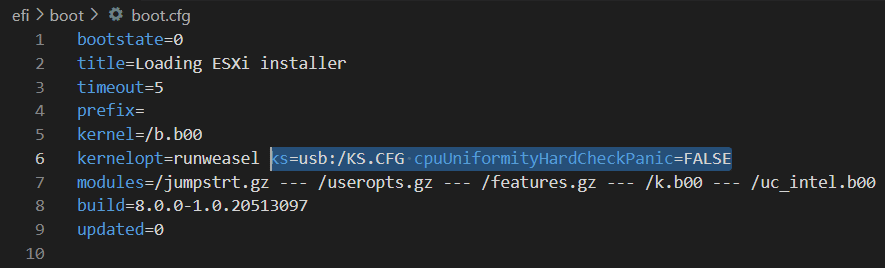
This will instruct the ESXi installer to perform a scripted installation from the /KS.CFG file. - As ESXi will not be able to boot without the kernel option and thus does not reach the %firstboot section, you have to manipulate the installed ESXi on the USB flash drive post-installation but before the first reboot. This happens in the %post section. Create the /KS.CFG file with the following content (fix parameters to match your environment):
vmaccepteula
install --firstdisk=usb --overwritevmfs

network --bootproto=static --ip=192.168.0.26 --netmask=255.255.255.0 --gateway=192.168.0.1 --hostname=esx12.virten.lab --nameserver=192.168.0.1
rootpw VMware1!

%post --interpreter=busybox

/bin/mcopy -o -i /dev/disks/mpx.vmhba32\:C0\:T0\:L0\:5 ::BOOT.CFG /tmp/BOOT.cfg
/bin/sed -i '/kernelopt/s/$/ cpuUniformityHardCheckPanic=FALSE/' /tmp/BOOT.cfg
/bin/mcopy -o -i /dev/disks/mpx.vmhba32\:C0\:T0\:L0\:5 /tmp/BOOT.cfg ::BOOT.CFG
/bin/reboot

%firstboot --interpreter=busybox

# Enable SSH
vim-cmd hostsvc/enable_ssh
vim-cmd hostsvc/start_ssh

# Enable ESXi Shell
vim-cmd hostsvc/enable_esx_shell
vim-cmd hostsvc/start_esx_shell

# Suppress Shell warning
esxcli system settings advanced set -o /UserVars/SuppressShellWarning -i 1

# Disable CPU Uniformity Check
localcli system settings kernel set -s cpuUniformityHardCheckPanic -v FALSE

# Ignore general protection faults as a result of rdmsr and wrmsr instructions
localcli system settings kernel set -s ignoreMsrFaults -v TRUE
# SSH Key
cat > /etc/ssh/keys-root/authorized_keys <<EOF
ssh-rsa AAAAB3N[...] yourname
EOF

# NTP
esxcli system ntp set -s pool.ntp.org
esxcli system ntp set -e 1
- Insert the flash drive into your System and power it on. The installation should start automatically and after a couple of minutes, you should be able to access the system with SSH or UI.
- Please note that the %firstboot section is not applied when Secure Boot is enabled, which is the default for most systems. Consider disabling Secure Boot for the full kickstart pleasure, or run these commands manually. Secure Boot does not affect the %post section, so the mcopy and sed magic will work.
Alternative Option - Disable Performance or Efficient Cores
If you do not want to change kernel options, you can also disable P or E cores to completely get rid of the non-uniform core configuration. For performance, I recommend disabling Efficient Cores. Make also sure to enable Hyperthreading.
- Make sure to get the latest BIOS version for your NUC
- Power On the NUC
- Immediately press F2 to enter BIOS
- Navigate to Power, Performance and Cooling and set External Ambient Temperature Tolerance to User Defined
- Navigate to Power, Performance and Cooling > Performance > Processor
- Set Active Efficient Cores to 0
- Press F10 to Save and Exit
Good post, can also disable E-cores at first install.
It seems like this is a better option rather than disabling the E-cores, because on that 1240p you get 12 total cpus to work with. However, it seems like it disables hyperthreading.
You also can install esxi normally in a hard drive, use manual method for the 1st boot and after server boots up, from cli, run the command: esxcli system settings kernel set -s cpuUniformityHardCheckPanic -v FALSE to set the option to the system.
run esxcli system settings kernel list -d to check if the option was set correctly, then reboot to test it.
Hi, I don't know what happened but I can't install ESXi. I can do the first part but at the restart it asks me to install again and it hangs. Can you detail the steps? Thank you.
Little late to the game. But for some reason the settings aren't saved after a reboot. The options are listed in kernel list -d but upon reboot it needs to be set again. Any advice?
Me too! it seems like settings are lost. This, and add a new user then that gets lost too (esxi 8)
I did two things:
1. Restore the bios to its default settings
2. Remove the other hard drives (I used to have two) from my NUC, remove the other memory, and only keep one.
Miraculously preserved it
Install works after setting the kernel option, but when running, esxi crashes when poweron several vm's. I'm on a intel nuc 13 pro i5. It works when disabling all e-cores, but then esxi runs with 4 cores instead of 12. On my intel nuc 12 i3 i didn't had this problem. Running fine on all 10 cores.
On 13th Gen CPUs, add the following kernel option (Credit to William Lam):
Hello all,
i have an Intel NUC12WSHi5 with 64GB memory, I5-1240P. I am installing Vmware ESXi 8.0.1. Also using cpuUniformityHardCheckPanic=FALSE setting. That is going well with loading the files. After that, i get the standard grey/yellow vmware screen for loading files. Now the screen stops at:
cndi_igc loaded successfully
activating: vmkdevmgr
then nothing happens. What is is this ? what causes this ?
Let me know
Any news on that? i'm having the same problem.
Hi! Thanks a lot for the guide that I'm trying to follow.
To me it says during installation:
Error (see log for more info): An error has occurred while parsing the installation script
error:/tmp/ks.cfg:line 2: install --firstdisk specified, but no suitable disk was found.
Any suggestion on how to fix this?
this post has a very high value - THANK YOU!
Hi,
First - Thanks for the help getting ESXi running in the first place ! I just installed on my Asus PN64 mini. I did also run the command line: esxcli system settings kernel set -s cpuUniformityHardCheckPanic -v FALSE
And ESXi boot fine every time.
I am now trying to use for something, and install my first guest OS. I am trying to install an Ubuntu on a partition. And seem to get a similar CPU panic as soon as I try to bring up the partition to start the install. Do I need to include the cpuUniformityHardCheckPanic flag somewhere in the VM config.
I created the I have not even got to install Ubuntu yet, I was just trying to start the VM to do the install when I get the pacnic.
I tried to put it under VM Options -> Advanced -> configuration parameters, but get this.
Failed to reconfigure virtual machine Linux. A specified parameter was not correct: config.extraConfig["cpuUniformityHardCheckPanic"]
Thanks for any help
Did you enable the ignoreMsrFaults kernel option? This is required for 13Gen+ CPUs. If not set, ESXi crashes when you power on VMs.
# esxcli system settings kernel set -s ignoreMsrFaults -v TRUEI have Gen 12, so I don't think I need that. I tried 2 different ISO images from Ubuntu and 1 from Fedora. What gives ?
I downloaded the ISO's, load it up to a VMWare storage folder. Set my CD drive to point to the ISO, and power it on. I increased the CPU, Disk, and Memory from the defaults, and set the CD to point to the ISO, no other changes to default VM.
What am I missing ?? This is my first ESXi experience, so I could be doing something wrong.
Thanks for any pointers,
~Scott
Which CPU Model does your model have?
Hi Florian - here is what I have
14 CPUs x 12th Gen Intel(R) Core(TM) i7-12700H
Asus MINIPC PN64
Thanks
~Scott
Is there any log that I can view more details ? It seemed like the machine would "core" dump when I try to install a guest OS.
We use Lenoo M70q product which does not currently allow disabling e-cores. Whe have tried to set cpuUniformityHardCheckPanic=FALSE and this will allow us to install and run VMWare, but when trying to reboot despite making the change permanent with command esxcli system settings kernel set -s cpuUniformityHardCheckPanic -v FALSE two things happend after reboot
1. cpuUniformityHardCheckPanic setting is lost
2. when manually applied again ESXi root password is lost and set to BLANK
We have tried all options even installing from the custom installer and the result is the same.This was tried with the latest version 7 and also with version 9.
We installed ESXi on internal SSD not USB.
Any suggestion or recommendations would be most appreicated
hey,
I currently have an Intel NUC 13 ANHi7 and am currently trying to install VMware ESXi 8.0.1 21813344.
The problem with cpuUniformityHardCheckPanic=FALSE or disabling the efficient cores is not a problem but for me the installation gets stuck at the following point.
cndi_igc loaded successfully
activating: vmkdevmgr
I can't find a post here or on other sites to fix this and I keep reading that others have this problem too.
Is there already a solution for this?
I will try it now with version 7.x.
Translated with http://www.DeepL.com/Translator (free version)
It looks like any time I try to start the VM I am getting the issue with my 12th gen Intel. I set the flag mentioned above, I can configure and play around with VMWare all day long without issue, but as soon as I try to start a guest OS to do an install - PSOD
https://www.dropbox.com/scl/fi/inv01oi2qi3oz9rufq3uh/VMWare-Image-Crash.png?rlkey=uq11e1eqvck2070qmlkj140of&dl=0
I tried to get into VMWare, but I don't think I have the correct hardware for it. I am just going to install Linux bare metal and move on ...
~Scott
Seems like intel is saying at least one e core needs to be left on. FYI.
https://www.intel.com/content/www/us/en/support/articles/000092468/intel-nuc.html
I followed the guidance when building on a 13900, but it's extremely unreliable. Turning on VMs crashes the host 9/10 times. Sometimes it just crashes after a few hours of being fine.
With the recent Broadcom buyout, I think that's the end of ESXi on consumer hardware.
I think it truly depends on the hardware. I'm using an i7 14700, and it's extremely reliable. I didn't have to enter any startup options, just disable the efficiency cores in the EFI. I'm running the HP customized ESXI 7.0 U3 on an HP Z2 Workstation. It's a small unit, only 32GB of ram and a 4TB M.2, but I did a "burn in" test with 4 vms running for several days - WinXP, WinVista, Win11, and Win Server 2022 Standard. No issues before I put it into production for the small shop that needed it.
Hello,
Just wanted to let you know the panic occurs even if E-cores are disabled and ignoreMsrFaults is set to TRUE on 13th gen intel and ESXi-8.0U3-24022510:
#GP Exception 13 in world XXXXX:swapob jd
Module(s) involved in panic: lumkernel Version Releasebui 1d-24022510]
cr0=0x80010031 cr2=0x6446b1e5e0 cr3=0x110928000 cr4=0x142768
FMS=06/ba/2 uCode=0x410c
This happened unexpectedly over the weekend, without touching the server. No stop/start VM activity.
I have tried many combinations so far but I still get weekly PSOD (on an average) so unfortunately ESXi is not reliable on this type of processor at this moment.
Cheers!
Hello,
Great news! I've managed to overcome the errors and currently have an impressive 46 days of uptime.
I've disabled SpeedStep, SpeedShift, RTH, and C-states.
So far, everything's running smoothly with over 60 days uptime!
Detailed instructions here:
https://youtu.be/0xTboY0ksWo
Thanks a lot, you saved my life.