This article covers Tips and Tricks for the vCenter Server Appliance In vSphere 8.0. While not all tips are recommended to be used without assistance in production environments, they might come in handy when you need them. Whether you are new to vCenter Server or an experienced user, these tips will help you get the most out of it.
- Clear HSTS Settings in Chrome
- Remove Browser Certificate Warnings (VMCA Root Certificate)
- Enable SSH
- File Transfer with SCP/SFTP
- Public Key Authentication
- Disable or Increase Shell Session Timeout
- Password Expiration
- Reset vCenter Server Appliance 8.0 root password
- Reset vCenter Server SSO password (administrator@vsphere.local)
- Create a Backup Job
- Install Additional Software
- VMware Datacenter CLI (DCLI)
- Run Docker Containers
- Connect to the Embedded vPostgres Database
- Wait after a reboot - Common Startup Errors
Clear HSTS Settings in Chrome
When you redeploy a vCenter Server with the same name, Chrome might block access to the new appliance because vCenter uses HSTS (HTTP Strict Transport Security) headers as a security feature.
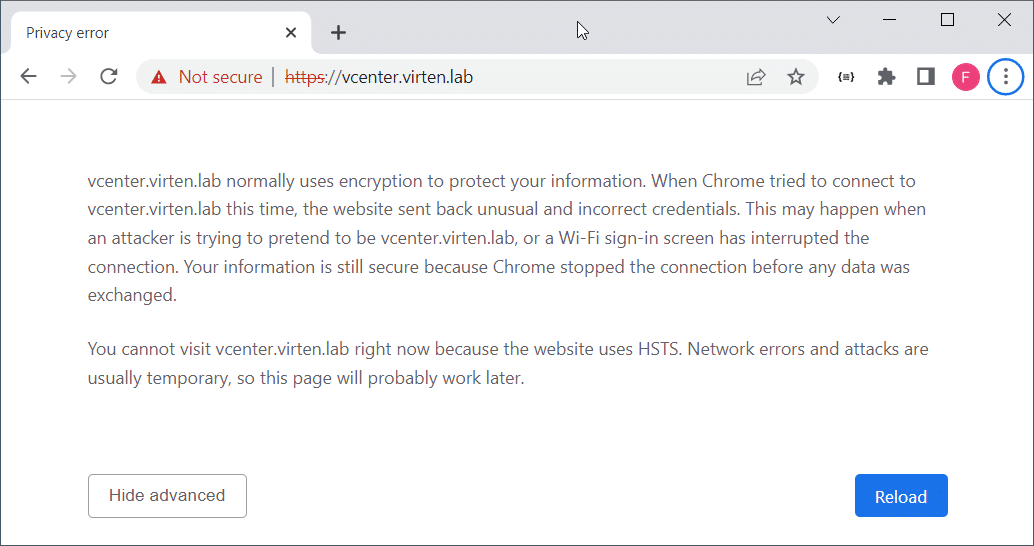
To regain access you have to delete HSTS settings for that domain.
- Open Chrome and enter chrome://net-internals/#hsts in your address bar
- In Delete domain security policies, enter your domain (eg. vcenter.virten.lab) and press Delete
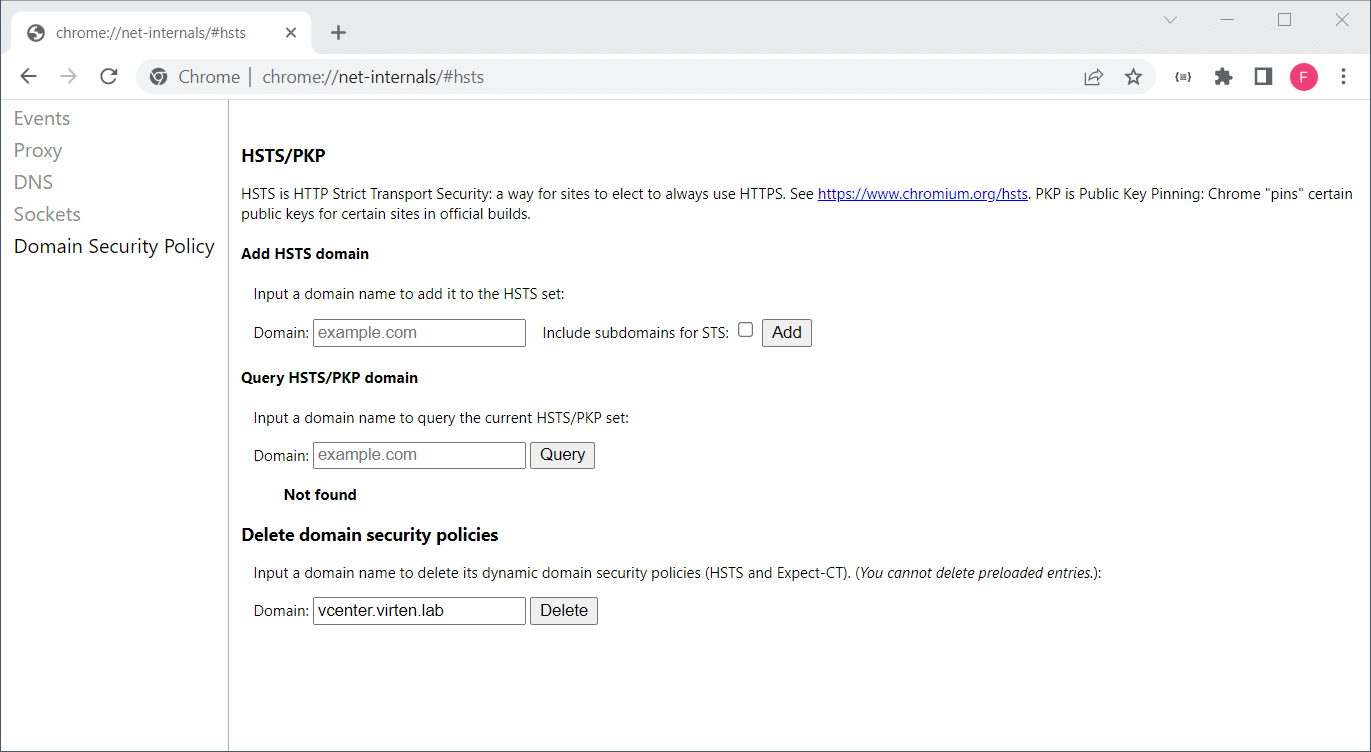
- Optionally, use the Query HSTS/PKP domain function to verify that there are no policies active.
- You should now be able to access your vCenter UI. Check out the next tip to add the vCenters CA to your trusted certificate authorities.
Remove Browser Certificate Warnings (VMCA Root Certificate)
To get rid of browser security certificate warnings, you must add the VMCA Root certificate to your local Trusted Root Certificate store. You can download the certificate from the vCenter Website. The following instructions are for Windows but certificates in the correct format for Linux and macOS are also included.
- Right-Click "Download trusted root CA certificates" > Save link as...
Note: Do not open (left-click) the link as this will open the file as text because VMware has set the Content-Type header to "zip" instead of the correct MIME type "application/zip".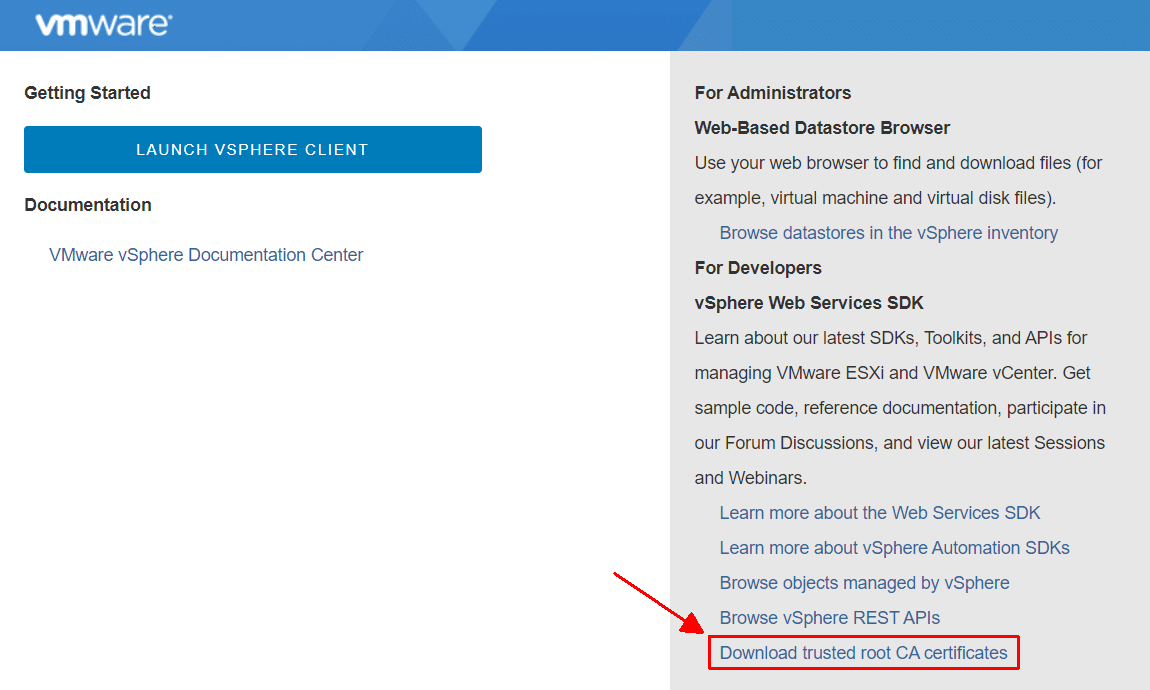
- Unzip download.zip
- Open the included \certs\win\ directory
- Double-click the .crt file
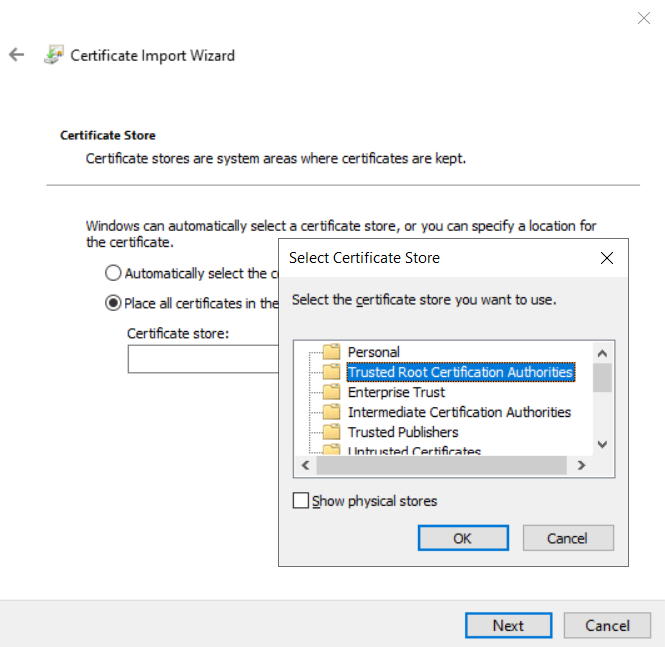
- Select Install Certificate... > Current User > Place all certificates in the following store > Browse > Trusted Root Certification Authorities
- Finish the wizard
Enable SSH
For troubleshooting vCenter and ESXi hosts, SSH is essential. SSH access to the vCenter Server Appliance is disabled by default but can be activated during the deployment wizard. When the vCenter is already deployed you can enable SSH in the "Appliance Management".
Appliance Management (https://[VCENTER]:5480/) > Access > Edit > Enable SSH Login
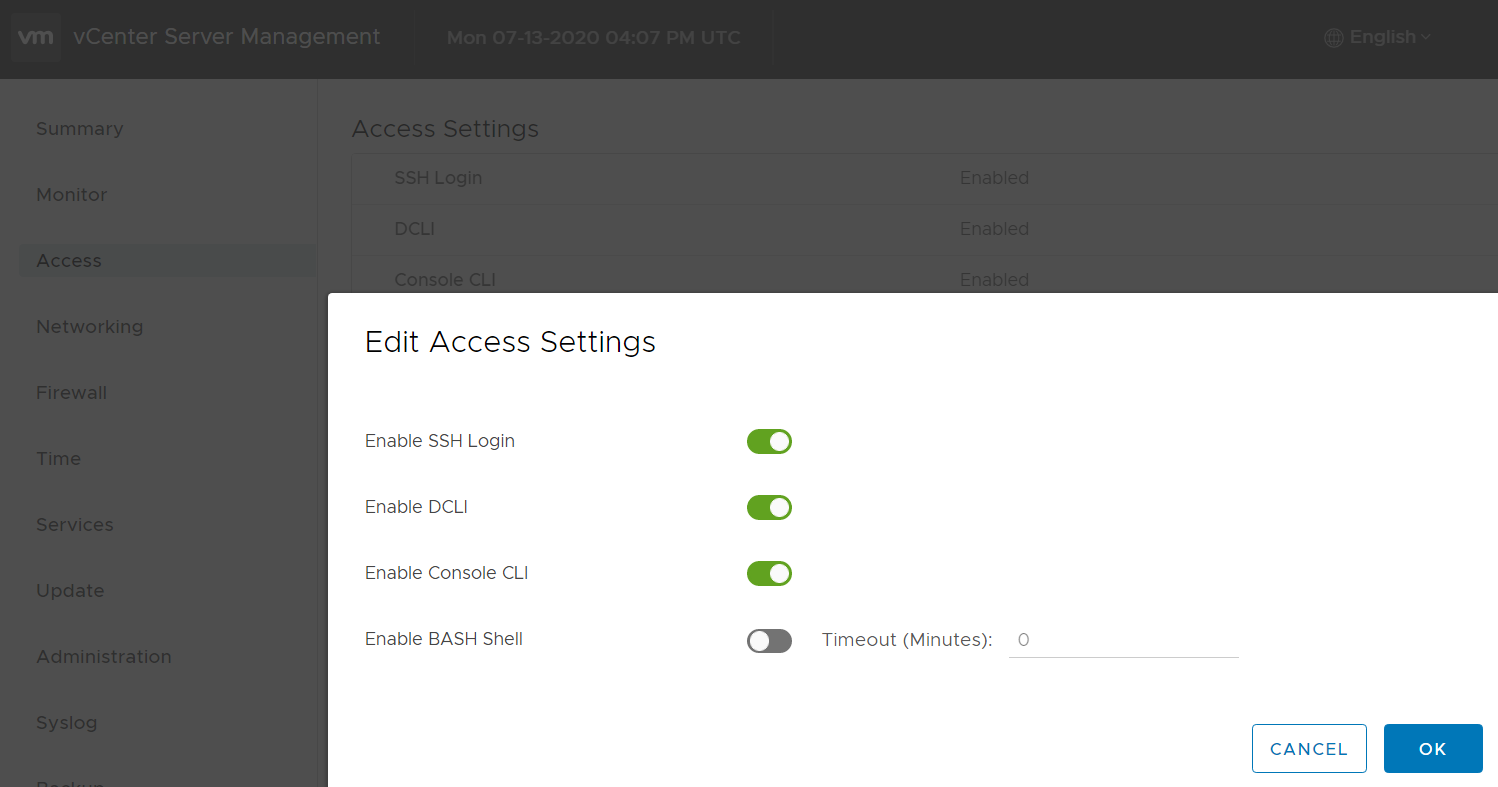
After connecting to the vCenter with SSH you see the proprietary Appliance Shell. To open the fully-featured Bash, just type "shell".
File Transfer with SCP/SFTP
To transfer files between your PC and the vCenter Appliance you typically use WinSCP or similar tools. This does not work out of the box because the default shell for the root user has been configured to Appliance Shell instead of Bash. When you use WinSCP to connect to the vCSA, the following error is displayed:
Received too large SFTP packet. Max supported packet site is 1024000 B.
Cannot initialize SFTP Protocol. Is this host running an SFTP Server?
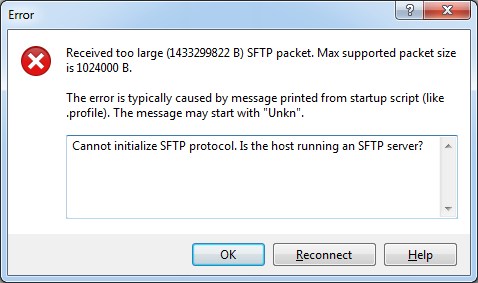
To be able to connect with WinSCP, the default shell has to be configured to /bin/bash:
- Connect to the vCSA with SSH and login as root
- Launch the BASH shell with the shell command
Command> shell
- Change the default shell for the root user to bash
# chsh -s "/bin/bash" root
You should now be able to connect to the vCenter with WinSCP. If you want to revert this change later and reactivate the Appliance Shell, change the default shell back to /bin/appliancesh:
# chsh -s /bin/appliancesh root
Public Key Authentication
When working with Linux you typically use SSH keys instead of passwords to log in. Public Key authentication is an authentication method that relies on a generated public/private key pair and enables the login without entering a password. If you are not familiar with SSH Public Key Authentication, read this post where I am explaining the basics. For security reasons, make sure to have a key size of at least 4096 bytes.
The vCenter Appliance already has a preconfigured authorized_keys file. Just add your key to the file by editing it with vi, or with echo/pipe:
# echo "ssh-rsa AAAAB[....] fgrehl" >> /root/.ssh/authorized_keys
Now you should be able to connect to the vCenter Appliance with your key. Please note that you can't use the Appliance Shell when you log in using an ssh key, so make sure to change the shell to bash:
# chsh -s "/bin/bash" root
Disable or Increase Shell Session Timeout
As a security feature, you are automatically logged out after being inactive for 15 minutes. You can view the current configuration with echo $TMOUT. The value is in seconds (900 seconds = 15 minutes):
# echo $TMOUT
900
The variable has been configured to be read-only, so you can't change it while you are logged in:
# echo $TMOUT
900
# TMOUT=1000
bash: TMOUT: readonly variable
To change the timeout, modify the profile configuration in /etc/profile.d/tmout.sh:
- Open /etc/profile.d/tmout.sh with an editor
- change the line TMOUT=900 to the desired value
- Save and close the file
- Log out and log back in
If you want to completely disable session timeout, delete the tmout.sh script:
# rm /etc/profile.d/tmout.sh
Password Expiration
There are two authentication sources where passwords are configured to expire by default. The root user configured in the Appliance Management and all SSO users expire after 90 days. This behavior can be configured:
Root password:
Appliance Management (https://[VCENTER]:5480/) > Administration > Password expiration settings
SSO Users (eg. administrator@vsphere.local):
vSphere Client > Administration > Single Sign On > Configuration > Local Accounts
Change the Maximum lifetime value. A value of 0 completely disables Password Expiration.
Reset vCenter Server 8.0 root password
The following method provides steps to recover the vCenter Server Appliance (vCSA) root password. The process is identical in vCenter 6.5, 6.7, and 7.0. The method is officially supported by VMware and documented in KB2147144.
- Take a snapshot of the vCSA to be able to roll back in case of any problems during password recovery.
- Connect to the ESXi Host that runs the vCSA and open a remote console.
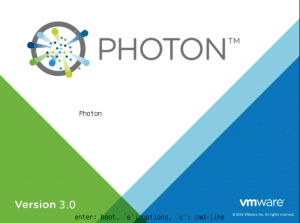
- Reboot the vCSA
- Press e immediately after the system starts (When the Photon screen shows up)
- Append rw init=/bin/bash to the line starting with linux
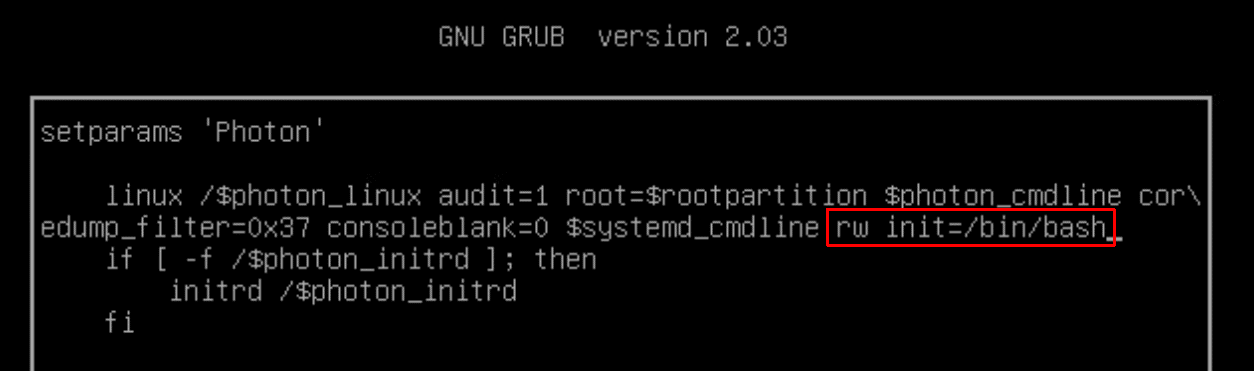
- Press F10 to boot
- In the command prompt, enter passwd and enter a new root password twice
- Enter umount / to unmount the root filesystem
- Reboot the vCSA by running the command reboot -f
- Verify that you can log in with the new root password and delete the snapshot created in step 1.
Reset vCenter Server SSO password (administrator@vsphere.local)
To reset user passwords that are managed by SSO, use the command line tool vdcadmintool. This tool can also be used to reset the administrator account if you've completely locked yourself out of the vCenter Application.
- Connect to the vCSA with SSH and login as root
- Launch the BASH shell with the shell command
Command> shell
- Start vdcadmintool
# /usr/lib/vmware-vmdir/bin/vdcadmintool
- Press 3 to "Reset account password"
- Enter the username you want to reset (eg. administrator@vsphere.local)
- The password is automatically set and displayed
 /usr/lib/vmware-vmdir/bin/vdcadmintool


==================
Please select:
0. exit
1. Test LDAP connectivity
2. Force start replication cycle
3. Reset account password
4. Set log level and mask
5. Set vmdir state
6. Get vmdir state
7. Get vmdir log level and mask
==================

3
  Please enter account UPN : administrator@vsphere.local
New password is -
MTRW"De'PVz*gz3 sKo
Create a Backup Job
Instead of using Snapshot-based Backup tools that rely on the vCenter Server itself to create and restore Backups, you can also use the native backup scheduler to create an application backup. The Appliance has an embedded backup scheduler that allows you to create backups without 3rd party tools:
Open Appliance Management (https://[VCENTER]:5480/) and navigate to Backup > Configure

Configure a backup target (FTP, FTPS, HTTP, HTTP, or SCP), the backup schedule, and a retention policy.
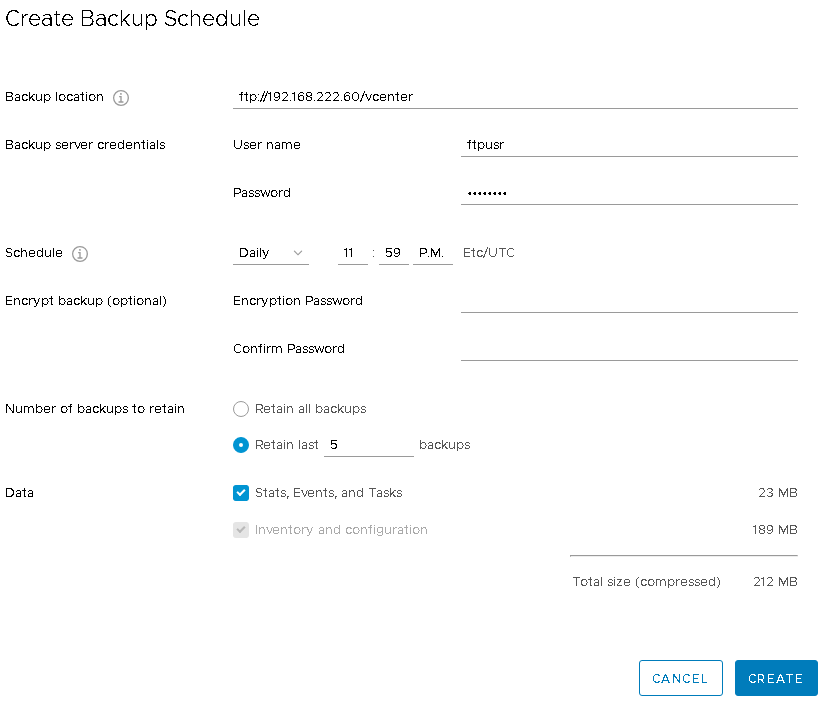
To restore the application backup, use the vCenter installation ISO to perform a fresh installation and select "Restore" during the installation wizard.
Install Additional Software (eg. PowerShell)
You can install additional software on the vCenter Appliance. Be careful as it might result in an unsupported stat when you install additional software without been advised by VMware GSS. Install additional software with the tdnf package manager. Use tdnf list to list available packages or tdnf search [package] to search for specific packages. You can install PowerShell for example:
# tdnf search powershell
powershell : PowerShell is an automation and configuration management platform.
# tdnf install powershell -y

Installing:
zlib-devel                                       x86_64                   1.2.11-3.ph3                     photon-updates             274.97k 281568
userspace-rcu                                    x86_64                   0.10.1-1.ph3                     photon                     638.89k 654221
lttng-ust                                        x86_64                   2.10.7-1.ph3                     photon-updates              1.13M 1187313
icu                                              x86_64                   67.1-2.ph3                       photon-updates            32.94M 34539002
powershell                                       x86_64                   7.1.7-1.ph3                      photon-updates           165.60M 173645276

Total installed size: 200.56M 210307380

Downloading:
zlib-devel                              108140   100%
userspace-rcu                           181074   100%
lttng-ust                               400135   100%
icu                                   13702833   100%
powershell                            66773165   100%
Testing transaction
Running transaction
Installing/Updating: icu-67.1-2.ph3.x86_64
Installing/Updating: userspace-rcu-0.10.1-1.ph3.x86_64
Installing/Updating: lttng-ust-2.10.7-1.ph3.x86_64
Installing/Updating: zlib-devel-1.2.11-3.ph3.x86_64
Installing/Updating: powershell-7.1.7-1.ph3.x86_64

Complete!

root@vcenter [ ~ ]# pwsh
PowerShell 7.1.7
Copyright (c) Microsoft Corporation. All rights reserved.

https://aka.ms/powershell
Type 'help' to get help.

PS /root>
VMware Datacenter CLI (DCLI)
VMware's Datacenter Command-Line Interface (DCLI) is a powerful but widely unknown feature. DCLI uses the vSphere REST API to provide an interactive and scriptable mode to monitor and manage all features made available to the REST-API.
Start the interactive mode with dcli +i and start typing to see possible commands:
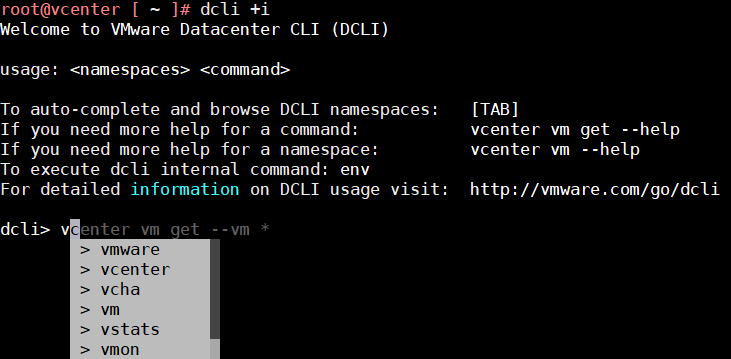
Example:
# dcli +i Welcome to VMware Datacenter CLI (DCLI) usage:To auto-complete and browse DCLI namespaces: [TAB] If you need more help for a command: vcenter vm get --help If you need more help for a namespace: vcenter vm --help To execute dcli internal command: env For detailed information on DCLI usage visit: http://vmware.com/go/dcli dcli> appliance system version get summary: Patch for VMware vCenter Server 7.0.0 summary: Patch for VMware vCenter Server 8.0 install_time: 2023-01-04T20:19:47.494Z product: VMware vCenter Server build: 20920323 releasedate: December 15, 2022 type: vCenter Server with an embedded Platform Services Controller version: 8.0.0.10100 dcli> com vmware vcenter vm list |---------------|-------|------------------|-----------|---------| |memory_size_MiB|vm |name |power_state|cpu_count| |---------------|-------|------------------|-----------|---------| |512 |vm-1001|vy |POWERED_ON |1 | |12288 |vm-1003|vcenter.virten.lab|POWERED_ON |2 | |16384 |vm-1016|nsx1.virten.lab |POWERED_ON |4 | |---------------|-------|------------------|-----------|---------| dcli>
You can also use Datacenter CLI in scripted mode:
root@vcenter [ ~ ]# dcli com vmware vcenter vm list
|---------------|-------|------------------|-----------|---------|
|memory_size_MiB|vm     |name              |power_state|cpu_count|
|---------------|-------|------------------|-----------|---------|
|512            |vm-1001|vy                |POWERED_ON |1        |
|12288          |vm-1003|vcenter.virten.lab|POWERED_ON |2        |
|16384          |vm-1016|nsx1.virten.lab   |POWERED_ON |4        |
|---------------|-------|------------------|-----------|---------|
Run Docker Containers
You can run Docker containers on the vCenter Appliance. See Docker Hub for available Container Images.
- Install Docker
# tdnf -y install docker
- Start Docker and load Kernel Bridge Modules
# systemctl enable docker
# insmod /usr/lib/modules/$(uname -r)/kernel/net/bridge/bridge.ko.xz
# systemctl start docker
If you get an error, try replacing "bridge.ko.xz" with "bridge.ko". If you've tried to start docker without installing the kernel module and starting it results in service start-limit-hit, reset the service with
# systemctl reset-failed docker
- Pull a Docker Image
# docker pull vmware/powerclicore
- Start a Docker Container
# docker run --rm -it vmware/powerclicore
Connect to the Embedded vPostgres Database
If you want to take a look into the vCenter Servers vPostgres Database, you can do so. Viewing is fine but you shouldn't change anything unless instructed by VMware GSS, or when you definitely know what you are doing. Deleting stale permissions for example is a task that I've done plenty of times.
root@vcenter [ ~ ]# /opt/vmware/vpostgres/current/bin/psql -U postgres -d VCDB
psql.bin (13.7 (VMware Postgres 13.7.0-19948008 release))
Type "help" for help.

VCDB=#
From here you have access to all tables which can be displayed with standard SQL queries:
VCDB=# select * from vpx_access;
 id |          principal          | role_id | entity_id | flag | surr_key
----+-----------------------------+---------+-----------+------+----------
  1 | VSPHERE.LOCAL\Administrator |      -1 |         1 |    1 |        1
(1 row)
For a more comprehensive guide for working with the PSQL DB, refer to this article.
Wait after a reboot - Common Startup Errors
This "non-issue" is often a shocker for impatient administrators. After a reboot, the vCenter Servier Application takes a couple of minutes to load. During the startup phase, the UI displays various types of error messages including:
- no healthy upstream
- vSphere Client service has stopped working.
- HTTP Status 404 – Not Found
- 503 Service Unavailable
If you see these errors during the startup phase, just wait a couple of minutes.
The first troubleshooting step when the problem did not solve itself is the service-control --status command. The command displays services that are not running (vmcam, vmware-imagebuilder, vmware-netdumper, vmware-rbd-watchdog, and vmware-vcha are disabled by default).
Thanks Florian. These are great tips.
Wow quite helpful thanks
Great Guide! Thank you for compiling it.
is it possible to change SSH port?
Great Guide! Thank you