When customers are deploying their services to a Cloud Datacenter delivered with VMware Cloud Director they quite often want to use their own virtual Firewall Appliance rather than the Edge and Distributed firewall that is built into the NSX infrastructure. Many Administrators prefer to use their well-known CheckPoint, Fortinet, or pfSense for seamless configuration management. While using standalone virtual Firewall Appliances is not an issue in general, there are some caveats with HA deployments, which can be addressed with features implemented in recent versions of VMware Cloud Director.
This article explains how to deploy High-Available Firewall Appliances in VMware Cloud Director 10.5
As stated, a single-instance Virtual Firewall Appliance is easy to deploy. The common method is to configure the external interface to a "Routed Network" and the internal interface to an "Isolated Network". The traffic is then routed through the virtual firewall and can be filtered. A more complex setup with an HA configuration requires features that have only been available since Cloud Director 10.3.2: Network Segment Profiles.
For redundancy, most systems use the Virtual Router Redundancy Protocol (VRRP) described in RFC 3768 and RFC 5798. VRRP allows routers and firewalls to share a virtual IP address (VIP) that can switch between two appliances in active-passive mode. The virtual IP Address uses a MAC Address in the following format: 00-00-5E-00-01-{VRID}. With the default configuration in NSX-T and VMware Cloud Director, you can't have a second MAC address on an interface. To allow multiple MAC addresses per port, the port needs to be configured to allow MAC Learning. While this feature can be enabled in NSX-T using Segment Profiles for a long time, it was only introduced to be used in Cloud Director with Version 10.3.2.
Example Infrastructure
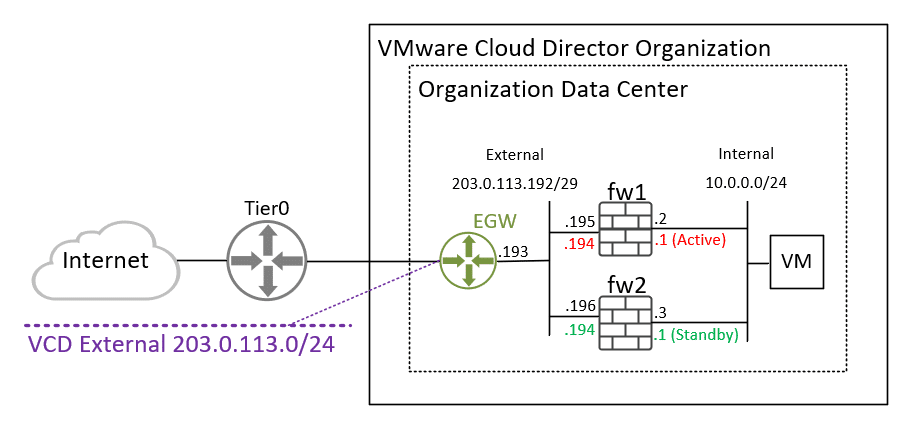
- The External Network is a Public Segment using IP Spaces (Cloud Director 10.4 Feature). You can also use a normal Routed Segment with private addresses.
- The Virtual Firewalls (fw1 and fw2) are VyOS (Download: VyOS 1.2.9)
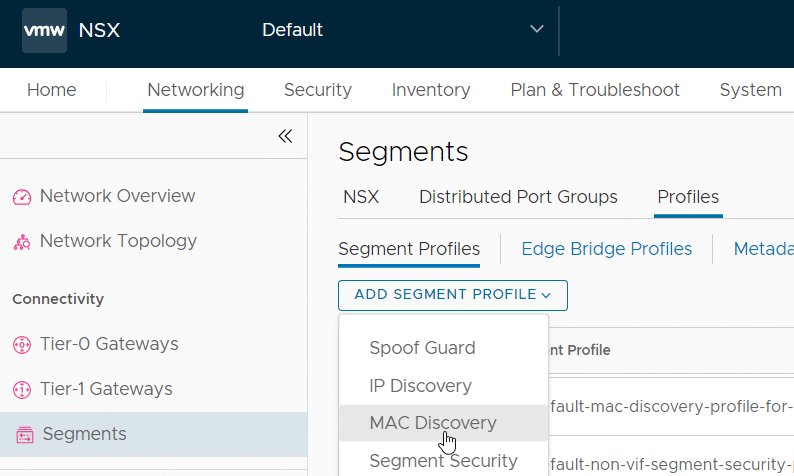
Step 1 - Create "MAC Discovery Profile" in NSX-T
- In NSX-T, navigate to Networking > Segments > Profiles
- Press ADD SEGMENT PROFILE > MAC Discovery
- Create a new MAC Discovery Profile with the name "mac-learning" and MAC Learning enabled.
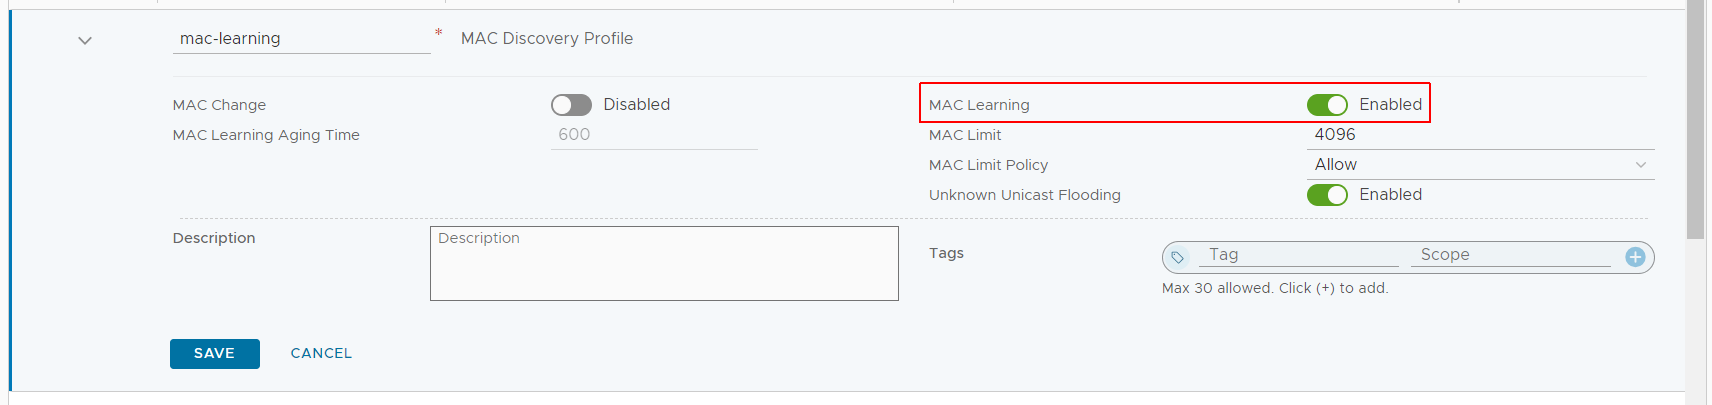
- Press SAVE
Step 2 - Add the Segment Profile in Cloud Director
- In VMware Cloud Director, login as System Administrator
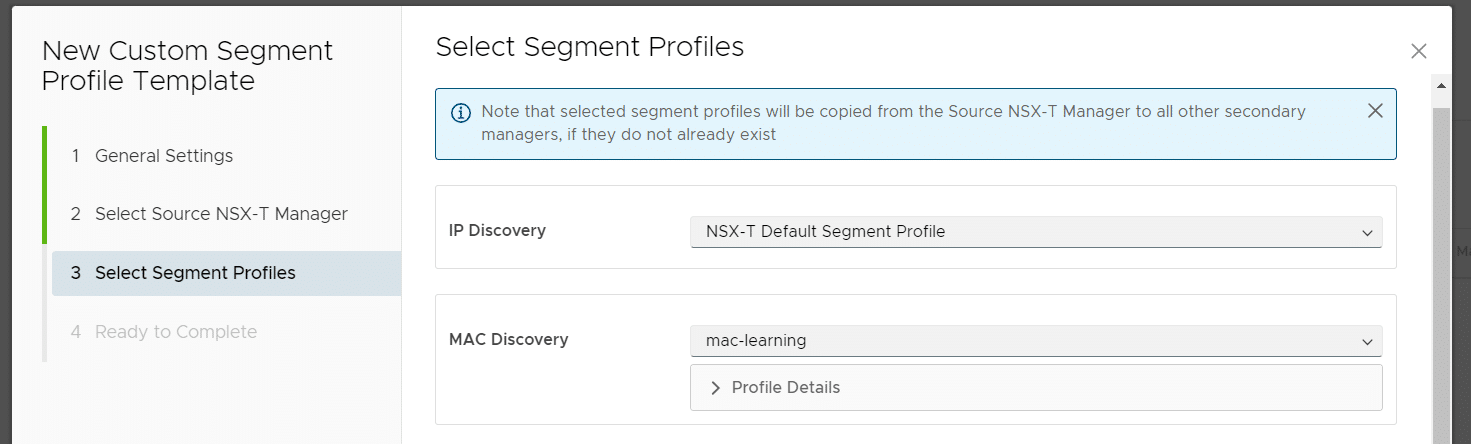
- Navigate to Resources > Infrastructure Resources > NSX-T > Segment Profile Templates
- Press NEW
- Enter a Name for the template

- Select the NSX-T Manager Instance
- Set the MAC Discovery Profile to the Segment profile created in NSX-T (mac-learning)
Step 3 - Enable Tenants to configure Segment Profiles
With the default setting, tenants are unable to view or configure Segment Profiles for their Networks. The Organization needs a Rights Bundle and the User needs a Role that is allowed to work with Segment Profile Templates. To be able to select which Organizations can change Segment Profiles I'm going to create a new Rights Bundle which is then published to specific Organizations. If you want this feature to be available for all Orgs, you can also just edit the Default Rights Bundle.
- In VMware Cloud Director, login as System Administrator
- Navigate to Administration > Tenant Access Control > Rights Bundle
- Press ADD
- Give the Rights Bundle a Name and Description and add the following rights:
- View Segment Profile Templates
- Manage Segment Profile Templates Implies Right
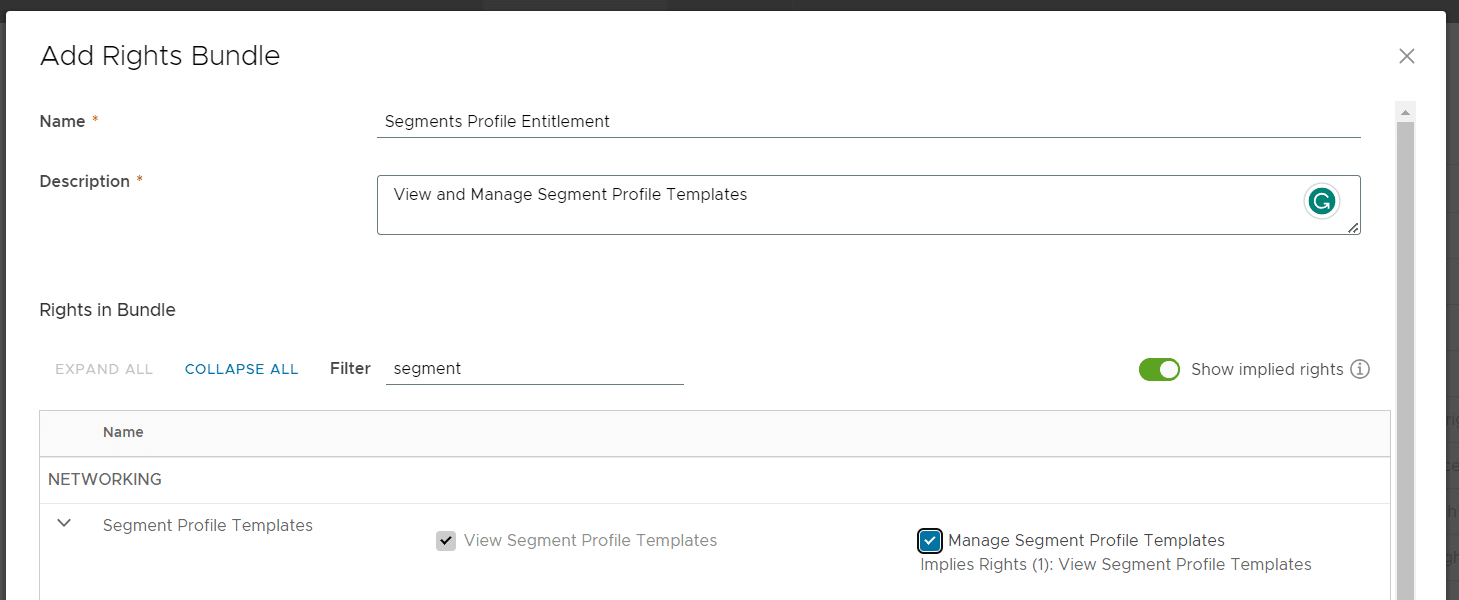
- Press SAVE
- Select the new Rights Bundle
- Press Publish
- Select to which Organizations the Rights Bundle should be published
With the Rights Bundle, the Organization Administrator is able to create a custom role with Segment Profile Rights enabled. In my opinion, it's a better option to change the default Organization Administrator role to have the Segment Profiles right. This does not mean that every Org-Admin can use the feature, they still need the Rights Bundle.
- Navigate to Administration > Tenant Access Control > Global Rights
- Select the Organization Administrator role and press EDIT
- Keep all existing rights, but add the following:
- View Segment Profile Templates
- Manage Segment Profile Templates Implies Right - Press SAVE
That's it from the Service Provider side. Tenants with the Rights Bundle should now see a new configuration option when creating or editing Networks.
Tenant Configuration
To test the feature, I'm building the following virtual infrastructure:
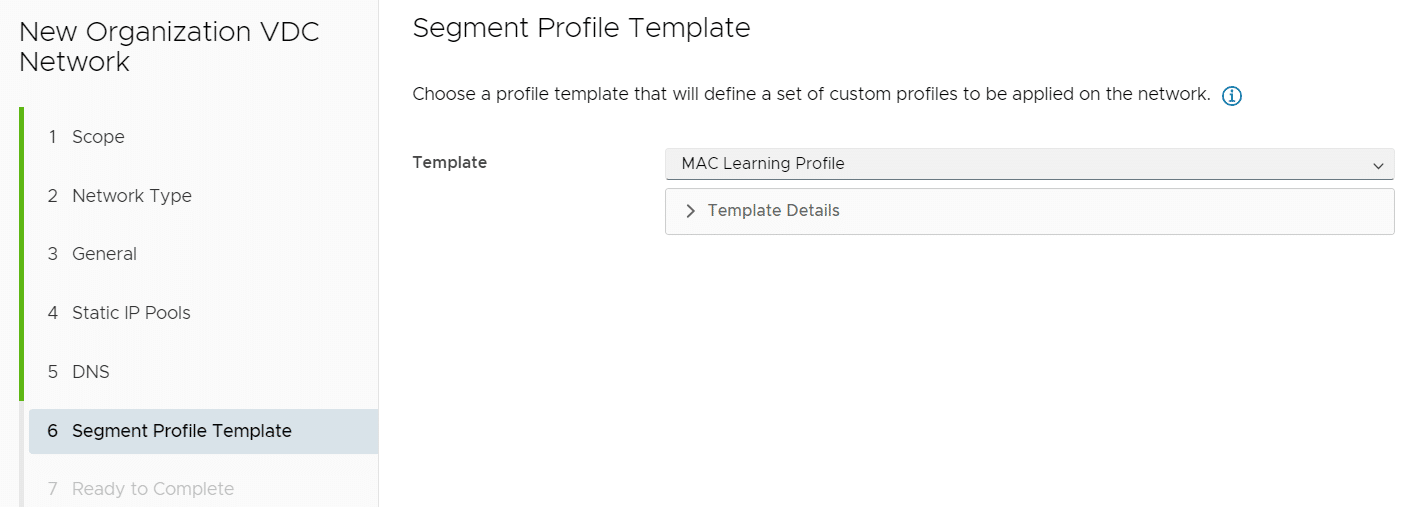
Create 2 Networks with the following configuration:
- Name: External | Type: Routed | Gateway CIDR: 203.0.113.193/29
- Name: Internal | Type: Isolated| Gateway CIDR: 10.0.0.1/24
Please note that the isolated network is not connected to the Edge Gateway and thus, the Gateway CIDR configured is still free and usable. The purpose of configuring an IP address here is that a default gateway and network information can be configured automatically in Virtual Machines connected to this network using Guest Customization.
During creation, set the Segment Profile Template to MAC Learning Profile for both Networks.
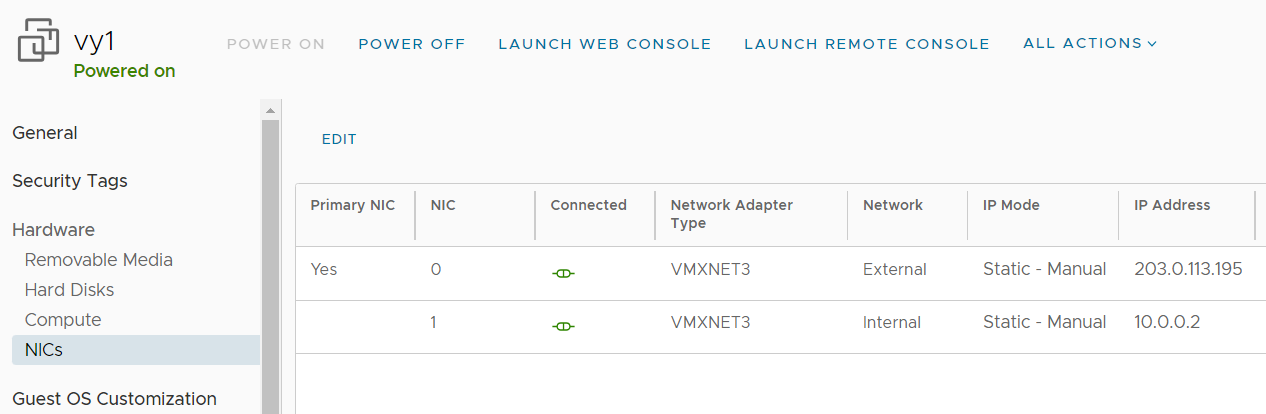
Deploy your virtual Firewall Appliances and configure virtual NICs according to the diagram.
vy1
External: 203.0.113.195
Internal: 10.0.0.2
vy2
External: 203.0.113.196
Internal: 10.0.0.3
Default Route for both: 203.0.113.193
To configure VyOS, login with default credentials vyos/vyos and enter configuration mode with the conf command.
vy1
set system host-name vy1
set interfaces ethernet eth0 address 203.0.113.195/29
set interfaces ethernet eth0 description OUTSIDE
set interfaces ethernet eth1 address 10.0.0.2/24
set interfaces ethernet eth1 description INSIDE
set protocols static route 0.0.0.0/0 next-hop 203.0.113.193
set service ssh port 22
set nat source rule 100 outbound-interface eth0
set nat source rule 100 source address 10.0.0.0/24
set nat source rule 100 translation address masquerade
vy2
set system host-name vy2
set interfaces ethernet eth0 address 203.0.113.196/29
set interfaces ethernet eth0 description OUTSIDE
set interfaces ethernet eth1 address 10.0.0.3/24
set interfaces ethernet eth1 description INSIDE
set protocols static route 0.0.0.0/0 next-hop 203.0.113.193
set service ssh port 22
set nat source rule 100 outbound-interface eth0
set nat source rule 100 source address 10.0.0.0/24
set nat source rule 100 translation address masquerade
Warning: Having your VyOS configured like that allows SSH access from internal and external interfaces which is very insecure. Refer to VyOS Quick Start for a basic firewall ruleset if you want to use it in production.
To activate the configuration and make it reboot-save, run the following commands:
# commit
# save
The next step is to configure VRRP. Run the following commands on both systems. This will create a VRRP group for each interface with the Virtual IP to share. Both groups are placed in a Sync Group to make sure that MASTER and BACKUP Roles are always on the same system.
set high-availability vrrp group eth0 vrid 10
set high-availability vrrp group eth0 rfc3768-compatibility
set high-availability vrrp group eth0 interface eth0
set high-availability vrrp group eth0 virtual-address 203.0.113.194/29

set high-availability vrrp group eth1 vrid 11
set high-availability vrrp group eth1 rfc3768-compatibility
set high-availability vrrp group eth1 interface eth1
set high-availability vrrp group eth1 virtual-address 10.0.0.1/24

set high-availability vrrp sync-group MAIN member eth0
set high-availability vrrp sync-group MAIN member eth1
Don't forget to run commit and save to make the configuration active. The status of VRRP can be viewed with show vrrp:

The Virtual Machine in Network 10.0.0.0/24, configured with a default gateway of 10.0.0.1 should now be able to access the Internet. Try testing HA by powering of the MASTER Router and it should failover in a few seconds (VRRP default is to failover after 3 failed heartbeats, which are sent out every second).
To make internal services available, configure a Destination NAT on the virtual VRRP interface:
set nat destination rule 10 destination port '80'
set nat destination rule 10 inbound-interface 'eth0v10'
set nat destination rule 10 protocol 'tcp'
set nat destination rule 10 translation address '10.0.0.11'
Note: If the external network is on a private non-advertised range, you also have to configure a DNAT on the Edge Gateway in Cloud Director.